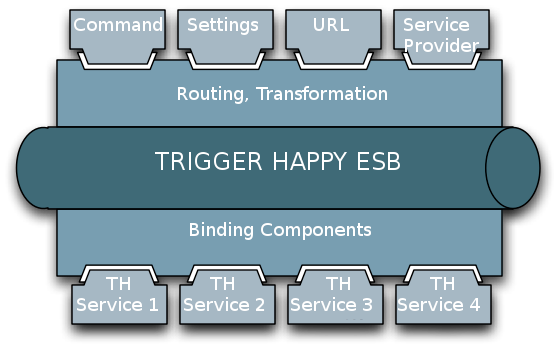
Trigger Happy: The bus 🚌 for your internet services


Description:
Trigger Happy is a free software that provides a “bus” to automatically share data between popular services you use on the web.
The goal of this project is to be independent from any other solution like IFTTT, CloudWork or others.
Thus you could host your own solution and manage your own triggers without depending on any non-open solution.
And then, instead of giving your credentials to those companies, keep them with your own Trigger Happy to keep the control of your data!
How does it work?
For example:
- A news is published on your favorites website, Trigger Happy will be able to automatically create a bookmark on your own Wallabag account, for later use, or create a note in your Evernote notebook.
- On your Slack or Mattermost community channel, Trigger Happy can publish the issue of github.
- When you add a tweet as favorite, Trigger Happy you can “toot” this one, on Mastodon
And so on.
The Installation Guide
Quickstart
Requirements:
- Python 3.6
- Redis
for installing redis, on Linux,
apt-get install redis
or
yum install redis
for installing redis on macosx:
brew install redis
Create a virtualenv
We just create a virtualenv with python 3.6 (or 3.5)
python3.6 -m venv myproject
cd $_
source bin/activate
Install from GitHub
We install Trigger-Happy from Pypi
git clone https://github.com/push-things/django-th.git
cd django-th
pip install -e .
Database
python manage.py migrate
python manage.py createsuperuser
Load the initial services:
python manage.py loaddata initial_services
Start the application
python manage.py runserver &
Now open your browser and go to http://127.0.0.1:8000/th/ to start using the application by logged in
Activating the service
Go to activate the (at least) 2 services you plan to use:
“Activated services” (http://127.0.0.1:8000/th/service/):

1rst Service
- Select Rss and validate
2nd Service
- Select Wallabag and fill the fields that are required with the parameters, can find in then page http://your-wallabag-instance/developer and validate
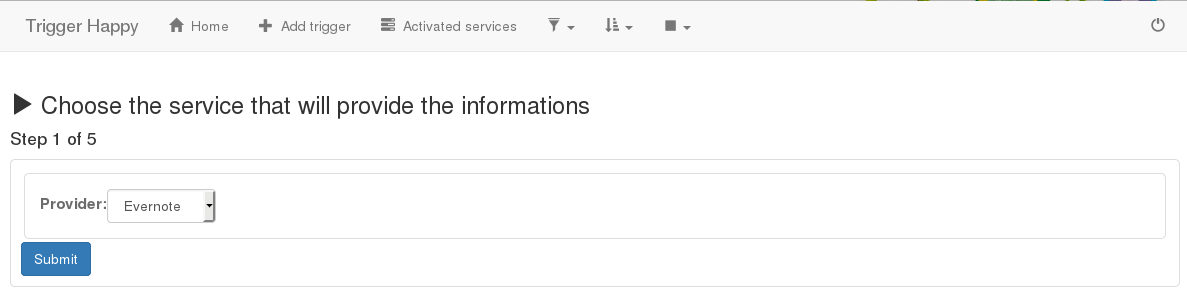
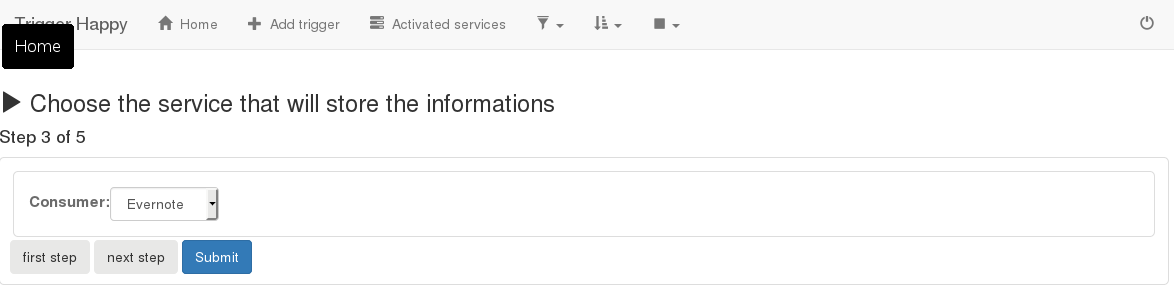
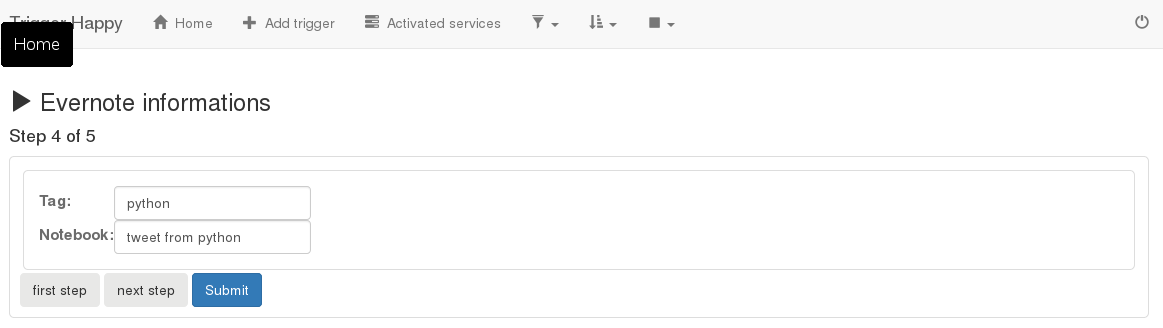
Create a trigger: in 5 steps
Once all of this is done, go back to the main page http://127.0.0.1:8000/th/ and create your first trigger
- Step One:
Select Rss
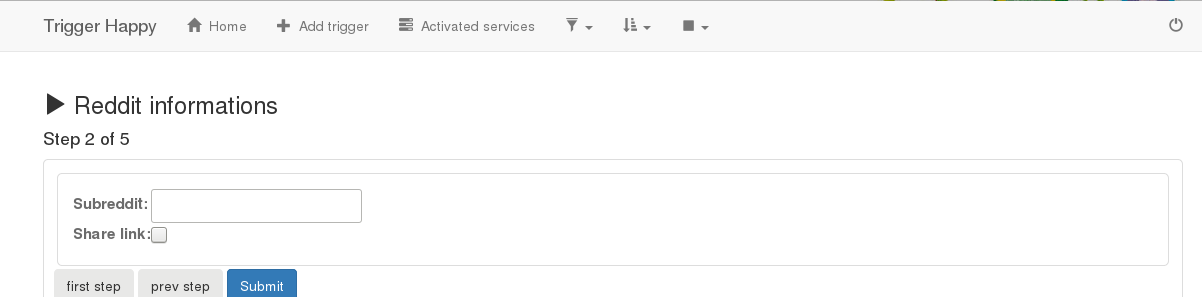
- Step 2:
enter the RSS URL that provide the data you want to grab
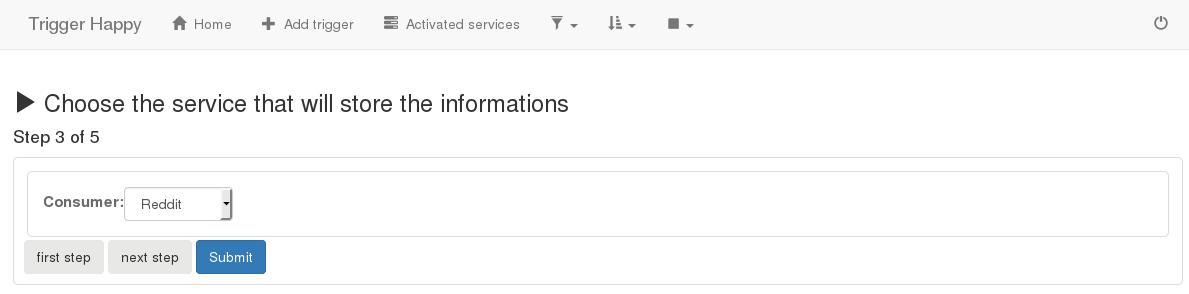
- Step 3:
Select Wallabag
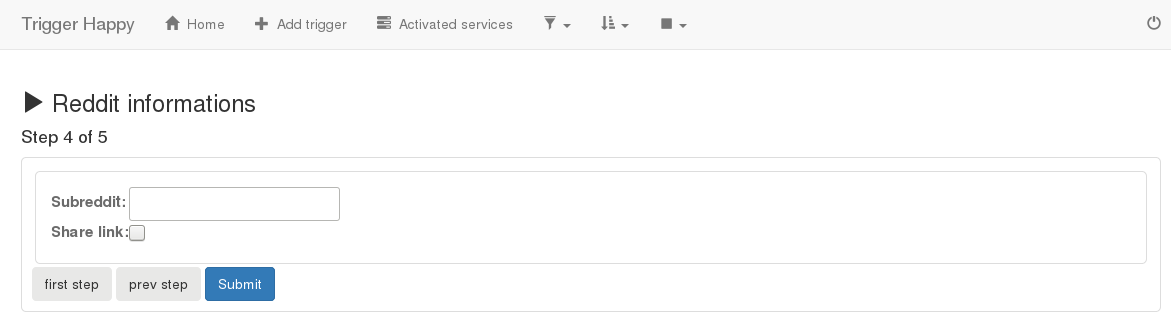
- Step 4:
Set a tag (if you need)
- Step 5:
Set a description that will be displayed in the list of your triggers
Turn the engine on:
Now that everything is setup, you can run the following commands:
python manage.py read
python manage.py publish
the first one, will read of the triggers that are enabled (with the blue “on/off” switch), and will download the data related to each of them, and will put them in the cache (available with Redis)
The second one, will read the data from the cache, and will publish them on Wallabag.
Once all of this is ok, you could automate this commands with Crontab later
Have Fun, and happy automation ;-)
Installation
TriggerHappy can be installed inside an existing project, or from scratch
Installation from scratch
We just create a virtualenv with python 3.6 (or 3.5)
python3.6 -m venv myproject
cd $_
source bin/activate
then you can continue with one of the two choice “From GitHub” or “From Pypi”
Installation from an existing project
cd /to/the/path/of/my/existing/project
source bin/activate   # (if you have a virtualenv)
then you can continue with one of the two choice “From GitHub” or “From Pypi”
Installation From GitHub
git clone https://github.com/push-things/django-th.git
then continue by installing :
cd django-th
pip install -e .[all]
Installation From Pypi
pip install django-th[all]
or to make your own “recipe”, for example to install some of the component and not all of them:
pip install django-th[min]   # will just install rss and Wallabag
pip install django-th[rss,wallabag]
pip install django-th[rss,twitter,wallabag,github]
Once it’s done, you can continue to the [configuration process](http://trigger-happy.readthedocs.org/en/latest/configuration.html)
Requirements
Commons requirements
Service requirements
for evernote support
The latest libtidy-dev should be installed with your operating system package manager, not from pip.
On a Debian/Ubuntu system:
apt-get install libtidy-dev
- for github support github
- for mastodon support Mastodon.py
- for pelican support awesome-slugify
- for pocket support pocket
- for pushbullet support pushbullet.py
- for reddit support praw
- for rss support feedparser
- for taiga support python-taiga
- for slack/mattermost support requests
- for todoist support todoist-python
- for trello support trello + pypandoc
Pandoc is also needed of the system, that you can install on a Debian/Ubuntu system like this:
apt-get install pandoc
- for twitter support twython
- for wallabag support wallabag_api
Advice
If you plan to setup Trigger Happy for you and a group of friends, I suggest you to install https://www.intenct.nl/projects/django-allauth/
Database
bootstrap the database
python manage.py migrate
python manage.py createsuperuser
Load the initial services:
python manage.py loaddata initial_services
Start the application
python manage.py runserver &
Now open your browser and go to http://127.0.0.1:8000/th/ to start using the application by logged in
Configuration
Here are the details that will allow the application to work correctly
setup urls.py
If TriggerHappy is the only project you installed in your virtualenv, go to “setup settings.py” this setup is only needed when you add TriggerHappy to an existing application
add this line to the urls.py to be able to use the complete application
url(r'', include('django_th.urls')),
this will give something like
from django.conf.urls import patterns, include, url
from django.contrib import admin

urlpatterns = patterns('',
    # Examples:
    # url(r'^$', 'th.views.home', name='home'),
    # url(r'^blog/', include('blog.urls')),

    url(r'^admin/', include(admin.site.urls)),
    url(r'', include('django_th.urls')),
)
setup settings.py
add the module django_th, and its friends, to the INSTALLED_APPS
INSTALLED_APPS = (
     ...
     'formtools',
     'django_js_reverse',
     'rest_framework',
     'django_th',
     'th_rss',
     'th_evernote',
     'th_github',
     'th_mastodon',
     'th_pelican',
     'th_pocket',
     'th_pushbullet',
     'th_reddit',
     'th_todoist',
     'th_trello',
     'th_twitter',
     'th_wallabag',
 )
comment the line of the application ervice you do not need, by adding a # before the single quote on each line.
setup for testing/debugging purpose
DEBUG = True
ALLOWED_HOSTS = ['*']
setup for production purpose
DEBUG = False
ALLOWED_HOSTS = ['127.0.0.1', 'localhost']
or set the hostname of your own domain
DEBUG = False
ALLOWED_HOSTS = ['mydomain.com']
setup th_settings.py
TH_SERVICES is a list of services, like for example,
TH_SERVICES = (
    'th_evernote.my_evernote.ServiceEvernote',
    'th_github.my_github.ServiceGithub',
    'th_mastodon.my_mastodon.ServiceMastodon',
    'th_pelican.my_pelican.ServicePelican',
    'th_pocket.my_pocket.ServicePocket',
    'th_pushbullet.my_pushbullet.ServicePushbullet',
    'th_rss.my_rss.ServiceRss',
    'th_reddit.my_reddit.ServiceReddit',
    'th_todoist.my_todoist.ServiceTodoist',
    'th_trello.my_trello.ServiceTrello',
    'th_twitter.my_twitter.ServiceTwitter',
    'th_wallabag.my_wallabag.ServiceWallabag',
)
comment the line of the service you do not need, by adding a # before the single quote on each line.
setup .env file
if you do not have any .env file in your project folder, then copy the django_th/env.sample to .env
if you do have an existing .env file, copy the content of django_th/env.sample into it
then the parameters are the following
DJANGO_TH_PAGINATE_BY=5
DJANGO_TH_PUBLISHING_LIMIT=2
DJANGO_TH_PROCESSES=1
DJANGO_TH_FAILED_TRIES=2
DJANGO_TH_FIRE=True
DJANGO_TH_DIGEST_EVENT=False
DJANGO_TH_SHARING_MEDIA=True

TH_EVERNOTE_SANDBOX=False
TH_EVERNOTE_CONSUMER_KEY=
TH_EVERNOTE_CONSUMER_SECRET=

TH_GITHUB_USERNAME=
TH_GITHUB_PASSWORD=
TH_GITHUB_CONSUMER_KEY=
TH_GITHUB_CONSUMER_SECRET=

TH_POCKET_CONSUMER_KEY=

TH_PUSHBULLET_CLIENT_ID=
TH_PUSHBULLET_CLIENT_SECRET=

TH_TODOIST_CLIENT_ID=
TH_TODOIST_CLIENT_SECRET=

TH_TUMBLR_CONSUMER_KEY=
TH_TUMBLR_CONSUMER_SECRET=

TH_TRELLO_CONSUMER_KEY=
TH_TRELLO_CONSUMER_SECRET=

TH_TWITTER_CONSUMER_KEY=
TH_TWITTER_CONSUMER_SECRET=

TH_PELICAN_AUTHOR=
for each Services You will need to set the corresponding variables to be used by it
Running
Setup the database and running the application
Update the database
Once the settings step is done, enter the following command to sync the database :
python manage.py migrate
If you meet some errors with this command, have a look at the MIGRATIONS from 0.10.x to 0.11.x:
If you are installing the project from scratch, do not forget to create a super user:
python manage.py createsuperuser
Start the application in development/local mode
python manage.py runserver
Now open your browser and go to 127.0.0.1:8000/th/ to start using the application
Note, that if DEBUG Setting in the settings.py is set to DEBUG=False static files won’t be served automatically and you’ll need to setup a web server (e.g nginx or apache) to serve the statics files from the statics folder.
If you do wish to run locally with DEBUG=False and automatic static files served you’ll need to run
python manage.py runserver --insecure
This isn’t a settings recommended for production deployments. for production deployments please follow the guide provided in django docs
Start the application in production mode
- Set DEBUG to False in settings.py
- you need a HTTP server to be up and running with the following settings:
For exemple for a Nginx HTTP server, with the following settings are just focused on the access to the application where /home/sites/your-domain.com/th/ is the path to the virtualenv
server {
    [...]
    # ROOT website
    root  /home/sites/your-domain.com/th/;

    location /static/ {
            root  /home/sites/your-domain.com/th/;
            gzip  on;
    }

    ## PROXY backend
    location / {
        proxy_pass http://127.0.0.1:8000;
        proxy_next_upstream error timeout invalid_header;
        proxy_set_header        Host            $host;
        proxy_set_header        X-Real-IP       $remote_addr;
        proxy_set_header        X-Forwarded-For $proxy_add_x_forwarded_for;
        proxy_set_header        X-Forwarded-Host $host;
        proxy_set_header        X-Forwarded-Proto $scheme;

    }
    [...]
}
- then from the folder /home/sites/your-domain.com/th/, run
python manage.py collectstatics
Setup gunicorn that will start the applications
From the path /home/sites/your-domain.com/th/bin
create a file init.cfg containing:
NAME="th"                                      # Name of the application
DJANGODIR=/home/sites/your-domain.com/th/      # Django project directory

USER=foxmask                                   # the user to run gunicorn as
GROUP=foxmask                                  # the group to run as
NUM_WORKERS=1                                  # how many worker processes should Gunicorn spawn
DJANGO_SETTINGS_MODULE=th.settings             # which settings file should Django use
DJANGO_WSGI_MODULE=th.wsgi                     # WSGI module name
IP=127.0.0.1
PORT=8000
#LOG
LOGDIR=/home/sites/your-domain.com/logs

LOG_LEVEL=INFO
ERRORFILE="$LOGDIR$NAME-error.log"
ACCESSFILE="$LOGDIR$NAME-access.log"

# HTTPS=on

# Activate the virtual environment
cd $DJANGODIR
source ../bin/activate
export DJANGO_SETTINGS_MODULE=$DJANGO_SETTINGS_MODULE
export PYTHONPATH=$DJANGODIR:$PYTHONPATH
change USER and GROUP to the user and group that fit your needs
create a gunicorn_start script
in the folder /home/sites/your-domain.com/th/bin/ put
#!/bin/bash
source $(dirname $0)/init.cfg

echo "Starting Gunicorn for $NAME"

exec ../bin/gunicorn ${DJANGO_WSGI_MODULE}:application \
  --name $NAME \
  --workers $NUM_WORKERS \
  --user=$USER --group=$GROUP \
  --log-level=$LOG_LEVEL \
  --bind=$IP:$PORT \
  --access-logfile $ACCESSFILE --error-logfile $ERRORFILE
then make the script runnable
chmod +x gunicorn_start
Crontab
a crontab is a system that automates tasks for you, at a given moment.
Here are the tasks to run the Trigger Happy engine automatically
# trigger happy
20,40 * * * * . /home/trigger-happy/bin/recycle
10,25,41,55 * * * * . /home/trigger-happy/bin/read
*/15 * * * * . /home/trigger-happy/bin/publish
The first line is used to recycle the data, that is unpublished, for example, because of reaching a rate limit. When this behavior occurs, the data stays in the cache, to be used at the next loop.
content of the recycle command
. /home/trigger-happy/bin/activate && cd /home/trigger-happy/th/ && python manage.py recycle
content of the read command
. /home/trigger-happy/bin/activate && cd /home/trigger-happy/th/ && python manage.py read
content of the publish command
. /home/trigger-happy/bin/activate && cd /home/trigger-happy/th/ && python manage.py publish
You may notice the folder /home/trigger-happy/th/ in each command, this is a virtualenv given for the example
The periodicity of the execution is set like this, to avoid to make 2 tasks run in same time, and also, to avoid to reach often the rate limitation of Twitter and others sensitives services.
Usage
Activating services:
The user activates the service for their own need. If the service requires an external authentication, the user will be redirected to the service which will be asked to authorize access to the user’s account. Once it’s done, go back to django-trigger-happy to finish and record the “auth token”.
Using the activated services:
a set of 3 pages will ask the user information that will permit to trigger data from a service “provider” to a service “consumer”.
For example:
- page 1: the user gives a RSS feed
- page 2: the user gives the name of the notebook where notes will be stored and a tag if wanted
- page 3: the user gives a description
Fire the Triggers:
Grabbing data and publishing data are done each 12 and 15 minutes from your crontab
Services
This page covers the services that are handled by TriggerHappy, and will guide you through their installation
Activate the services
to activate a service, you will need to follow those steps
- Requesting a key to the Services
- Adding the key to your .env file
- Activating the service from http://127.0.0.1:8000/th/service/
in details this gives us:
Requesting a key to the Services
For each service, Trigger Happy expects to have some consumer key coming from the wanted service. So you need to register an account on each of the services, then require a key.
Adding the key to the .env file
TH_<SERVICE_NAME>_CONSUMER_KEY = 'your key'
TH_<SERVICE_NAME>_CONSUMER_SECRET = 'your secret'
For example for Twitter:
TH_TWITTER_CONSUMER_KEY = 'abcdefghijklmnopqrstuvwxyz',
TH_TWITTER_CONSUMER_SECRET = 'abcdefghijklmnopqrstuvwxyz',
Activate the service
From the page http://127.0.0.1:8000/th/service/
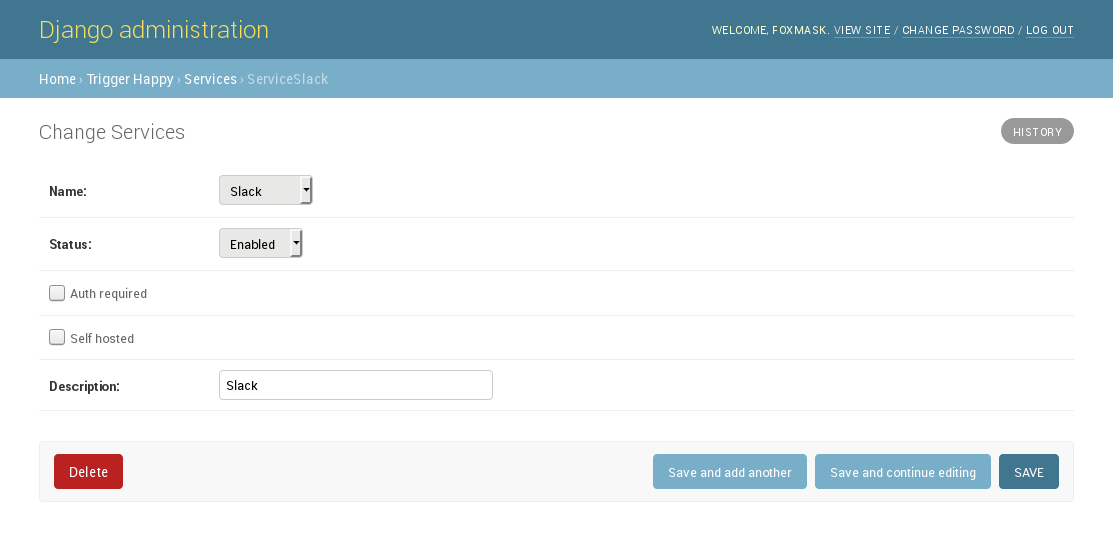
Disable an existing service from the admin panel
From this page http://127.0.0.1:8000/admin/django_th/servicesactivated/, select the service(s) you don’t need and in the action dropdown choose ‘Status disable’ Thus, the service(s) won’t be available for anyone.
Supported services
Here are the services that will follow almost the same previous path
Evernote
Service Description:
This service allows to take notes, photos, schedule things and so on
User Guide
From the page http://127.0.0.1:8000/th/service/
from the “Services available” part of the page, select Evernote and press “Activate it”
with Evernote as provider, when another service is used as a consumer

with Evernote as consumer, when another service is used as a provider
Installation Guide
On https://dev.evernote.com/ at the top right of the page, click on ‘get an api key’.
Fill the form and get the informations that you will need to provide in the next paragraph
Here are the modifications of .env file you will need to make to be able to use your credentials with Evernote
TH_EVERNOTE_SANDBOX = False
TH_EVERNOTE_CONSUMER_KEY = 'your consumer key'
TH_EVERNOTE_CONSUMER_SECRET =  'your consumer secret'
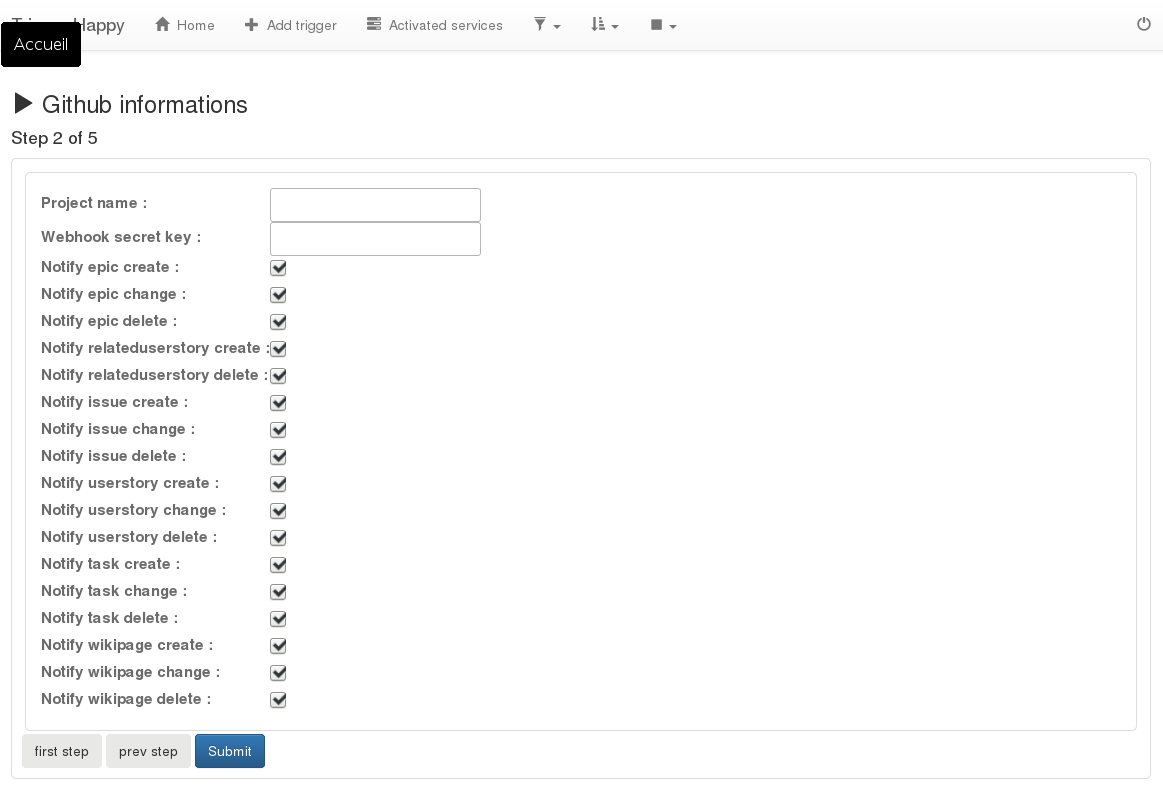
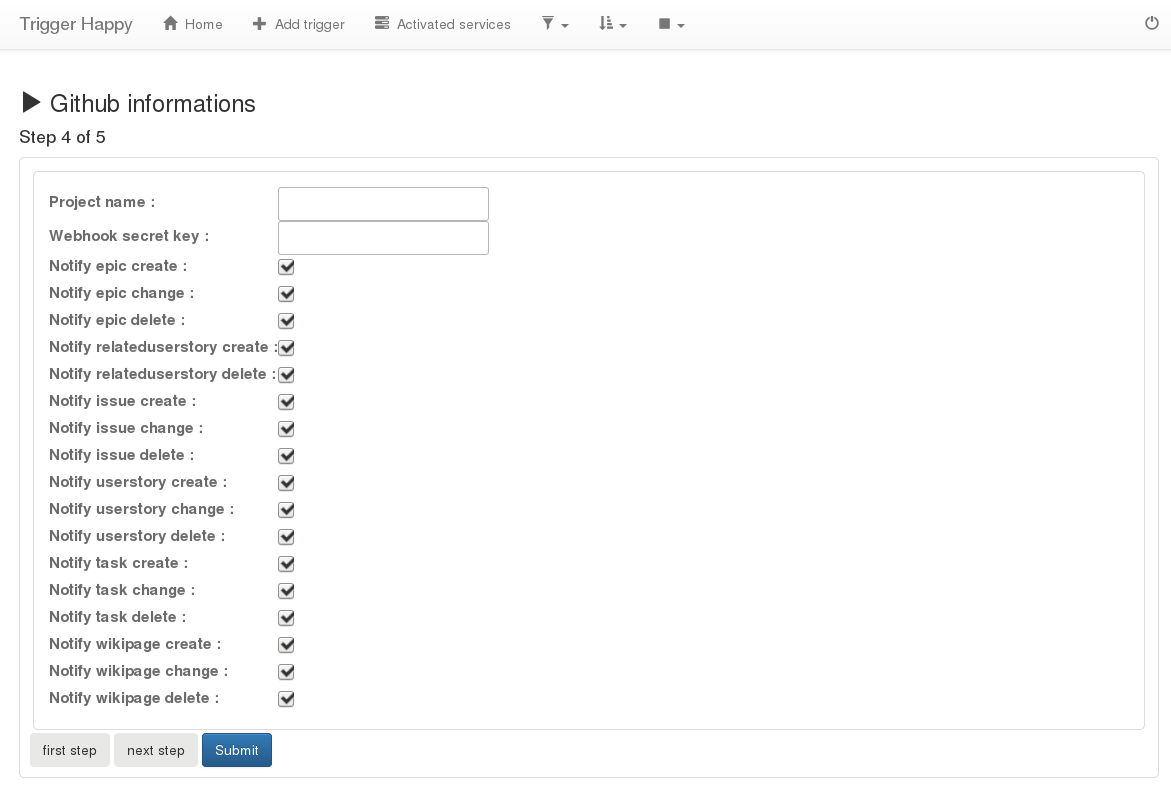
GitHub
Service Description:
Powerful collaboration, code review, and code management for open source and private projects. Public projects are always free.
User Guide
From the page http://127.0.0.1:8000/th/service/
from the “Services available” part of the page, select Github and press “Activate it”
with Github as provider, when another service is used as a consumer

with Github as consumer, when another service is used as a provider

Installation Guide
On https://github.com/settings/developers, click on “New Oauth App” button at right.
Fill the form and get the informations that you will need to provide in the next paragraph
Here are the modifications of .env file you will need to make to be able to use your credentials with Github
TH_GITHUB_USERNAME= 'username'
TH_GITHUB_PASSWORD= 'password'
TH_GITHUB_CONSUMER_KEY= 'your consumer key'
TH_GITHUB_CONSUMER_SECRET= 'your consumer secret'

Instapush
Service Description:
Notification service
User Guide
From the page http://127.0.0.1:8000/th/service/
from the “Services available” part of the page, select Instapush then fill the user token, then press “Activate it”
instapush is not used as provider as it’s just send notification from others data
with Instapush as consumer, when another service is used as a provider


Mastodon
Service Description:
Your self-hosted, globally interconnected microblogging community
User Guide
From the page http://127.0.0.1:8000/th/service/
from the “Services available” part of the page, select Mastodon then fill all the fields with the information you can have from mastodon:
- in Nickname ; put your mastodon nickname
- in Password ; put your mastodon password
- in Client ID ; put the “Client key”
- in Client Secret ; put the “Client Secret”
- in the Host ; put the host of the mastodon instance
Then press “Activate it”
with Mastodon as provider, when another service is used as a consumer
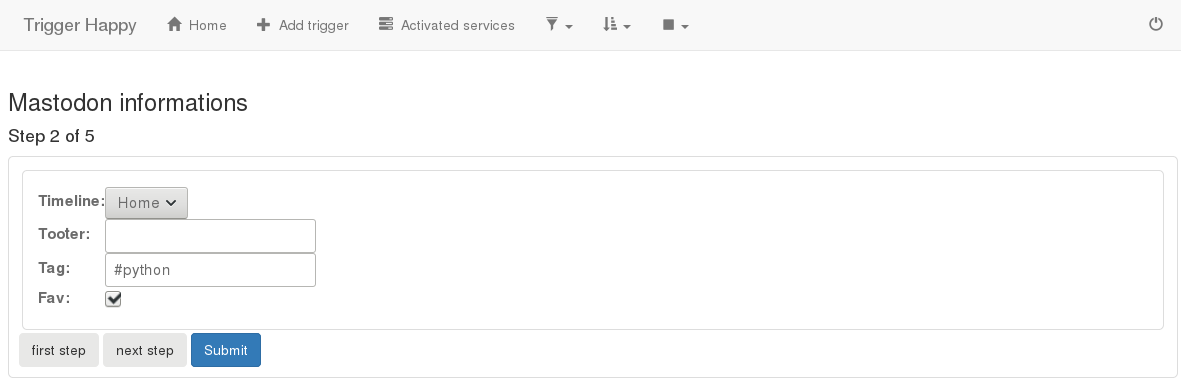
with Mastodon as consumer, when another service is used as a provider

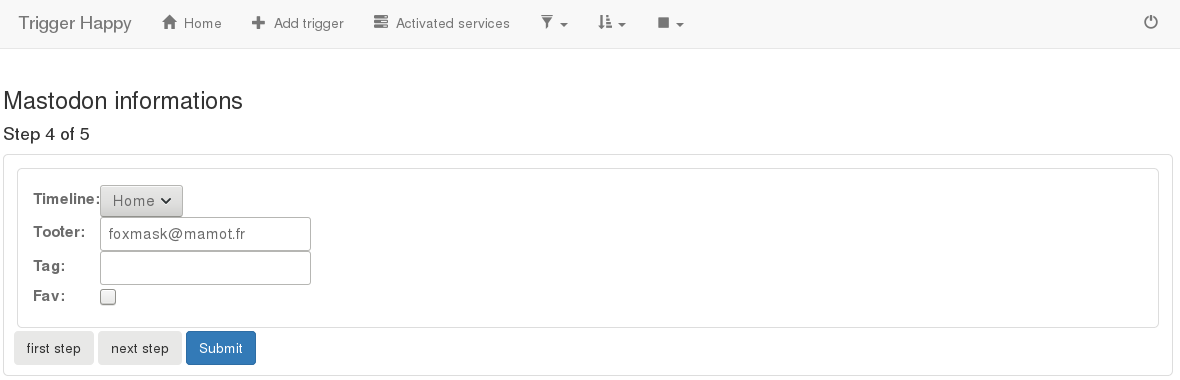
if you tick the “fav” checkbox, this will allow you to “save” the toot to another service, for example to Wallabag, to be read later.
Installation Guide
- on the “new” page (https://<your mastodon instance>/settings/applications/new), fill application name, application url, redirect uri
the redirect uri is
https://<your trigger happy instance>/th/callbackmastodon
- once the page is validated, we can get the client_key and client_secret by editing the application we created at step 1. Those two data will be needed in the form of the activation of the mastodon service
- activation of the mastodon service
- username is the email you used when you registered to your mastodon instance
- password is your mastodon password
- client_ key is the key you own from the step2
- client_ secret is the key you own from the step2
- host is the host of the mastodon instance
eg
- username: foxmask@somewhere.bar
- password: foobar
- client_ key: abcdefg
- client_ secret: abcdefg
- host: https://mastodon.xyz
Pelican
Service Description:
Pelican Static Site Generator
User Guide
From the page http://127.0.0.1:8000/th/service/
from the “Services available” part of the page, select Pelican and press “Activate it”

Pocket
Service Description:
a “Read it Later” service
User Guide
From the page http://127.0.0.1:8000/th/service/
from the “Services available” part of the page, select Pocket and press “Activate it”
with Pocket as provider, when another service is used as a consumer
with Pocket as consumer, when another service is used as a provider

Installation Guide
On https://getpocket.com/developer/ , click on ‘create a new app’
Fill the form and get the information that you will need to provide in the next paragraph
TH_POCKET_CONSUMER_KEY= 'your pocket key'

Pushbullet
Service Description:
Your devices working better together
Nota: to be able to work, this service requires that your host uses HTTPS
User Guide
From the page http://127.0.0.1:8000/th/service/
from the “Services available” part of the page, select Pushbullet and press “Activate it”
with Pushbullet as provider, when another service is used as a consumer
with Pushbullet as consumer, when another service is used as a provider

Installation Guide
On https://www.pushbullet.com/#settings/account
Fill the form and get the informations that you will need to provide in the next paragraph
Here are the modifications of .env file you will need to do to be able to use your credentials with Pushbullet
TH_PUSHBULLET_CLIENT_ID= 'your pushbulet id'
TH_PUSHBULLET_CLIENT_SECRET= 'your pushbulet secret'

Reddit
Service Description:
The front page of internet
User Guide
From the page http://127.0.0.1:8000/th/service/
from the “Services available” part of the page, select Reddit and press “Activate it”
with Reddit as provider, when another service is used as a consumer
with Reddit as consumer, when another service is used as a provider
Installation Guide
On https://dev.evernote.com/ at the top right of the page, click on ‘get an api key’.
Fill the form and get the informations that you will need to provide in the next paragraph
Here are the modifications of .env file you will need to make to be able to use your credentials with Reddit
TH_REDDIT_CLIENT_ID='your consumer key'
TH_REDDIT_CLIENT_SECRET='your consumer secret'
TH_REDDIT_USER_AGENT=TriggerHappy:1.5.0 (by /u/push-things2)
RSS
Service Description:
Service that grabs RSS all around the web or creates also RSS from other services
User Guide
From the page http://127.0.0.1:8000/th/service/
from the “Services available” part of the page, select RSS and press “Activate it”
with RSS as provider, when another service is used as a consumer
with RSS as consumer, when another service is used as a provider

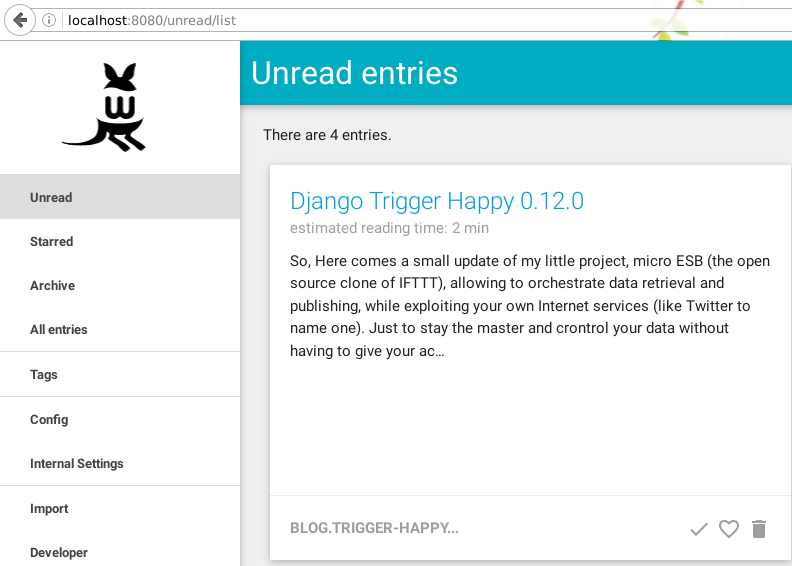
Yes RSS can be used as a consumer. That way, Trigger Happy will generate a RSS Feeds from the provider of your choice. Then you can access to the feeds by http://127.0.0.1:8000/th/myfeeds/. This can be useful for service that don’t provide RSS or ATOM feeds like Twitter.

Slack
Service Description:
A messaging app for teams who put robots on Mars
This app does not need any key, you need to have a Slack account and being able to provide incoming webhook or outgoing webhook
this webhook can be defined from https://<your community>.slack.com/apps/manage/custom-integrations > “customer integration” > incoming|outgoing webhook
User Guide
From the page http://127.0.0.1:8000/th/service/
from the “Services available” part of the page, select Slack and press “Activate it”
with Slack as provider, when another service is used as a consumer
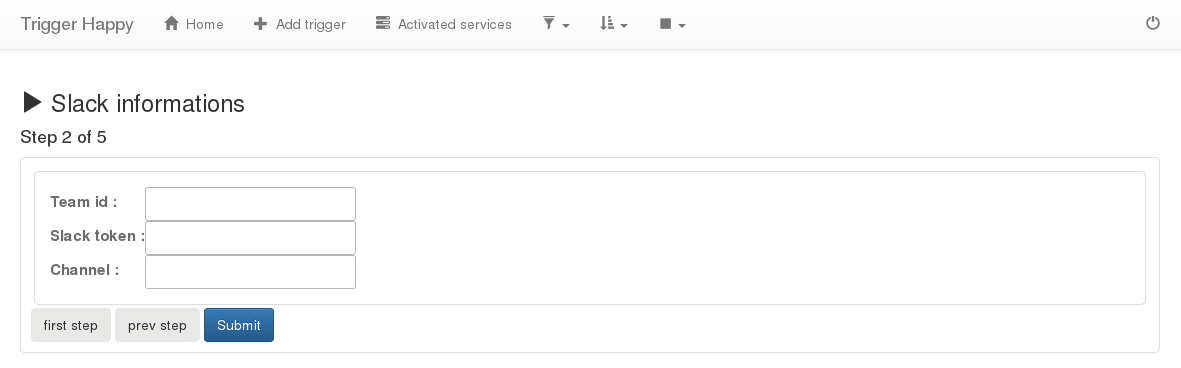
with Slack as consumer, when another service is used as a provider


Installation Guide
Taiga
Service Description:
Taiga is a project management platform for agile developers & designers and project managers who want a beautiful tool that makes work truly enjoyable.
this app does not need any key, you need to have a Taiga account and being able to provide a webhook
this webhook can be defined from https://tree.taiga.io/project/<your account>-<your community>/admin/third-parties/webhooks
User Guide
From the page http://127.0.0.1:8000/th/service/
from the “Services available” part of the page, select Taiga, then set the username and password, the host, and press “Activate it”
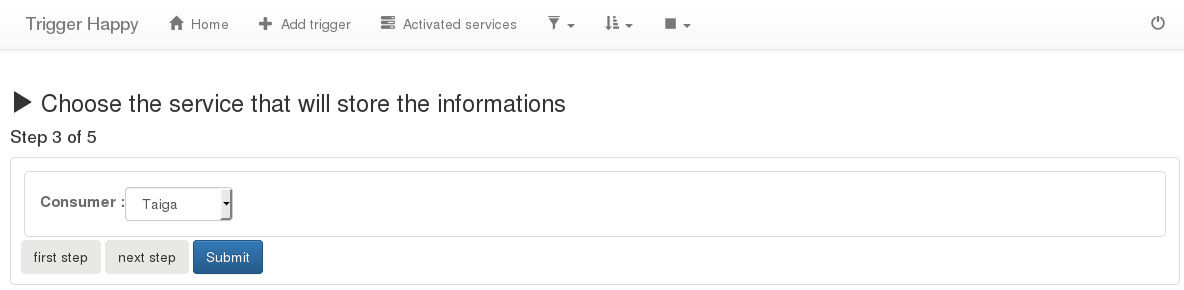
with Taiga as provider, when another service is used as a consumer
with Taiga as consumer, when another service is used as a provider
Installation Guide
http://127.0.0.1:8000/admin/django_th/servicesactivated/
Check “auth required”, and “self hosted”, even if you plan to use taiga.io
Todoist
Service Description:
a Tasks Management tool
Nota: to be able to work, this service requires that your host uses HTTPS
User Guide
From the page http://127.0.0.1:8000/th/service/
from the “Services available” part of the page, select Todoist and press “Activate it”
with Todoist as provider, when another service is used as a consumer
with Todoist as consumer, when another service is used as a provider
Installation Guide
On https://api.todoist.com/app?lang=fr#start select “generate a new api key”
Here are the modifications of .env file you will need to make to be able to use your credentials with Todoist
TH_TODOIST_CLIENT_ID= 'your todoist id'
TH_TODOIST_CLIENT_SECRET= 'your todoist secret'

Trello
Service Description:
a Kanban application
User Guide
From the page http://127.0.0.1:8000/th/service/
from the “Services available” part of the page, select Trello and press “Activate it”
with Trello as provider, when another service is used as a consumer

with Trello as consumer, when another service is used as a provider


Installation Guide
Once you are connected, go to https://trello.com/app-key
Here are the modifications of .env file you will need to make to be able to use your credentials with Trello
TH_TRELLO_CONSUMER_KEY= 'your trello key'
TH_TRELLO_CONSUMER_SECRET= 'your trello secret'
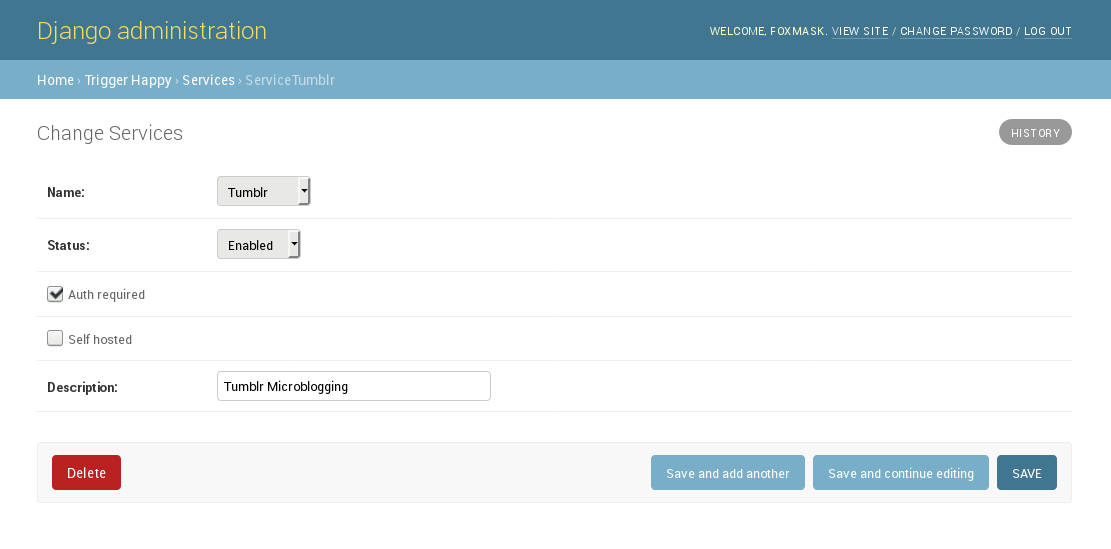
Tumblr
Service Description:
A Microblogging tool and social network
User Guide
From the page http://127.0.0.1:8000/th/service/
from the “Services available” part of the page, select Tumblr and press “Activate it”
with Tumblr as provider, when another service is used as a consumer
with Tumblr as consumer, when another service is used as a provider

Installation Guide
Once you are connected, go to https://www.tumblr.com/oauth/apps
Here are the modifications of .env file you will need to make to be able to use your credentials with Tumblr
TH_TUMBLR_CONSUMER_KEY= 'your tumblr key'
TH_TUMBLR_CONSUMER_SECRET= 'your tumblr secret'
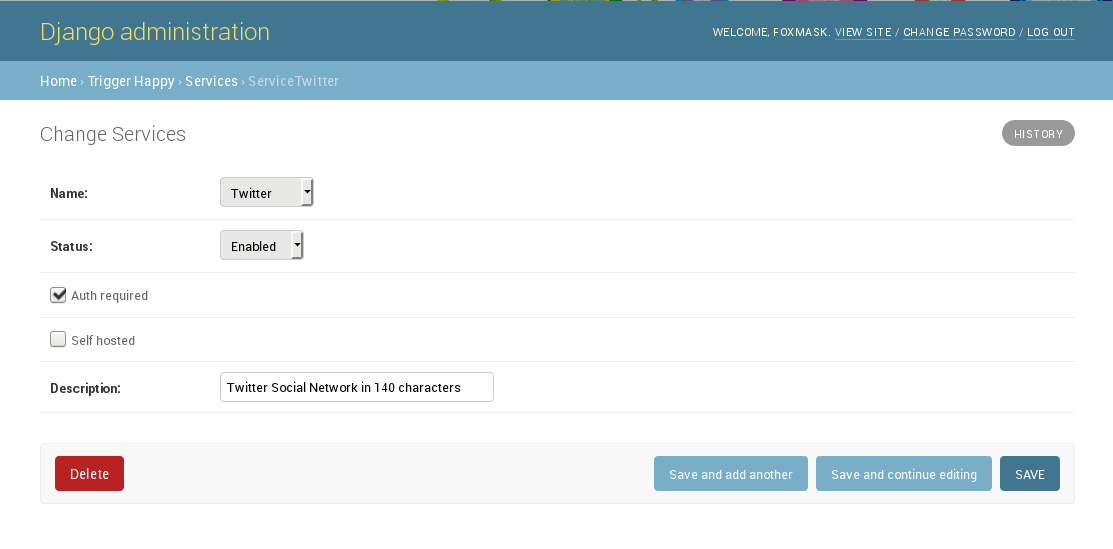
Twitter
Service Description:
a Social Network
User Guide
From the page http://127.0.0.1:8000/th/service/
from the “Services available” part of the page, select Twitter and press “Activate it”
with Twitter as provider, when another service is used as a consumer

with Twitter as consumer, when another service is used as a provider

if you tick the “fav” checkbox, this will allow you to “save” the tweet to another service, for example to Wallabag, to be read later.
Installation Guide
Access the page https://apps.twitter.com/app/new
- in the field “WebSite”, set https://<yourdomain.com>
- in the field “Callback URL”, set https://<yourdomain.com>/th/callbacktwitter
then validate and grab the key on the next page
Here are the modifications of .env file you will need to make to be able to use your credentials with Twitter
TH_TWITTER_CONSUMER_KEY= 'your twitter key'
TH_TWITTER_CONSUMER_SECRET= 'your twitter secret'
Wallabag
User Guide
From the page http://127.0.0.1:8000/th/service/
from the “Services available” part of the page, select Mastodon then fill all the fields with the information you can have from mastodon:
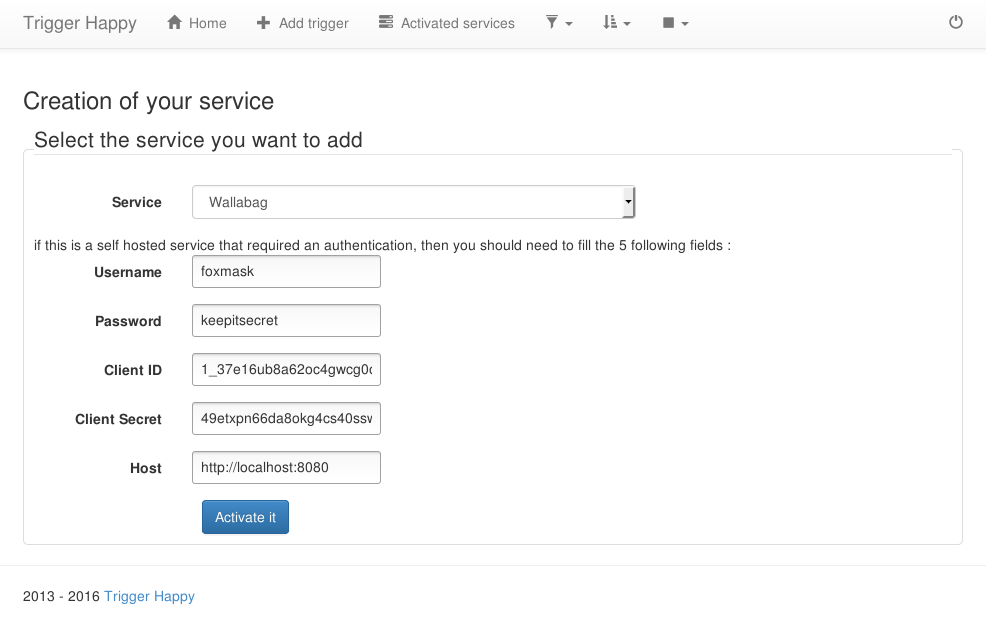
- in Username ; put your wallabag username
- in Password ; put your wallabag password
- in Client ID ; put the “Client key”
- in Client Secret ; put the “Client Secret”
- in the Host ; put the host of the wallabag instance
Then press “Activate it”
Installation Guide
Those will be required when activating the service for each user
Have a look at https://github.com/push-things/wallabag_api/blob/master/README.rst for more details about them
MIGRATIONS from 0.10.x to 0.11.x:
Note: in the SQL queries below, I use CURRENT_TIMESTAMP because of Postgresql. Adapt it to your own RDBMS.
Trigger Happy tables
To migrate, enter,
python manage.py migrate
if the migration complains that you’ve already created the table django_th_rss then check the following:
select * from django_migrations ;
to find
11 | django_th | 0001_initial | 2015-06-10 10:00:00.977958+02
if you don’t have it then do:
insert into django_migrations (app,name,applied) values('django_th','0001_initial',CURRENT_TIMESTAMP);
then replay
python manage.py migrate
Trigger Happy Module tables
Evernote:
if the migration complains that you’ve already created the table django_th_evernote then check it by:
select * from django_migrations ;
check that you don’t have those record in the django_migrations table
select * from django_migrations ;

13 | th_evernote       | 0001_initial        | 2015-06-10 10:00:00.977958+02
if it’s not the case, then add the following by hand like that:
insert into django_migrations (app,name,applied) values('th_evernote','0001_initial',CURRENT_TIMESTAMP);
Pocket:
if the migration complains that you’ve already created the table django_th_pocket then check it by:
select * from django_migrations ;
check that you don’t have those record in the django_migrations table
select * from django_migrations ;

13 | th_pocket       | 0001_initial        | 2015-06-10 10:00:00.977958+02
if it’s not the case, then add the following by hand like that:
insert into django_migrations (app,name,applied) values('th_pocket','0001_initial',CURRENT_TIMESTAMP);
Twitter:
if the migration complains that you’ve already created the table django_th_twitter then check it by:
select * from django_migrations ;
check that you don’t have those record in the django_migrations table
select * from django_migrations ;

13 | th_twitter     | 0001_initial        | 2015-06-10 10:00:00.977958+02
if it’s not the case, then add the following by hand like that:
insert into django_migrations (app,name,applied) values('th_twitter','0001_initial',CURRENT_TIMESTAMP);
insert into django_migrations (app,name,applied) values('th_twitter','0002_int_to_bigint',CURRENT_TIMESTAMP);
before adding by hand the line below, check that the table django_th_twitter contains the column max_id and since_id as bigint and not just int
if that columns are not bigint add just this
insert into django_migrations (app,name,applied) values('th_twitter','0001_initial',CURRENT_TIMESTAMP);
otherwise add this too
insert into django_migrations (app,name,applied) values('th_twitter','0002_int_to_bigint',CURRENT_TIMESTAMP);
Table to drop:
with the last
python manage.py migrate
you will see this message:
Running migrations:
  No migrations to apply.
  Your models have changes that are not yet reflected in a migration, and so won't be applied.
  Run 'manage.py makemigrations' to make new migrations, and then re-run 'manage.py migrate' to apply them.
The following content types are stale and need to be deleted:

    django_th | userprofile
answer yes as this one is not used at all
then play again
python manage.py migrate
thus the migration will skip that step and will continue smoothly.
The User Guide
User Guide
That part of the guide will explain the following topics:
- Lexicon
- How to activate a service and fill the form
- How to create a trigger in 5 steps
- How to edit the trigger
- How to turn off/on a trigger
- What’s happened when a trigger is set back to on.
- How to trigger a task from the application without using the commands line
- Filtering the list of trigger by a given service
- Trigger information (date of creation, last execution, number of time it has been run, the message of the last execution, why the trigger has been stopped by the engine)
- My trigger is “in grey” and I can’t select it, edit it, launch it
Lexicon
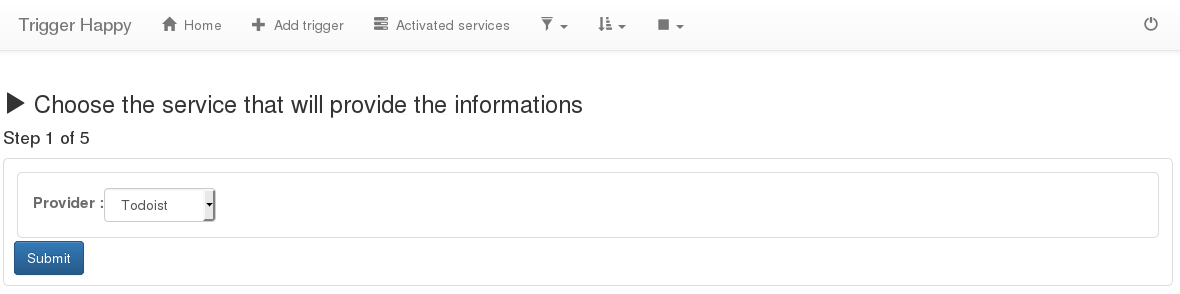
- Provider: the first of the 2 services. Used to provide the data
- Consumer: the second of the 2 services. Used to publish the data grabbed by the provider
- a Trigger is composed of one provider and one consumer (and a description)
How to activate a service and fill the form
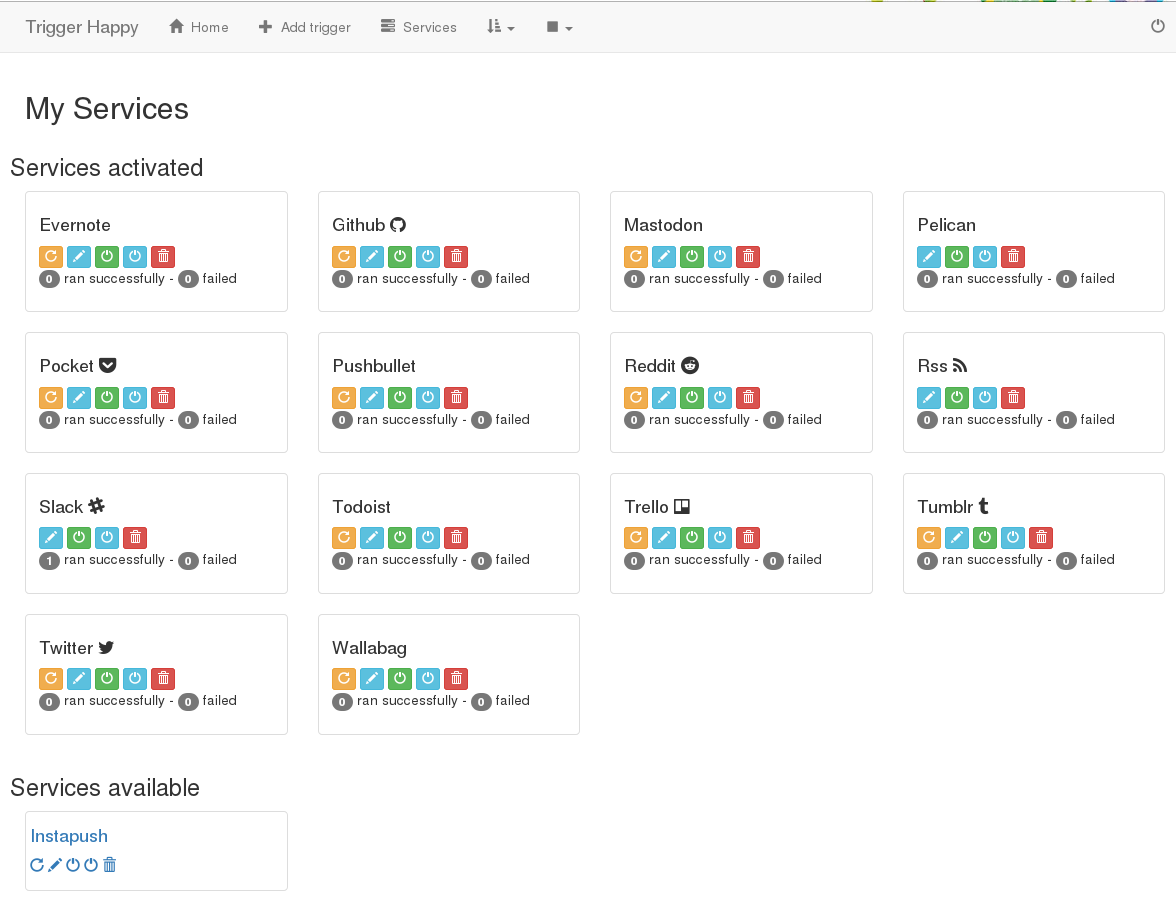
From the page “Services” http://127.0.0.1:8000/th/service/ you have the list of the services you can use to get date or publish data.
The page is divided in two parts.
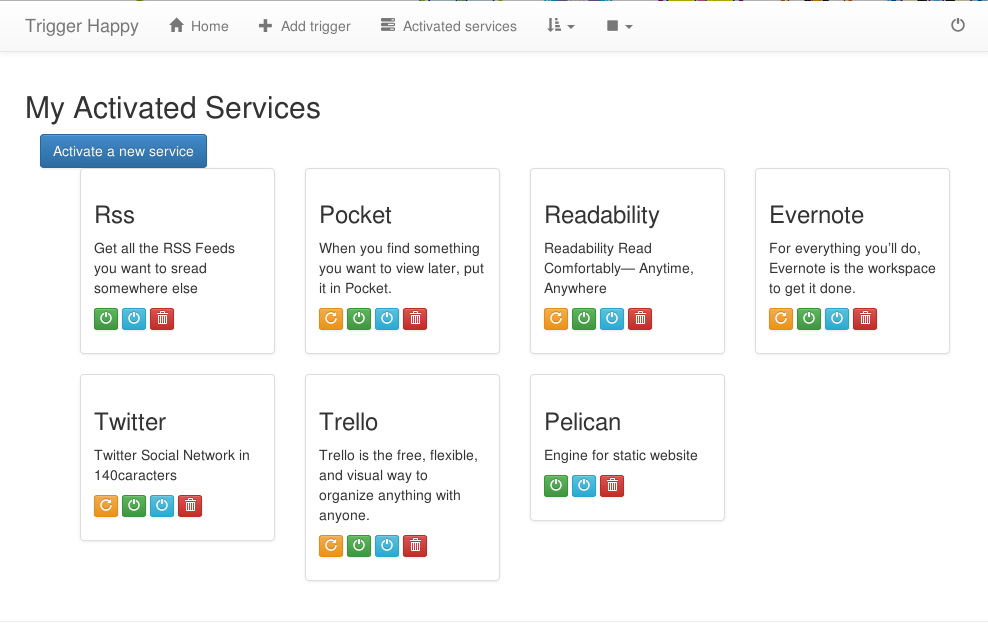
One part: Activated Services, the ones that are already activated, the other part: Available Services, that you have not yet activated.
To activate them, have a look at the page Services list of each service that pleases you.
What a line of the trigger contains
- at left :
- description - provider name - consumer name
- date creation - date last time a trigger has
- the message OK, or the error related to one of the service
- the number of times the trigger run successfully - unsuccessfully
- at right : buttons to :
- launch the current trigger
- set to off (when the button is blue) or on (if the button is green) the status of the trigger
- delete the trigger
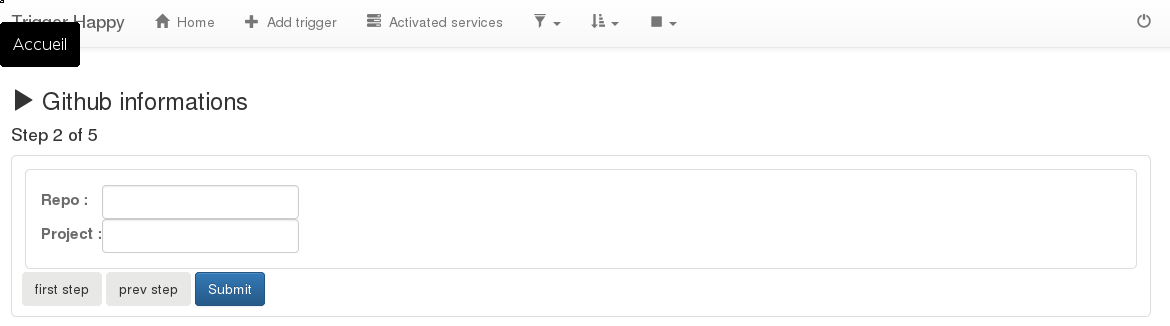
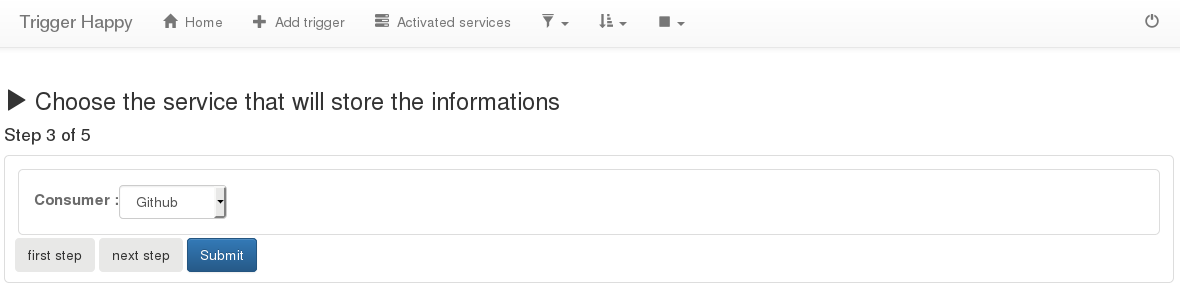
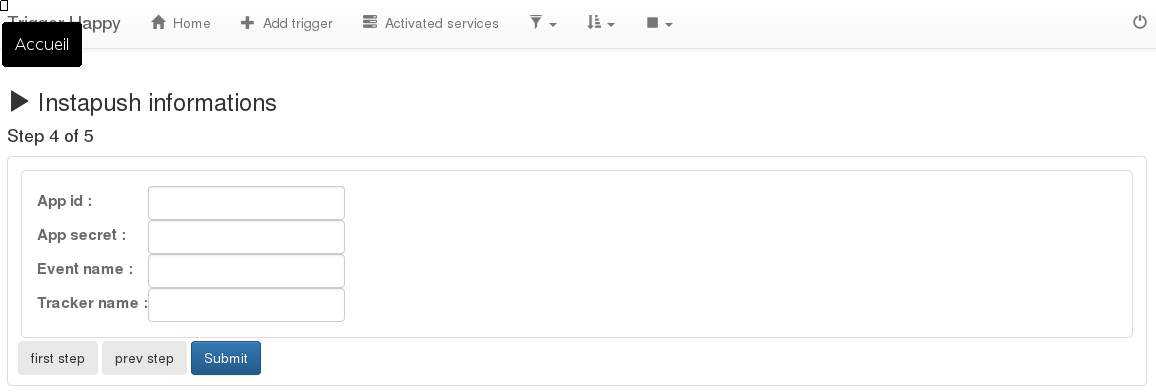
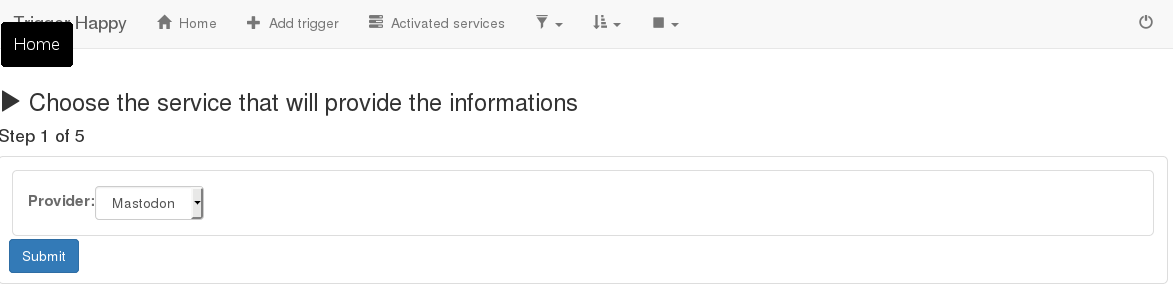
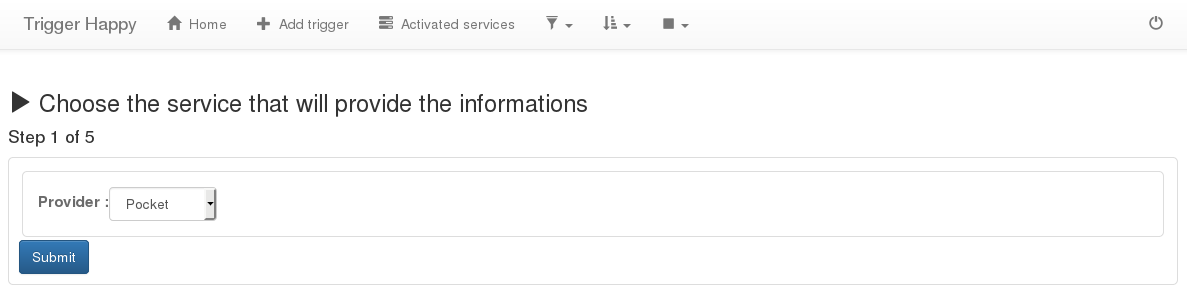
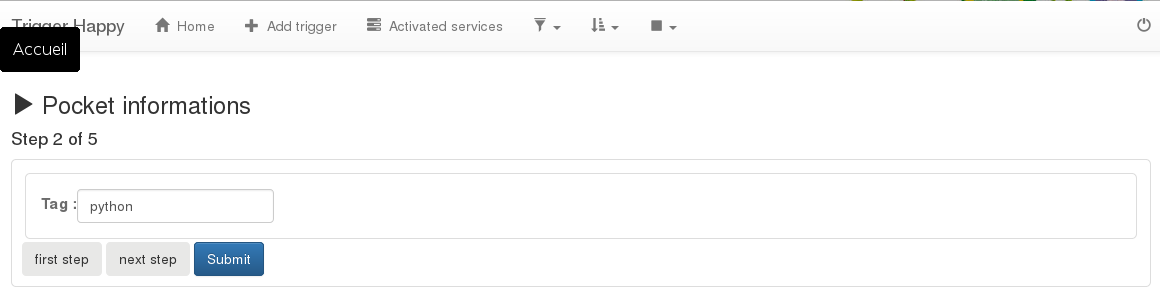
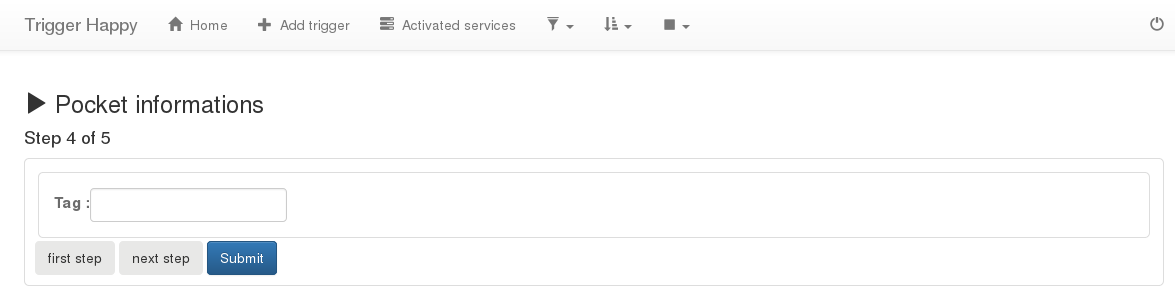
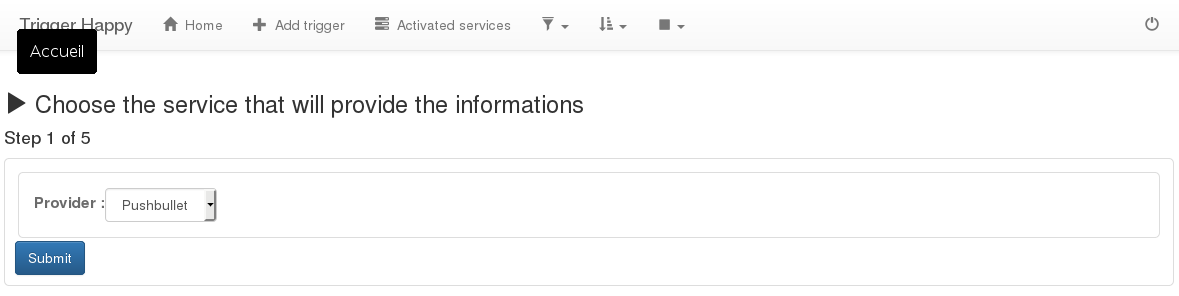
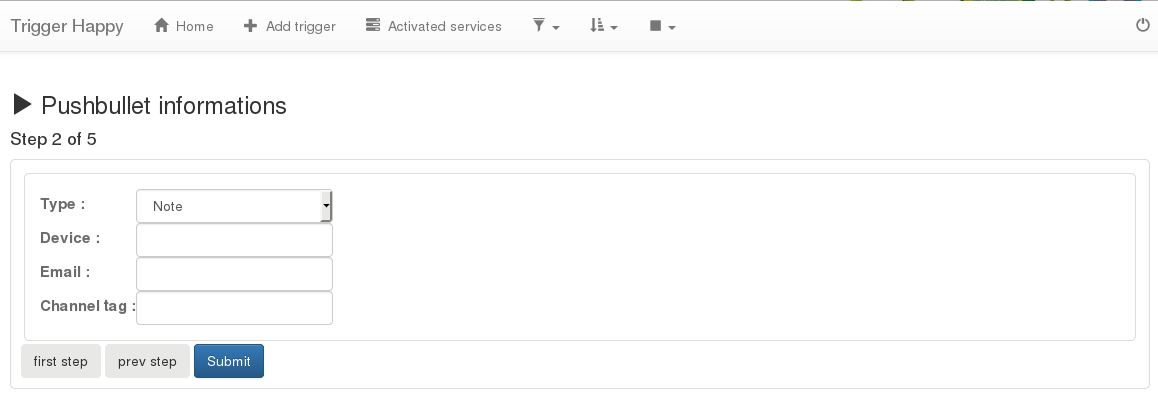
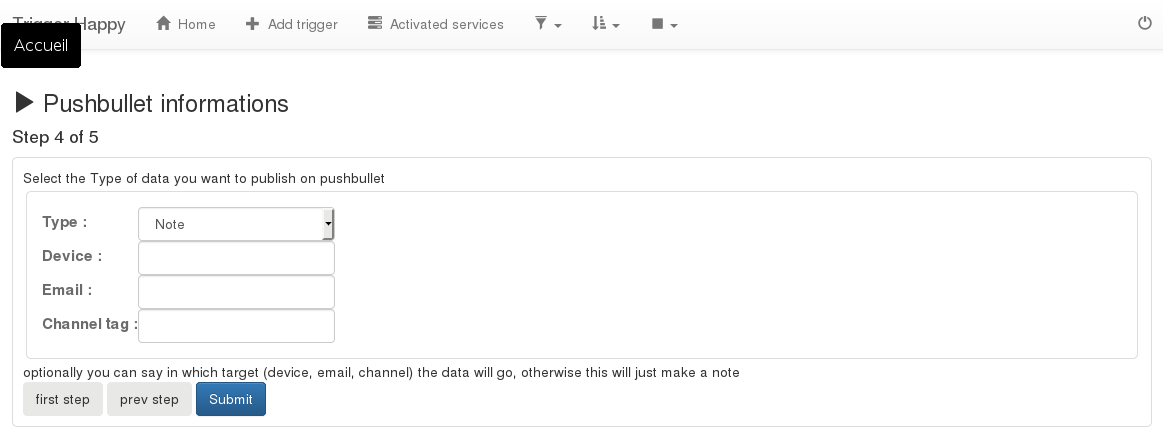
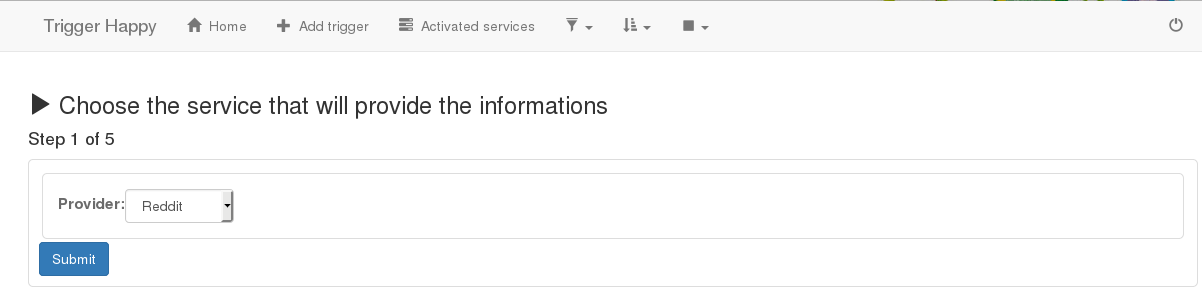
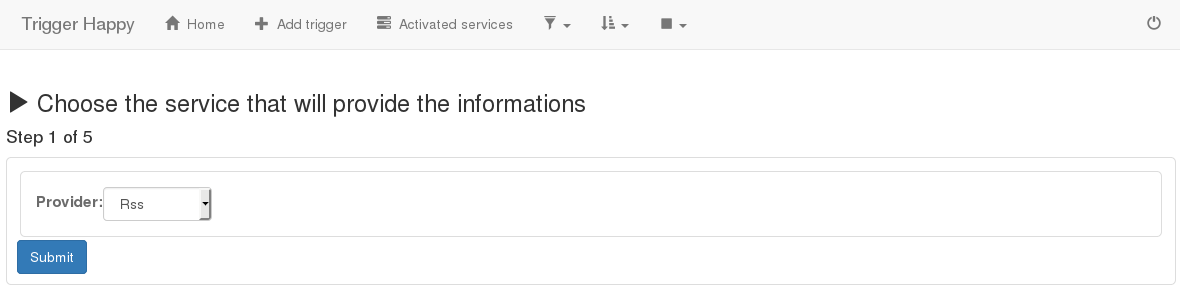
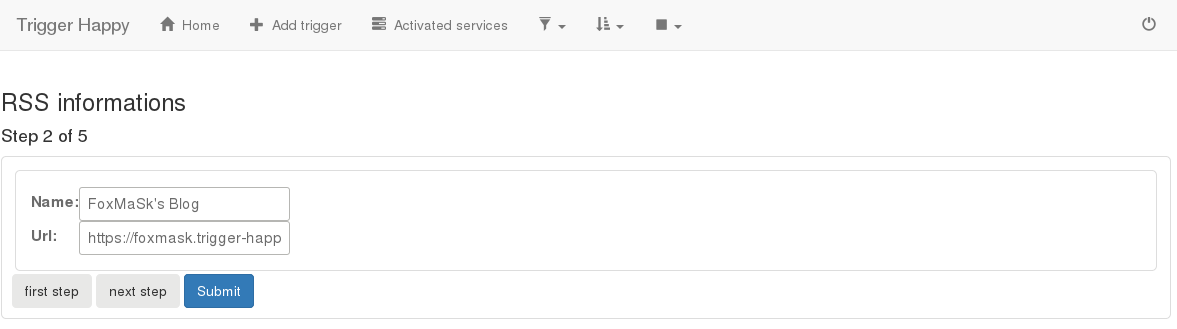
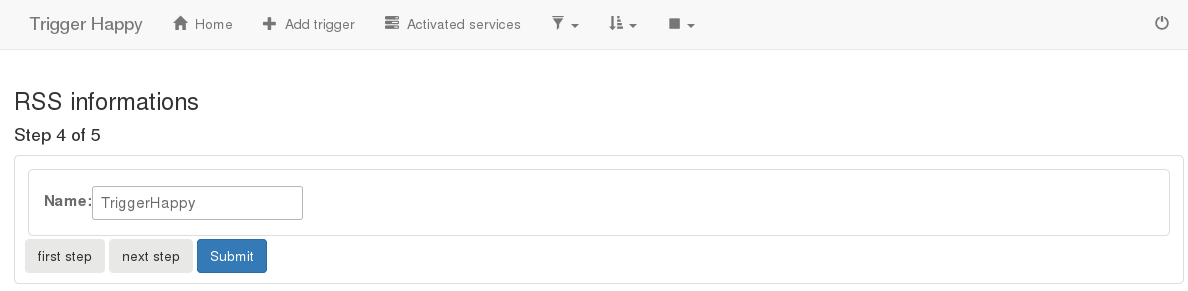
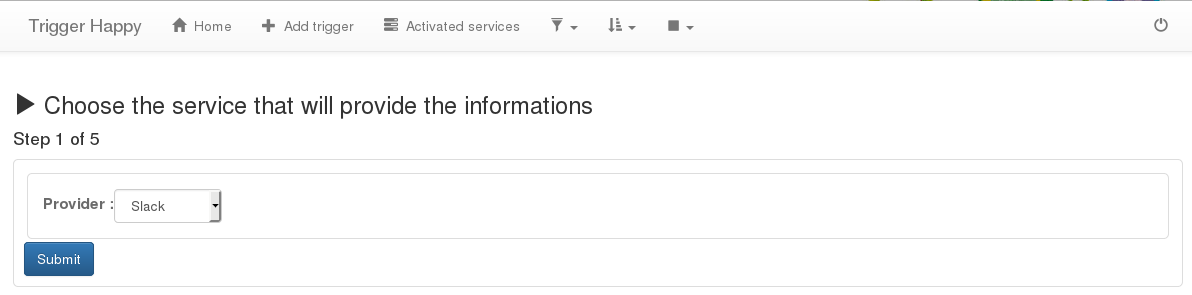
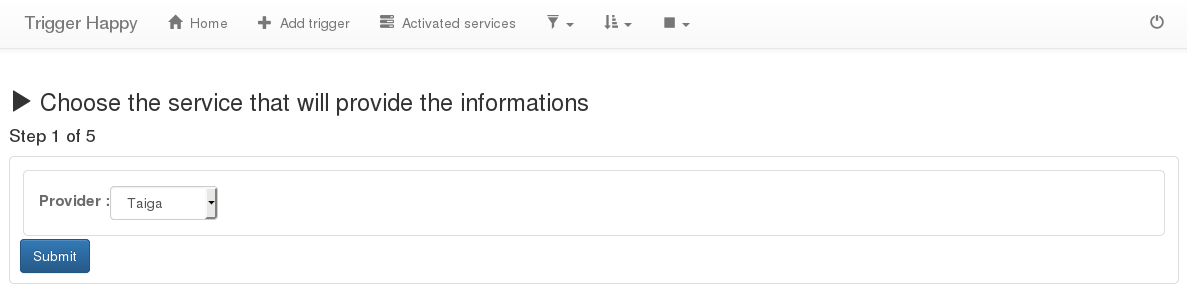
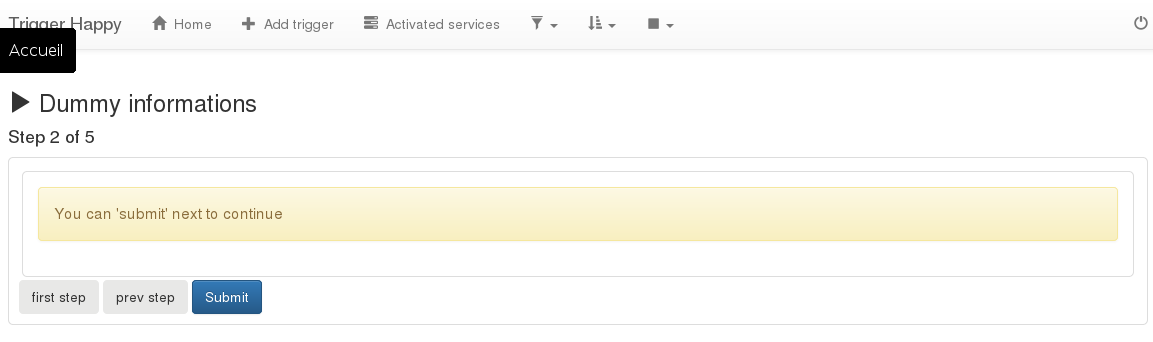
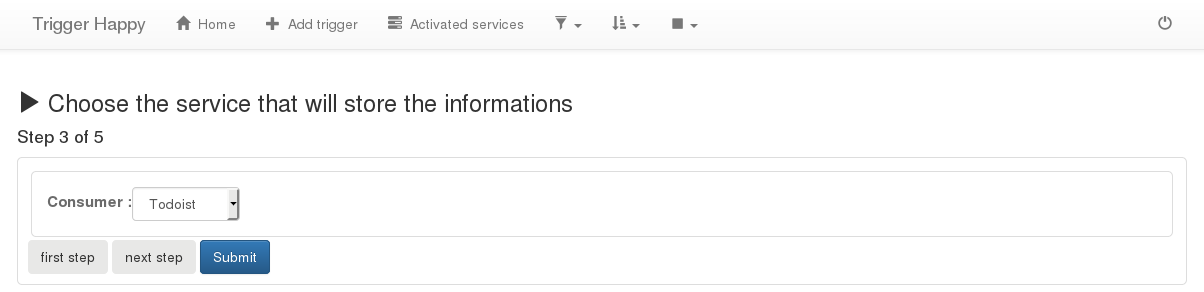
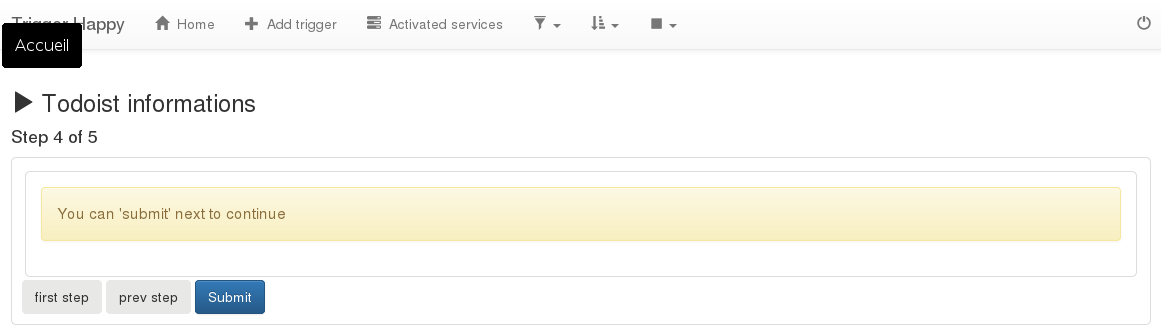
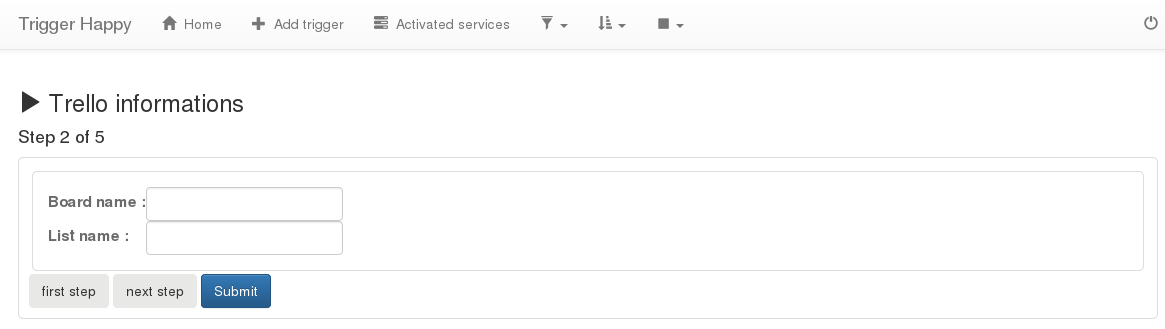
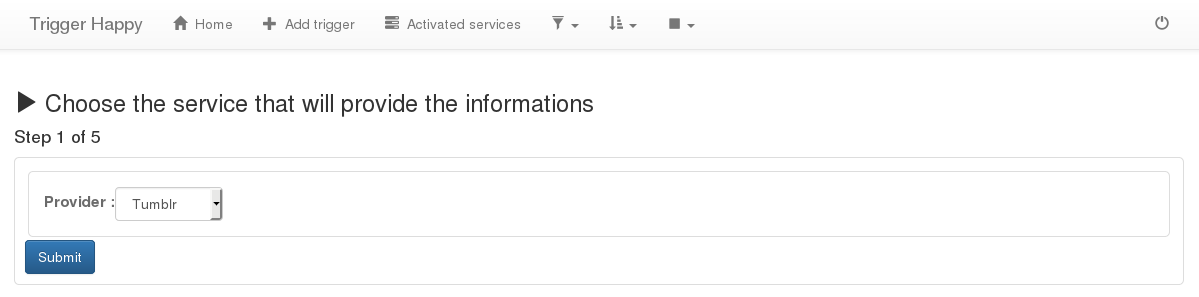
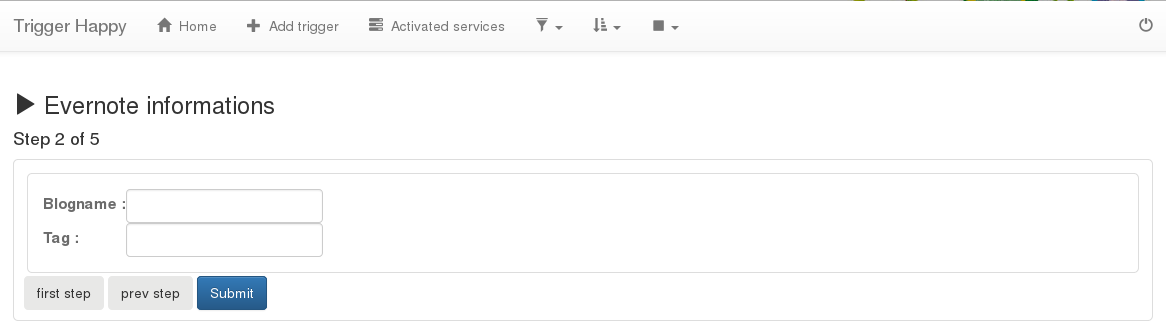
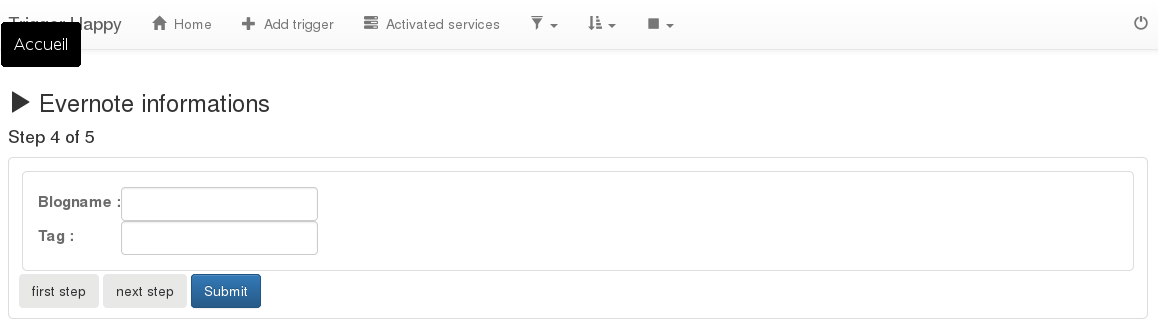
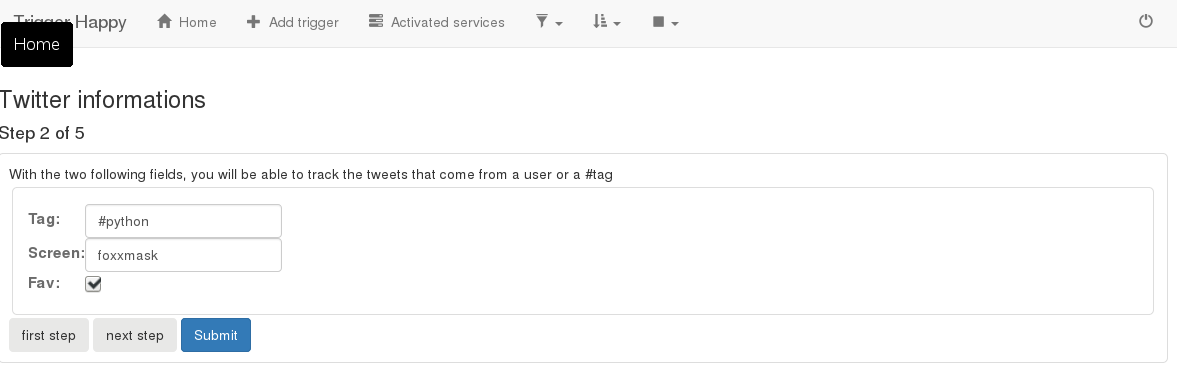
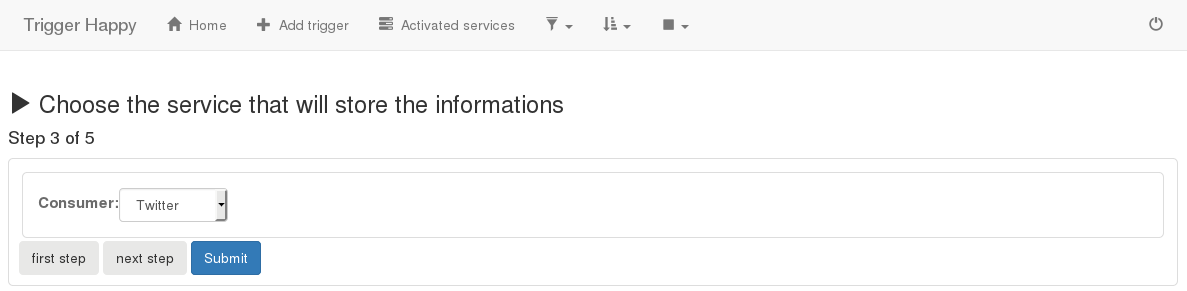
How to create a trigger in 5 steps
- Page 1 select one of the service that will provide the data you want
- Page 2 fill the field(s) related to the service, if necessary
- Page 3 select one of the service that will consume the data you want
- Page 4 fill the field(s) related to the service, if necessary
- Page 5 fill a description
role of each couple of page :
- Page 1 and 3 are the same, except that, a provider can not be a consumer too
- Page 2 and 4 their content, depends of the choice you made page 1 and 3.
To know what information you need to enter, see the service of your choice from the Services list
How to edit the trigger
You can edit the provider or consumer by selecting its name, or change the description of the trigger by clicking of it.
How to turn off/on a trigger
on each line of the trigger, as explain earlier, at the right of the trigger line, set to off (when the button is blue) or on (if the button is green) the status of the trigger
What’s happened when a trigger is set back to on
When a trigger is set back to ‘on’, the date triggered is set to the current date. This allow you to avoid to flood the consumer with the data you’d grabbed from the provider from a long long time.
For example, imagine, it’s summer, you go on holidays and to be quite, you set all your triggers to off. Then when you will come back home, you are relax and ready to dive back into the active life. Then you set all triggers back to on, and the trigger happy engine, won’t flood all your consumer.
My trigger is “in grey” and I can’t select it, edit it, launch it
The administrator of the Trigger Happy instance, disabled one of the services or both. The trigger(s) won’t be available at all, until the administrator set reactive it/them.
The Administration Guide
Administation Guide
That part of the guide will explain the following topics:
- How to create, add a new service
- For the users of your TriggerHappy instance, What’s happened when you disable a service.
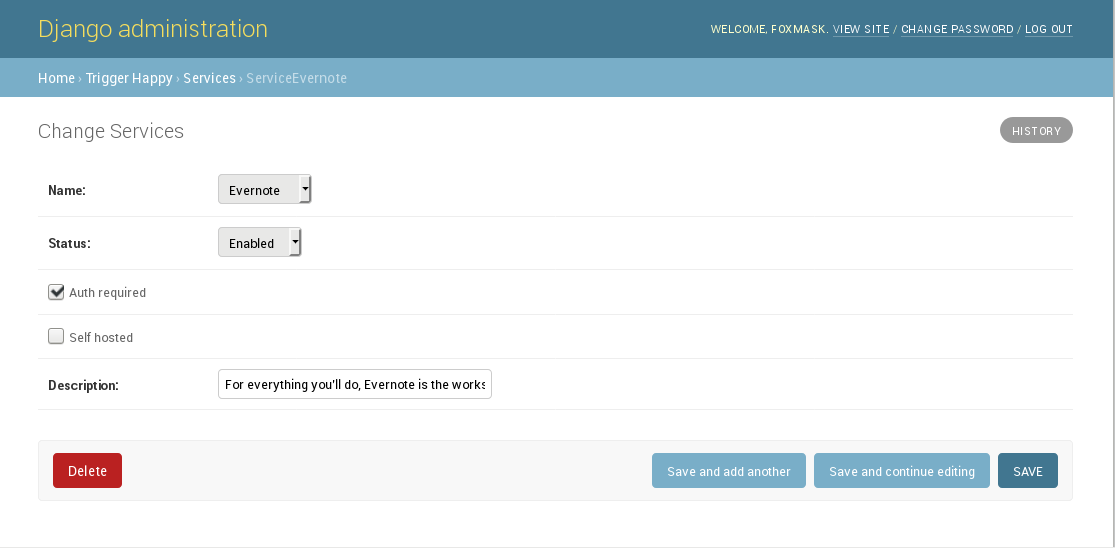
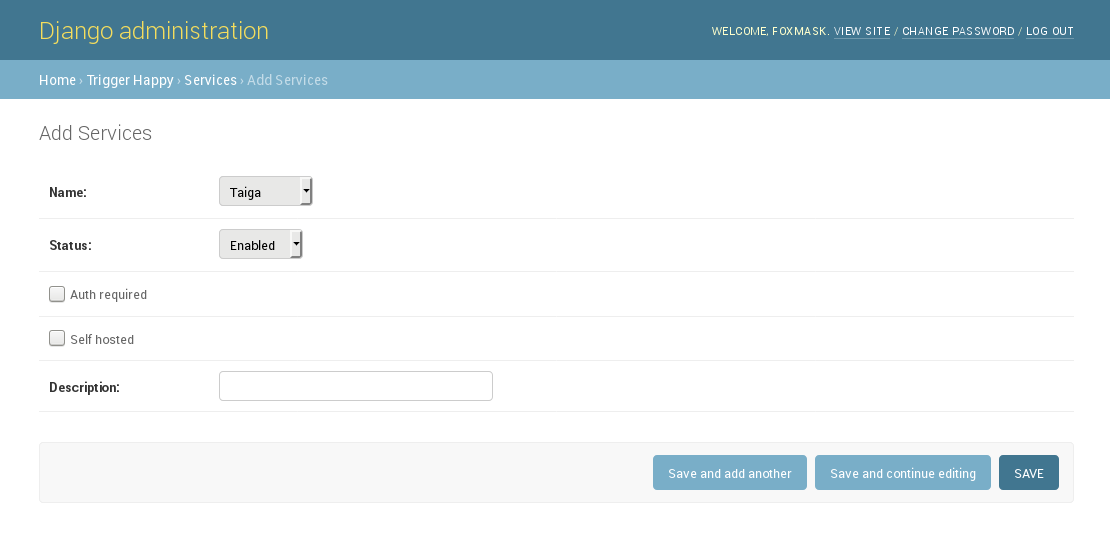
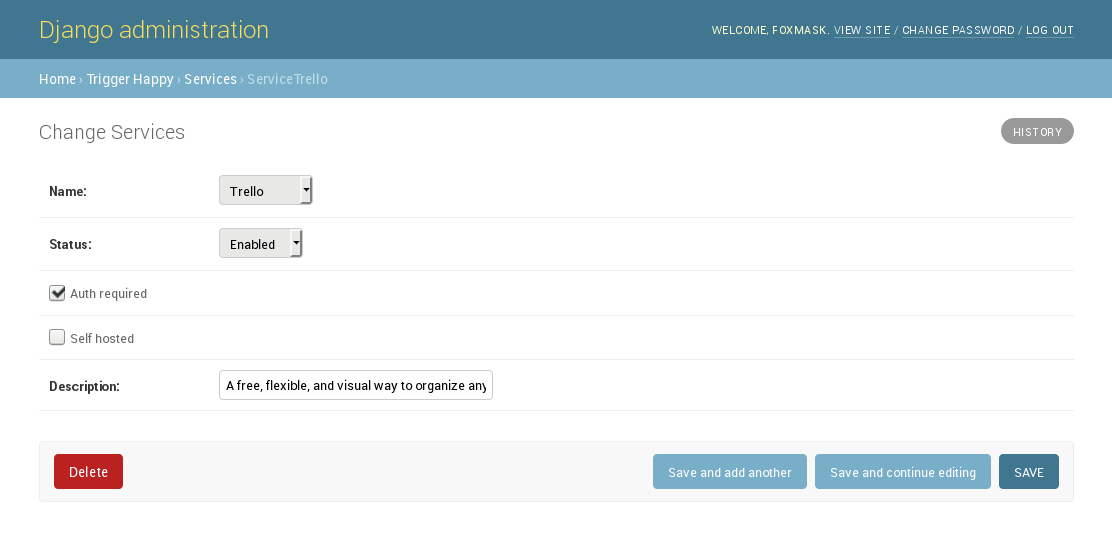
How to create, add a new service
from the admin panel at http://127.0.0.1:8000/admin/
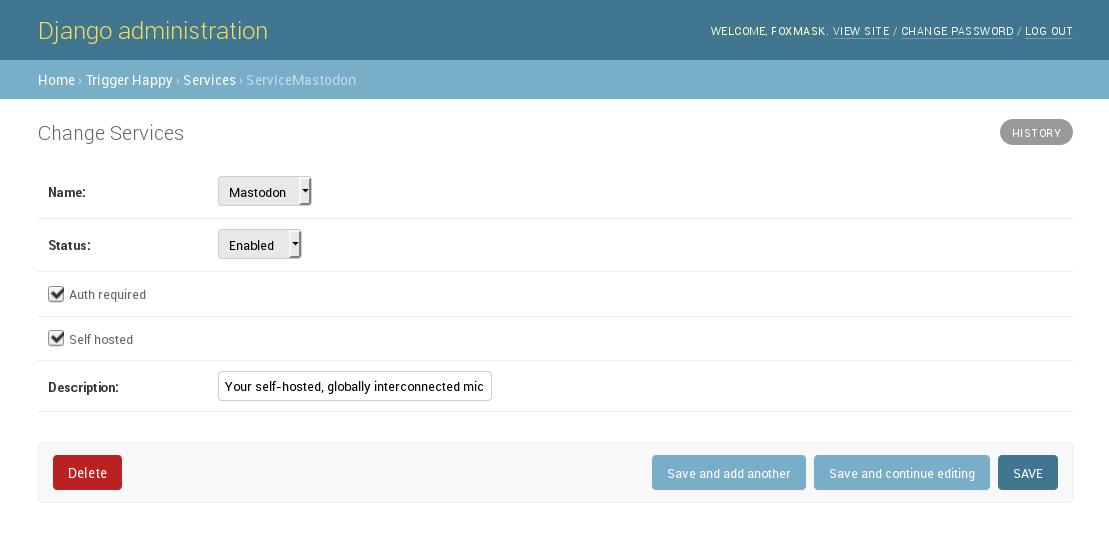
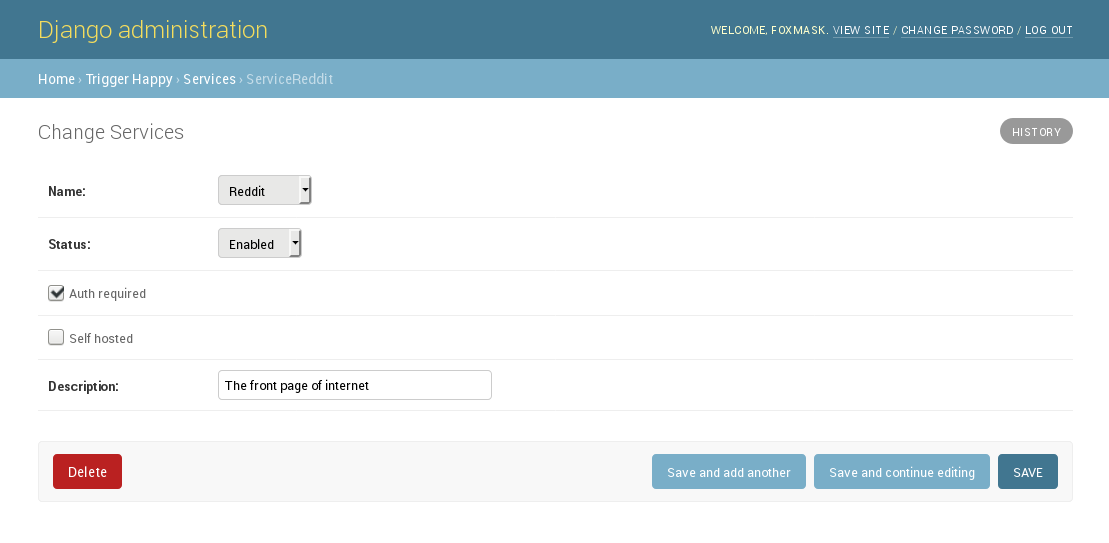
Under the paragraph “Trigger Happy”, select “Services”, then press “add service”. Choose the new service name and fill the fields. If you don’t know how to fill them, see the “Configuration from the Admin panel” for each of the service from the Services list
Disabling a service, what consequences
When you turn off a given service:
- if users did not use it before, the service will desappears from the dropdown list of the services, a user can add from the activated services page
- if users already used it before, then the triggers that use the service, will be disabled, the line of the trigger will become inert, impossible to interact with it, and the trigger-happy engine wont handle it all at.
The Docker Guide
Docker Guide
The docker file is based on build and compose and a bit of django hub
Build
The first time you use the docker image of trigger happy, launch this command to build the image.
This won’t be necessary for the next time
docker-compose build
Database update/create
This is necessary the first time, after building the docker image done above.
docker-compose run web  python manage.py migrate --settings=django_th.settings_docker
docker-compose run web  python manage.py loaddata initial_services --settings=django_th.settings_docker
docker-compose run web  python manage.py createsuperuser --settings=django_th.settings_docker
This is necessary only when a new release of Trigger Happy is done
docker-compose run web python manage.py migrate --settings=django_th.settings_docker
Running tasks
2 tasks are usually in the crontab: one to read the data source, one to publish the grabbed data:
docker-compose run web  python manage.py read --settings=django_th.settings_docker
docker-compose run web  python manage.py publish --settings=django_th.settings_docker

\ Sort by:\ best rated\ newest\ oldest\
\\
Add a comment\ (markup):
\``code``, \ code blocks:::and an indented block after blank line