Django JET
Contents
Getting Started
Contents:
Installation
Note
After following this instruction Django JET dashboard won’t be active (as it is located into a separate application). If you want to make it work, you will have to enable dashboard application by following Dashboard Installation steps too.
- Download and install latest version of Django JET:
pip install django-jet
# or
easy_install django-jet
- Add ‘jet’ application to the INSTALLED_APPS setting of your Django project settings.py file (note it should be before ‘django.contrib.admin’):
INSTALLED_APPS = (
...
'jet',
'django.contrib.admin',
...
)
- Make sure
django.template.context_processors.requestcontext processor is enabled in settings.py (Django 1.8+ way):
TEMPLATES = [
{
'BACKEND': 'django.template.backends.django.DjangoTemplates',
'DIRS': [],
'APP_DIRS': True,
'OPTIONS': {
'context_processors': [
...
'django.template.context_processors.request',
...
],
},
},
]
Warning
Before Django 1.8 you should specify context processors different way. Also use django.core.context_processors.request instead of django.template.context_processors.request.
from django.conf import global_settings
TEMPLATE_CONTEXT_PROCESSORS = global_settings.TEMPLATE_CONTEXT_PROCESSORS + (
'django.core.context_processors.request',
)
- Add URL-pattern to the urlpatterns of your Django project urls.py file (they are needed for related–lookups and autocompletes):
urlpatterns = patterns(
'',
url(r'^jet/', include('jet.urls', 'jet')), # Django JET URLS
url(r'^admin/', include(admin.site.urls)),
...
)
- Create database tables:
python manage.py migrate jet
# or
python manage.py syncdb
- Collect static if you are in production environment:
python manage.py collectstatic
- Clear your browser cache
Dashboard Installation
Note
Dashboard is located into a separate application. So after a typical JET installation it won’t be active. To enable dashboard application follow these steps:
- Add ‘jet.dashboard’ application to the INSTALLED_APPS setting of your Django project settings.py file (note it should be before ‘jet’):
INSTALLED_APPS = (
...
'jet.dashboard',
'jet',
'django.contrib.admin',
...
)
- Add URL-pattern to the urlpatterns of your Django project urls.py file (they are needed for related–lookups and autocompletes):
urlpatterns = patterns(
'',
url(r'^jet/', include('jet.urls', 'jet')), # Django JET URLS
url(r'^jet/dashboard/', include('jet.dashboard.urls', 'jet-dashboard')), # Django JET dashboard URLS
url(r'^admin/', include(admin.site.urls)),
...
)
- For Google Analytics widgets only install python package:
pip install google-api-python-client==1.4.1
- Create database tables:
python manage.py migrate dashboard
# or
python manage.py syncdb
- Collect static if you are in production environment:
python manage.py collectstatic
Dashboard installed! Learn about making your custom dashboard here Dashboard.
Configuration
Contents:
Config file
Options available in settings.py:
JET_DEFAULT_THEME
Django JET allows you to change default theme. This feature is mainly used for customizing color schemes rather than making absolutely different themes. This option in fact make Django load different css styles.
Possible built-in themes are:
- default
- green
- light-violet
- light-green
- light-blue
- light-gray
To change theme use parameter:
JET_DEFAULT_THEME = 'light-gray'
JET_THEMES

You can allow your users to change admin panel color scheme. This option will add color scheme chooser to the user dropdown menu. Make JET_THEMES an empty list to disable this feature.
JET_THEMES = [
{
'theme': 'default', # theme folder name
'color': '#47bac1', # color of the theme's button in user menu
'title': 'Default' # theme title
},
{
'theme': 'green',
'color': '#44b78b',
'title': 'Green'
},
{
'theme': 'light-green',
'color': '#2faa60',
'title': 'Light Green'
},
{
'theme': 'light-violet',
'color': '#a464c4',
'title': 'Light Violet'
},
{
'theme': 'light-blue',
'color': '#5EADDE',
'title': 'Light Blue'
},
{
'theme': 'light-gray',
'color': '#222',
'title': 'Light Gray'
}
]
CUSTOM JET_THEME
You are free to add your own color schemes by adding new folder to /static/jet/css/themes/. You can use /jet/static/jet/css/themes/light-violet/ folder as an example (available in Django JET repository). _variables.scss contains all customizable variables. You’ll have to compile all .scss files in theme directory to start using your own theme.
COMPACT MENU

If you don’t have a lot of apps and models it can be annoying to have a two-level menu. In this case you can use menu’s compact mode, which will list applications and models in the side menu without need to move pointer over applications to show models.
JET_SIDE_MENU_COMPACT = True
Default is False
JET_CHANGE_FORM_SIBLING_LINKS

Adds buttons to change forms that allows you to navigate to previous/next object without returning back to change list. Can be disabled if hit performance.
JET_CHANGE_FORM_SIBLING_LINKS = True
Default is True
JET_INDEX_DASHBOARD
Sets which dashboard class will be used for rendering admin index dashboard. Allows you to create your own dashboard with custom modules and pre-installed layout.
JET_INDEX_DASHBOARD = 'jet.dashboard.dashboard.DefaultIndexDashboard'
JET_APP_INDEX_DASHBOARD
Same as JET_INDEX_DASHBOARD, but for application pages
JET_APP_INDEX_DASHBOARD = 'jet.dashboard.dashboard.DefaultAppIndexDashboard'
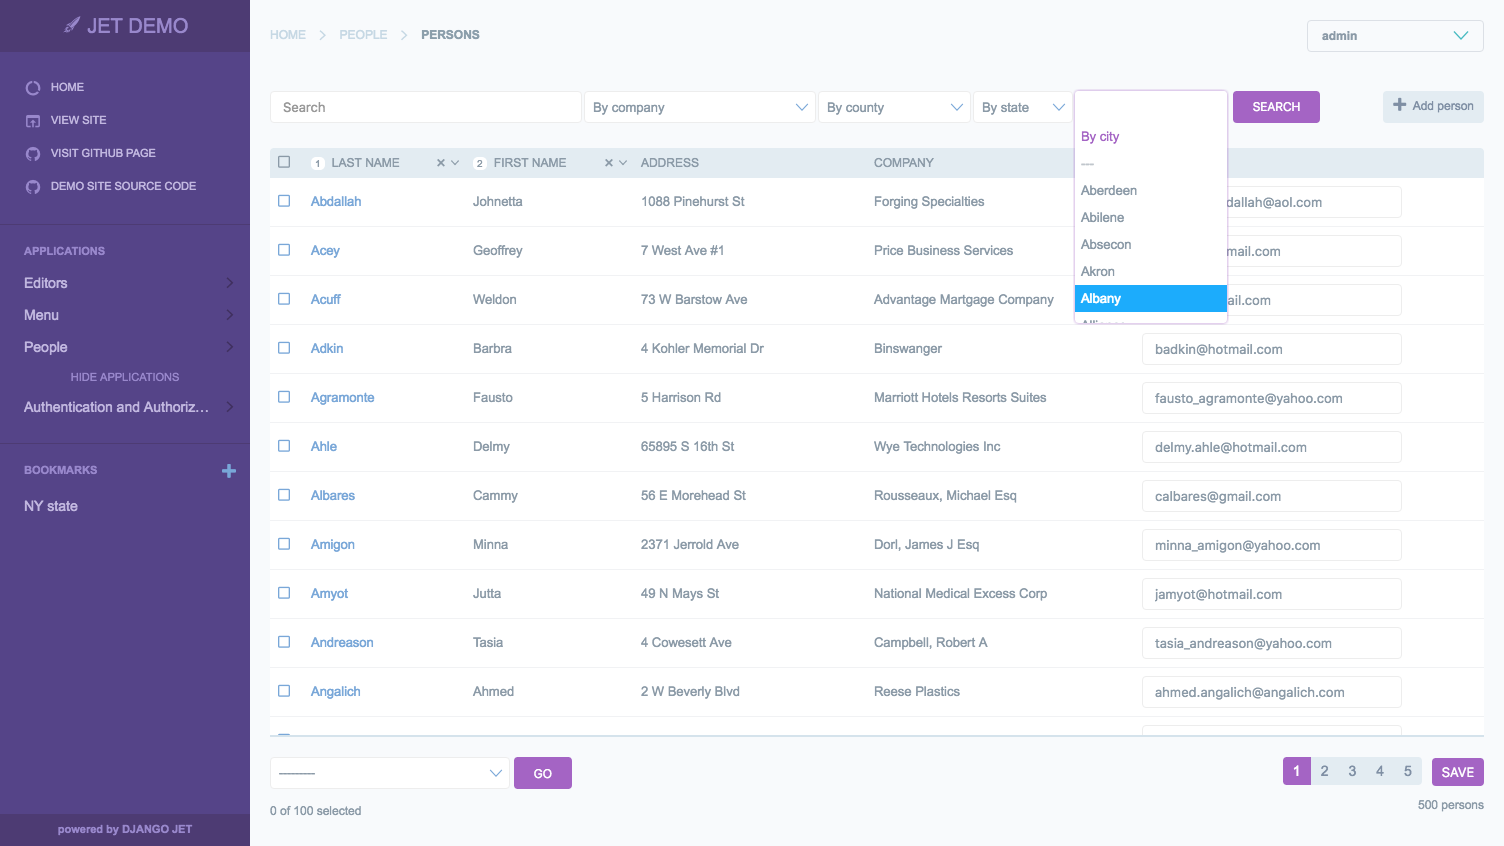
Autocomplete
By default Django JET renders all possible choices for select inputs. This behavior may be unwanted if number of available options is rather big. In this case Django JET allows you to load these options dynamically through AJAX.
Configuration
In order to achieve this functionality all you have to do is:
- Specify which model fields should be searchable by AJAX queries. Add this static method which must return
a
tupleorlistof fields you want to be searchable with AJAX:
@staticmethod
def autocomplete_search_fields():
return 'field1', 'field2'
# for single field
@staticmethod
def autocomplete_search_fields():
return 'field1',
Example from Django JET demo site:
class Address(models.Model):
name = models.CharField(_('name'), max_length=255)
city = models.ForeignKey(City, verbose_name=_('city'), related_name='addresses')
zip = models.IntegerField(_('zip/postal code'))
class Meta:
verbose_name = _('address')
verbose_name_plural = _('addresses')
unique_together = ('name', 'city')
def __str__(self):
return self.name
@staticmethod
def autocomplete_search_fields():
return 'name', 'city__name'
- Use custom AJAX filter class
jet.filters.RelatedFieldAjaxListFilterif you have any foreign key list filters:
from jet.filters import RelatedFieldAjaxListFilter
class PersonAdmin(admin.ModelAdmin):
list_filter = (
...
('address', RelatedFieldAjaxListFilter),
)
- Now all your admin select boxes will perform AJAX queries to load available options while you type.
Note
This work for both ForeignKey and ManyToManyField fields.
Disabling Autocomplete For Form Fields
Autocomplete is nice, but sometimes you don’t want this behaviour (e.x. because you want to limit the provided queryset for a particular widget). In this case you can disable autocompletion this way:
class YourForm(forms.ModelForm): def __init__(self, *args, **kwargs): super(YourForm, self).__init__(*args, **kwargs) if SOME_CASE(self.instance): self.fields['FIELD_NAME'].autocomplete = False self.fields['FIELD_NAME'].queryset = Model.queryset.some_filter()
Compact Inline
By default Django admin interface provides two types of inlines to edit models on the same page as a
related model – StackedInline and TabularInline. StackedInline is mostly used when there are
not so many objects. If number of models is rather big, TabularInline can help you. Unfortunately when
related model has a lot of fields it may be not convenient to interact with them.
To solve this problem JET has a CompactInline class built-in.

Usage
CompactInline works exactly like Django built-in inlines, you need just
to inherit jet.admin.CompactInline inline class. That’s all.
from django.contrib import admin
from people.models import County, State, City
from jet.admin import CompactInline
class StateCountiesInline(admin.TabularInline):
model = County
extra = 1
show_change_link = True
class StateCitiesInline(CompactInline):
model = City
extra = 1
show_change_link = True
class StateAdmin(admin.ModelAdmin):
inlines = (StateCountiesInline, StateCitiesInline)
Filters
django-admin-rangefilter
In order to fix compatibility issues with django-admin-rangefilter package you should use JET’s admin filter class
jet.filters.DateRangeFilter instead of rangefilter.filter.DateRangeFilter.
#from rangefilter.filter import DateRangeFilter
from jet.filters import DateRangeFilter
class MyUserAdmin(UserAdmin):
...
list_filter = (
('date_joined', DateRangeFilter),
)
Dashboard
Custom Dashboard
Note
Django JET Dashboard tries to be as compatible as possible with django-admin-tools dashboard so that django-admin-tools modules could be easily ported to Django JET. In most cases in will be enough to change python imports and remove extending in modules templates.
Dashboard represents Dashboard class instance with DashboardModule class instances as its children.
Any custom Dashboard class should inherit jet.dashboard.dashboard.Dashboard
and use init_with_context to fill it with widgets. You should add your widgets
to children and available_children attributes.
Before continue make sure you have completed Dashboard Installation.
Set Up Custom Dashboard
Create
dashboard.pyin any suitable location (e.g., in your project root) with the following content:from django.utils.translation import ugettext_lazy as _ from jet.dashboard import modules from jet.dashboard.dashboard import Dashboard, AppIndexDashboard class CustomIndexDashboard(Dashboard): columns = 3 def init_with_context(self, context): self.available_children.append(modules.LinkList) self.children.append(modules.LinkList( _('Support'), children=[ { 'title': _('Django documentation'), 'url': 'http://docs.djangoproject.com/', 'external': True, }, { 'title': _('Django "django-users" mailing list'), 'url': 'http://groups.google.com/group/django-users', 'external': True, }, { 'title': _('Django irc channel'), 'url': 'irc://irc.freenode.net/django', 'external': True, }, ], column=0, order=0 ))
Add to your settings.py path to created
dashboard.py(example fordashboard.pyin project root):
JET_INDEX_DASHBOARD = 'dashboard.CustomIndexDashboard'
That’s all, now you have dashboard with only one widget - LinkList. Dashboard reset may be needed
if your had another dashboard already rendered for any user. Visit Dashboard Modules to learn
other widgets you can add to your custom dashboard or Custom Dashboard Module to create your own.
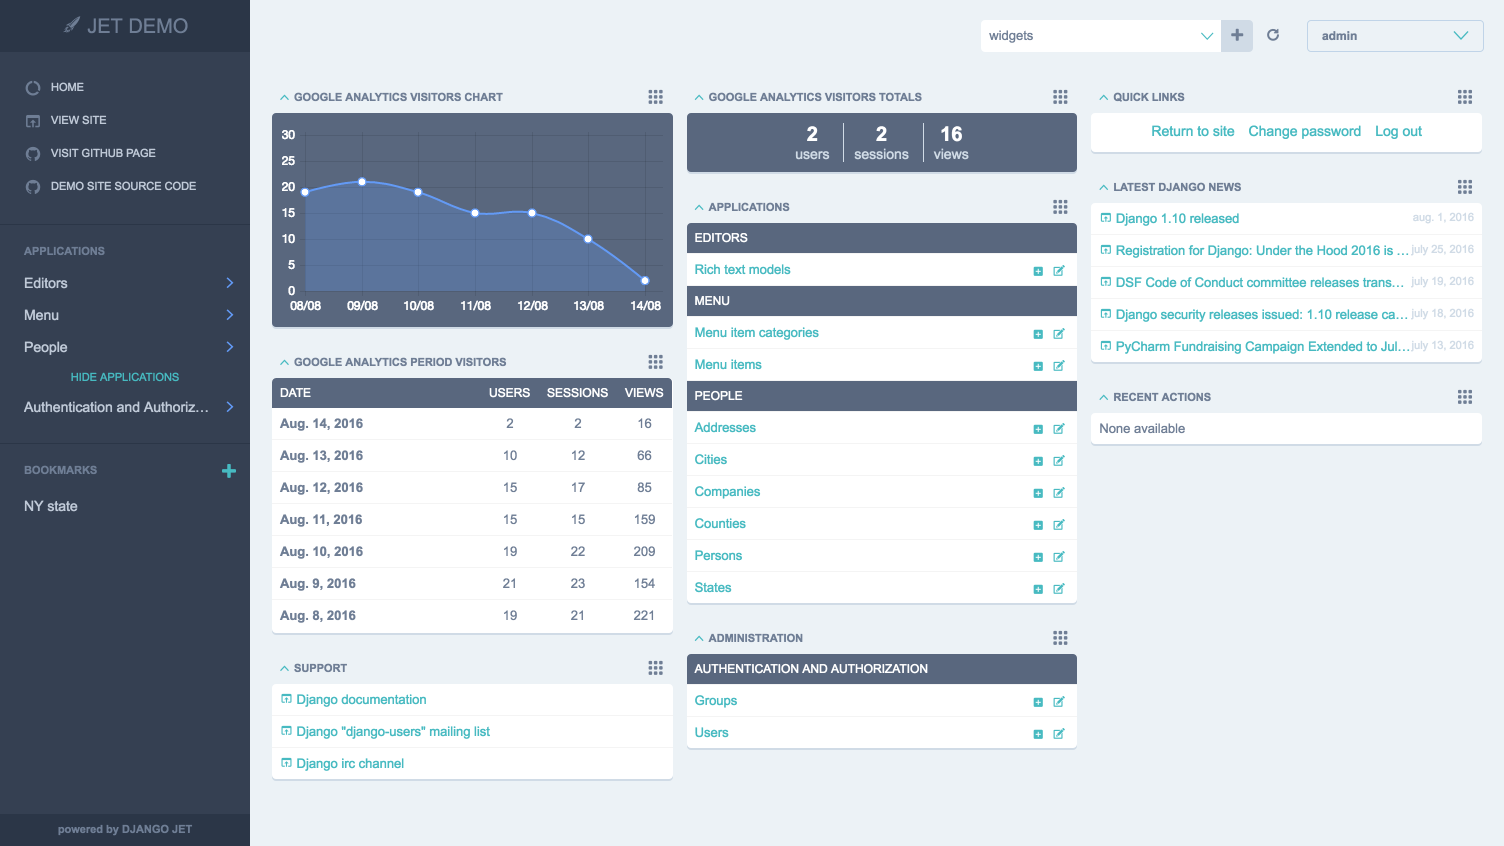
Dashboard Modules
Build-In Dashboard Modules
LinkList

-
class
jet.dashboard.modules.LinkList(title=None, children=[], **kwargs)¶ List of links widget.
Usage example:
from django.utils.translation import ugettext_lazy as _ from jet.dashboard import modules from jet.dashboard.dashboard import Dashboard, AppIndexDashboard class CustomIndexDashboard(Dashboard): columns = 3 def init_with_context(self, context): self.available_children.append(modules.LinkList) self.children.append(modules.LinkList( _('Support'), children=[ { 'title': _('Django documentation'), 'url': 'http://docs.djangoproject.com/', 'external': True, }, { 'title': _('Django "django-users" mailing list'), 'url': 'http://groups.google.com/group/django-users', 'external': True, }, { 'title': _('Django irc channel'), 'url': 'irc://irc.freenode.net/django', 'external': True, }, ], column=0, order=0 ))
-
children= []¶ Links are contained in
childrenattribute which you can pass as constructor parameter to make your own preinstalled link lists.childrenis an array of dictinaries:[ { 'title': _('Django documentation'), 'url': 'http://docs.djangoproject.com/', 'external': True, }, ... ]
-
layout= 'stacked'¶ Specify widget layout. Allowed values
stackedandinline.
-
AppList

-
class
jet.dashboard.modules.AppList(title=None, model=None, context=None, **kwargs)¶ Shows applications and containing models links. For each model “created” and “change” links are displayed.
Usage example:
from django.utils.translation import ugettext_lazy as _ from jet.dashboard import modules from jet.dashboard.dashboard import Dashboard, AppIndexDashboard class CustomIndexDashboard(Dashboard): columns = 3 def init_with_context(self, context): self.children.append(modules.AppList( _('Applications'), exclude=('auth.*',), column=0, order=0 ))
-
exclude= None¶ Specify models which should NOT be displayed.
excludeis an array of string formatted asapp_label.model. Also its possible to specify all application models with * sign (e.g.auth.*).
-
models= None¶ Specify models which should be displayed.
modelsis an array of string formatted asapp_label.model. Also its possible to specify all application models with * sign (e.g.auth.*).
-
ModelList

-
class
jet.dashboard.modules.ModelList(title=None, model=None, context=None, **kwargs)¶ Shows models links. For each model “created” and “change” links are displayed.
Usage example:
from django.utils.translation import ugettext_lazy as _ from jet.dashboard import modules from jet.dashboard.dashboard import Dashboard, AppIndexDashboard class CustomIndexDashboard(Dashboard): columns = 3 def init_with_context(self, context): self.children.append(modules.ModelList( _('Models'), exclude=('auth.*',), column=0, order=0 ))
-
exclude= None¶ Specify models which should NOT be displayed.
excludeis an array of string formatted asapp_label.model. Also its possible to specify all application models with * sign (e.g.auth.*).
-
models= None¶ Specify models which should be displayed.
modelsis an array of string formatted asapp_label.model. Also its possible to specify all application models with * sign (e.g.auth.*).
-
RecentActions

-
class
jet.dashboard.modules.RecentActions(title=None, limit=10, **kwargs)¶ Display list of most recent admin actions with following information: entity name, type of action, author, date
Usage example:
from django.utils.translation import ugettext_lazy as _ from jet.dashboard import modules from jet.dashboard.dashboard import Dashboard, AppIndexDashboard class CustomIndexDashboard(Dashboard): columns = 3 def init_with_context(self, context): self.children.append(modules.RecentActions( _('Recent Actions'), 10, column=0, order=0 ))
-
exclude_list= None¶ Specify actions of which models should NOT be displayed.
exclude_listis an array of string formatted asapp_label.model. Also its possible to specify all application models with * sign (e.g.auth.*).
-
include_list= None¶ Specify actions of which models should be displayed.
include_listis an array of string formatted asapp_label.model. Also its possible to specify all application models with * sign (e.g.auth.*).
-
limit= 10¶ Number if entries to be shown (may be changed by each user personally).
-
Feed

-
class
jet.dashboard.modules.Feed(title=None, feed_url=None, limit=None, **kwargs)¶ Display RSS Feed entries with following information: entry title, date and link to the full version
Usage example:
from django.utils.translation import ugettext_lazy as _ from jet.dashboard import modules from jet.dashboard.dashboard import Dashboard, AppIndexDashboard class CustomIndexDashboard(Dashboard): columns = 3 def init_with_context(self, context): self.children.append(modules.Feed( _('Latest Django News'), feed_url='http://www.djangoproject.com/rss/weblog/', limit=5, column=0, order=0 ))
-
feed_url= None¶ URL of the RSS feed (may be changed by each user personally).
-
limit= None¶ Number if entries to be shown (may be changed by each user personally).
-
Google Analytics Widgets
Attention
Google Analytics widgets required extra setup

Extra Installation
- Install python package:
pip install google-api-python-client==1.4.1
- Specify path to your Google Analytics
client_secrets.json(obtained at Google website):
JET_MODULE_GOOGLE_ANALYTICS_CLIENT_SECRETS_FILE = os.path.join(PROJECT_DIR, 'client_secrets.json')
- Add import to the top of your urls.py:
from jet.dashboard.dashboard_modules import google_analytics_views
Usage Example
from django.utils.translation import ugettext_lazy as _ from jet.dashboard.dashboard import Dashboard, AppIndexDashboard from jet.dashboard.dashboard_modules import google_analytics class CustomIndexDashboard(Dashboard): columns = 3 def init_with_context(self, context): self.available_children.append(google_analytics.GoogleAnalyticsVisitorsTotals) self.available_children.append(google_analytics.GoogleAnalyticsVisitorsChart) self.available_children.append(google_analytics.GoogleAnalyticsPeriodVisitors)
Yandex Metrika Widgets
Attention
Yandex Metrika widgets required extra setup

Extra Installation
- Set your Yandex Metrika CLIENT_ID and CLIENT_SECRET (obtained at Yandex Metrika API website):
JET_MODULE_YANDEX_METRIKA_CLIENT_ID = 'YANDEX_METRIKA_CLIENT_ID'
JET_MODULE_YANDEX_METRIKA_CLIENT_SECRET = 'YANDEX_METRIKA_CLIENT_SECRET'
- Add import to the top of your urls.py:
from jet.dashboard.dashboard_modules import yandex_metrika_views
Usage Example
from django.utils.translation import ugettext_lazy as _ from jet.dashboard.dashboard import Dashboard, AppIndexDashboard from jet.dashboard.dashboard_modules import yandex_metrika class CustomIndexDashboard(Dashboard): columns = 3 def init_with_context(self, context): self.available_children.append(yandex_metrika.YandexMetrikaVisitorsTotals) self.available_children.append(yandex_metrika.YandexMetrikaVisitorsChart) self.available_children.append(yandex_metrika.YandexMetrikaPeriodVisitors)
-
class
jet.dashboard.dashboard_modules.yandex_metrika.YandexMetrikaVisitorsTotals(title=None, period=None, **kwargs)¶ Yandex Metrika widget that shows total number of visitors, visits and viewers for a particular period of time. Period may be following: Today, Last week, Last month, Last quarter, Last year
-
period= None¶ Which period should be displayed. Allowed values - integer of days
-
-
class
jet.dashboard.dashboard_modules.yandex_metrika.YandexMetrikaVisitorsChart(title=None, period=None, show=None, group=None, **kwargs)¶ Yandex Metrika widget that shows visitors/visits/viewer chart for a particular period of time. Data is grouped by day, week or month Period may be following: Today, Last week, Last month, Last quarter, Last year
-
group= None¶ Sets grouping of data. Possible values:
day,week,month
-
period= None¶ Which period should be displayed. Allowed values - integer of days
-
show= None¶ What data should be shown. Possible values:
visitors,visits,page_views
-
-
class
jet.dashboard.dashboard_modules.yandex_metrika.YandexMetrikaPeriodVisitors(title=None, period=None, group=None, **kwargs)¶ Yandex Metrika widget that shows visitors, visits and viewers for a particular period of time. Data is grouped by day, week or month Period may be following: Today, Last week, Last month, Last quarter, Last year
-
group= None¶ Sets grouping of data. Possible values:
day,week,month
-
period= None¶ Which period should be displayed. Allowed values - integer of days
-
Custom Dashboard Module
In order create your own dashboard module you need to follow these steps:
- Inherit Dashboard Module
- Create module template
- (optional) Add module views
Also you can always see build-in modules as examples in jet/dashboard/modules.py file and
jet/dashboard/dashboard_modules/ directory on the repository.
Inherit Dashboard Module
- Create dashboard modules file
dashboard_modules.py(or any other you prefer) inside your Django application - Create dashboard module class inherited from base dashboard module class and add it to
dashboard_modules.pyfile. You can see list of all available module attributes here.init_with_contextmethod allows you to load data and initialize module’s state. You can store data in module’s fields as this instance will be passed to template.
Example of dashboard_modules.py:
from jet.dashboard.modules import DashboardModule from contact.models import Ticket class RecentTickets(DashboardModule): title = 'Recent tickets' title_url = Ticket.get_admin_changelist_url() template = 'contact/dashboard_modules/recent_tickets.html' limit = 10 def init_with_context(self, context): self.children = Ticket.objects.order_by('-date_add')[:self.limit]
- Optionally you can add customizable module settings and content which will be seen in administration interface.
For customizable settings
settings_formshould be set, alsosettings_dictandload_settingsmethods should be implemented. For customizable content itemschild_form,child_nameandchild_name_pluralshould be set, alsostore_childrenshould returnTrue. You can validate loaded from database children in__init__method.

Example of LinkList dashboard module which has custom settings and editable list of links:
class LinkList(DashboardModule): title = 'Links' template = 'jet.dashboard/modules/link_list.html' layout = 'stacked' children = [] settings_form = LinkListSettingsForm child_form = LinkListItemForm child_name = 'Link' child_name_plural = 'Links' def __init__(self, title=None, children=list(), **kwargs): children = list(map(self.parse_link, children)) kwargs.update({'children': children}) super(LinkList, self).__init__(title, **kwargs) def settings_dict(self): return { 'layout': self.layout } def load_settings(self, settings): self.layout = settings.get('layout', self.layout) def store_children(self): return True def parse_link(self, link): if isinstance(link, (tuple, list)): link_dict = {'title': link[0], 'url': link[1]} if len(link) >= 3: link_dict['external'] = link[2] return link_dict elif isinstance(link, (dict,)): return link class LinkListSettingsForm(forms.Form): layout = forms.ChoiceField(label='Layout', choices=(('stacked', 'Stacked'), ('inline', 'Inline'))) class LinkListItemForm(forms.Form): url = forms.CharField(label='URL') title = forms.CharField(label='Title') external = forms.BooleanField(label='External link', required=False)
Create Module Template
Create template at path specified in module class. Module instance is passed to template as module variable
so you can get data directly from it.
{% load humanize %} <ul> {% for ticket in module.children %} <li> <span class="float-right"> <span class="dim"> {{ ticket.date_add|naturalday }} <span class="icon-clock tooltip" title="{{ ticket.date_add }}"></span> </span> </span> {% if ticket.forwarded %} <span class="icon-tick" style="color: #8ecb8e;"></span> {% else %} <span class="icon-cross" style="color: #dba4a4;"></span> {% endif %} <a href="{{ ticket.get_admin_url }}">{{ ticket.name }}</a> </li> {% empty %} <li> Nothing to show </li> {% endfor %} </ul>
Add Module Views (Optional)
If your dashboard module needs to have own views you can register them the following way and store for example
in dashboard_modules_views.py file inside your application:
from django.conf.urls import url from django.contrib import messages from django.shortcuts import redirect from jet.dashboard import dashboard from core.utils.utils import DatabaseManager def update_database(request): database_manager = DatabaseManager() database_manager.update_database() messages.success(request, 'Database was successfully updated') return redirect(request.META.get('HTTP_REFERER')) # This method registers view's url dashboard.urls.register_urls([ url( r'^update_database/', update_database, name='update-database' ), ])
You should import this file before dashboard urls have been imported in you main urls.py file.
from django.conf import settings from django.conf.urls import include, url from django.contrib import admin # Import dashboard module views from core import dashboard_modules_views urlpatterns = [ url(r'^admin/', include(admin.site.urls)), url(r'^jet/', include('jet.urls', 'jet')), url(r'^jet/dashboard/', include('jet.dashboard.urls', 'jet-dashboard')), ... ]
After that you can reverse url to module’s view this way:
{% url "jet-dashboard:update-database" %}
Dashboard API
This page describes the API of the dashboard and dashboard modules.
Dashboard
-
class
jet.dashboard.dashboard.Dashboard(context, **kwargs)¶ Base dashboard class. All custom dashboards should inherit it.
-
available_children= None¶ Dashboard Modules (widgets) that user can add to dashboard at any time
List of dashboard module classes
-
children= None¶ Dashboard Modules (widgets) that dashboard is filled with, when the user open it for the first time
List of dashboard module instances
-
columns= 2¶ Number of columns in which widgets can be placed
-
init_with_context(context)¶ Override this method to fill your custom Dashboard class with widgets. You should add your widgets to
childrenandavailable_childrenattributes.Usage example:
from django.utils.translation import ugettext_lazy as _ from jet.dashboard import modules from jet.dashboard.dashboard import Dashboard, AppIndexDashboard class CustomIndexDashboard(Dashboard): columns = 3 def init_with_context(self, context): self.available_children.append(modules.LinkList) self.children.append(modules.LinkList( _('Support'), children=[ { 'title': _('Django documentation'), 'url': 'http://docs.djangoproject.com/', 'external': True, }, { 'title': _('Django "django-users" mailing list'), 'url': 'http://groups.google.com/group/django-users', 'external': True, }, { 'title': _('Django irc channel'), 'url': 'irc://irc.freenode.net/django', 'external': True, }, ], column=0, order=0 ))
-
DashboardModule
-
class
jet.dashboard.modules.DashboardModule(title=None, model=None, context=None, **kwargs)¶ Base dashboard module class. All dashboard modules (widgets) should inherit it.
-
ajax_load= False¶ A boolean field which specify if widget should be rendered on dashboard page load or fetched later via AJAX.
-
child_form= None¶ A
django.forms.Formclass which may contain custom widget child settings, if it has any. Not required.
-
child_name= None¶ Child name that will be displayed when editing module contents. Required if
child_formset.
-
child_name_plural= None¶ Same as child name, but plural.
-
collapsible= True¶ Specify if module can be collapsed.
-
contrast= False¶ A boolean field which makes widget ui color contrast.
-
deletable= True¶ Specify if module can be deleted.
-
draggable= True¶ Specify if module can be draggable or has static position.
-
init_with_context(context)¶ Allows you to load data and initialize module’s state.
-
load_settings(settings)¶ Should be implemented to restore saved in database settings. Required if you have custom settings.
-
post_content= None¶ HTML content that will be displayed after widget content.
-
pre_content= None¶ HTML content that will be displayed before widget content.
-
settings_dict()¶ Should be implemented to save settings to database. This method should return
dictwhich will be serialized usingjson. Required if you have custom settings.
-
settings_form= None¶ A
django.forms.Formclass which may contain custom widget settings. Not required.
-
store_children()¶ Specify if children field should be saved to database.
-
style= False¶ Optional style attributes which will be applied to widget content container.
-
template= 'jet.dashboard/module.html'¶ Path to widget’s template. There is no need to extend such templates from any base templates.
-
title= ''¶ Default widget title that will be displayed for widget in the dashboard. User can change it later for every widget.
-
title_url= None¶ Specify title url.
Noneif title shouldn’t be clickable.
-
Contributing
Django JET is open-source and every member of the community can contribute to it. We are happy to see patches and improvements with Django JET. But please keep in mind that there are some guidelines you should follow.
Requirements
- Git master branch should always be stable
- All pull requests are made to git dev branch
- Non AGPL compatible code is not eligible for inclusion
Guidelines For Reporting An Issue/Feature
So you’ve found a bug or have a great idea for a feature. Here’s the steps you should take to help get it added/fixed in Django JET:
First check if there’s an existing issue/pull request for this bug/feature. Issues can be found here https://github.com/geex-arts/django-jet/issues, PRs here https://github.com/geex-arts/django-jet/pulls
If there isn’t one there, please add an issue. The ideal report includes:
A description of the problem/suggestion
How to reproduce the bug
If relevant including the versions of your:
- Python interpreter
- Django
- Django JET
- Optionally of the other dependencies involved
It would be great if you also make a pull request which solves your issue
Guidelines For Contributing Code
If you’re ready to contribute back some code/docs, the process should look like:
- Fork the project on GitHub into your own account
- Clone your copy of Django JET to a separate folder
- Install it into your demo project using
pip install -e PATH_TO_CLONED_JET - Make a new branch in git & commit your changes there
- Push your new branch up to GitHub
- Again, ensure there isn’t already an issue or pull request out there on it. If there is and you feel you have a better fix, please take note of the issue number and mention it in your pull request
- Create a new pull request (based on your branch), including what the problem/feature is, versions of your software and referencing any related issues/pull requests
In order to be merged into Django JET, contributions must have the following:
- A solid patch that:
- is clear
- works across all supported versions of Python/Django
- follows the existing style of the code base (mostly PEP-8)
- Desirably a test case that demonstrates the previous flaw that now passes with the included patch
- If it adds/changes a public API, it must also include documentation for those changes
- Must be appropriately licensed (see requirements)
If your contribution lacks any of these things, they will have to be added by a core contributor before being merged into Django JET proper, which may take time to get to.
Contribution Translations
If you want to add new translations locale, please do not use automatic Django locale generation, because it will produce files with missing JS strings and duplicates. Instead copy the following well formatted “en” files to your new locale folder:
- jet/locale/LOCALE/LC_MESSAGES/django.mo
- jet/locale/LOCALE/LC_MESSAGES/djangojs.mo
- jet/dashboard/locale/LOCALE/LC_MESSAGES/django.mo
- jet/dashboard/locale/LOCALE/LC_MESSAGES/djangojs.mo
Contribution Styles/Javascript/Translations
Javascript/CSS/Translations need to be built each time after updating. For this you need Node and Gulp. It’s out of the scope of this tutorial to go into details, but you should find lots of useful references on how to install it.
Node is needed for Gulp, so install it using your system package manager:
apt-get install -nodejs
# or
yum install nodejs
# or
brew install node
# ...
Now you are able to install Gulp globally:
npm install --global gulp-cli
Change your working directory to Django JET where package.json and gulpfile.js are located and
install Gulp dependencies:
npm install
Now you are ready for contribution. Run Gulp from JET’s directory to build all styles/scripts/locales and start watching for changes (gulp will rebuild files as soon they change):
gulp
Or if you want just to perform a single build without watching for changes run:
gulp build
Building produces the following files:
- CSS files for each theme:
- jet/static/jet/css/themes/THEME_NAME/base.css
- jet/static/jet/css/themes/THEME_NAME/jquery-ui.theme.css
- jet/static/jet/css/themes/THEME_NAME/select2.theme.css
- CSS for other JS libraries used in JET – jet/static/jet/css/vendor.css
- Combined JS scripts of JET – jet/static/jet/js/build/bundle.min.js
- Localization files for JS libraries:
- jet/static/jet/js/i18n/jquery-ui/
- jet/static/jet/js/i18n/jquery-ui-timepicker/
- jet/static/jet/js/i18n/select2/
- Compiled Django localizations:
- jet/locale/LOCALE/LC_MESSAGES/django.mo
- jet/locale/LOCALE/LC_MESSAGES/djangojs.mo
- jet/dashboard/locale/LOCALE/LC_MESSAGES/django.mo
- jet/dashboard/locale/LOCALE/LC_MESSAGES/djangojs.mo
You should commit generated build files together with sources.
Contribution Documentation
If you update documentation files, you can build the html files (this is not needed with a pull-request,
but you might wanna check how documentation will look like locally). To do so change your working directory
to docs/ inside JET and run:
make html
docs/_build/html/ folder will contain all html files including starting index.html.
License
Django JET has two kinds of licenses: open-source (AGPLv3) and commercial. Please note that using AGPLv3 code in your programs make them AGPL compatible too. So if you don’t want to comply with that we can provide you a commercial license (visit Home page). The commercial license is designed for using Django JET in commercial products and applications without the provisions of the AGPLv3.
Resources
- Home page: http://jet.geex-arts.com/
- Live Demo: http://demo.jet.geex-arts.com/admin/
- libi.io http://libi.io/library/1683/django-jet
- PyPI: https://pypi.python.org/pypi/django-jet
- Support: support@jet.geex-arts.com