The DutchX is a fully decentralized trading protocol that allows anyone to add any trading token pair.
It uses the Dutch auction principle to prevent the problems that exchanges are experiencing (such as front running, issues with low liquidity, and third party risk), thereby creating a more fair ecosystem for everyone to use.
The DutchX is governed by a series of smart contracts deployed on the Ethereum Blockchain that allow peer-to-peer trades between users applying a Dutch auction mechanism without the need for intermediaries.
It is fully on-chain and permissionless. There is no restriction besides the fact that tokens traded on the DutchX must be ERC20 compliant.
It was developed by Gnosis Limited as infrastructure of the Ethereum Blockchain. It is upgradeable and those powers are retained by the [dxDAO](https://dutchx.readthedocs.io/en/latest/dxDAO.html). Gnosis Limited is not part of the dxDAO and retains absolutely no miscellaneous powers over or to affect the DutchX.
Learn more about DutchX
Here are some interesting links to learn all about the mechanisms of the DutchX:
- Small introduction to the features of DutchX: https://ethresear.ch/t/dutchx-fully-decentralized-auction-based-exchange/2443
- Blog with information about DutchX: https://blog.gnosis.pm/tagged/dutchx
Documentation for the Smart Contracts
To get a deeper knowledge about the DutchX mechanisms, and the math behind them,
check out the DutchX Documentation for the smart contracts.
Decentralized trading protocol for ERC20 tokens
The DutchX has two phases (for each token pair):
(1) the batching before an auction starts (for sellers to deposit their tokens)
(2) and the running Dutch auction (when bidders are active).
Sellers can submit the tokens they would like to sell at any point in time. These tokens will automatically be placed into the next available auction as no tokens can be submitted into the running auction.
Bidders are only active during the running of an auction.
There is always only one auction per token pair running (with opposite auctions running simultaneously). All auctions run independent of one another.
When an auction for a given token pair begins, the initial price is set at twice the final closing price of the previous auction (of the same pairing). From this initial price, the price falls according to a decreasing function. During the auction bidders can submit their bid at any point in time at that current price (remember: the price function is decreasing). The bidders are guaranteed the minimum amount of tokens at the price point at which they took part. Bidders can submit bids until the auction closes (where bidVolume x price = sellVolume). Note that all bidders receive the same final and therefore lowest price. Bidders should therefore take part where the current price of the auction reflects their maximum willingness to pay.
Since bidders will only pay the final market clearing price, which is either at their bid or lower, they have an economic incentive to submit the bid at their highest willingness to pay.
Check the section on interfaces for ways to participate.
Liquidity contribution
On the DutchX Protocol, liquidity contribution is levied on users in place of traditional fees.
These do not go to anyone (not to Gnosis, or any other party):
Rather, the liquidity contribution is committed to the next running auction for the respective auction pair and are thus redistributed to all users of the DutchX protocol! This mechanism helps boost volume and use of the protocol.
Your individual liqudity contribution depends on your amount of Magnolia token held as a percentage of the entire Magnolia market (it is a step function):
=>10% of Magnolia held –> 0.1% liquidity contribution
1%-10% of Magnolia held –> 0.2% of liquidity contribution
0.1%-1% of Magnolia held –> 0.3% of liquidity contribution
0.01%-0.1% of Magnolia held –> 0.4% of liquidity contribution
anything below 0.01% of Magnolia held –> 0.5% of liquidity contribution.
The liquidity contribution could also be positive for a trader that has lower contribution than other traders in the same pair!
Magnolia
Magnolia (MGN) tokens are intrinsic to the DutchX and lower the default liquidity contribution on the DutchX Protocol.
MGN are automatically generated and credited to users: 1 MGN is credited for trading 1 ETH worth of any whitelisted token pair (and of course trading any fraction of ETH generates the same fraction of MGN).
MGN are locked by default into a smart contract for which the user’s address is associated with a particular balance.
A user may unlock all Magnolia associated with an address at once and after 24 hours have passed, these tokens may be transferred to another address. The new holder must then lock their tokens again (or a portion thereof) in order to use the Magnolia balance for liquidity contribution reduction.
Magnolia are inflationary, which should incentivise early adoption and continuous use of the DutchX protocol.
Magnolia are not needed to participate as a seller or bidder on the DutchX.
Whitelist
Whitelisted tokens are tokens that generate Magnolia when traded in a whitelisted pair. Non-whitelisted tokens can still be traded (if added to the DutchX protocol), but will not generate Magnolia! The idea of whitelisted tokens is to maintain MGN’s benefit: no token should be traded with the sole intention to create Magnolia and benefit from liquidity contributions (and others’ liquidity contribution to be hence reduced).
Whitelisting is - as per 14 July 2019, 12GMT noon - determined by the dxDAO.
During the Vote Staking Period, Gnosis whitelisted any tokens that were added to the protocol, which had a reasonable pricefeed AND were also part of this suggested whitelist.
This suggested list had been put together based on a legal assessment of token characteristics, which suggest that legislation of major jurisdictions regulating securities, financial instruments or similar and/or mandating customer due diligence procedures do not apply to them at this point in time for the purposes of the DutchX protocol.
Regardless of being whitelisted, tokens will still first need to be added to the protocol before trading is possible.
Note that whitelisted tokens are not the same as listed and traded tokens. A whitelisted token has the potential to create Magnolia tokens (used for reduction of liquidity contribution) if traded in a whitelisted pair. Tokens can be listed for trading on the DutchX protocol, albeit not whitelisted (and hence trades do not generate Magnolia); on the flip side, tokens could in the future also be whitelisted by the dxDAO, however not listed/traded on the DutchX protocol.
- Check out this API endpoint on actually whitelisted tokens.
- Check out this API endpoint on added tokens to the DutchX protocol.
GNO
There is no special use case for GNO. It is treated as any other ERC20 token.
OWL
In version DutchX 2.0, OWL is part of the DutchX Protocol:
What is OWL?
What is OWL used for on the DutchX?
- Users may use OWL to settle half of their liquidity contribution. The rest is settled in the token they are taking part in.
- This does not affect the reduction of your liquidity contribution. The reduction happens first, then half may be settled in OWL.
- 1 OWL is treated as an equivalent of 1USD worth of fees.
- The OWL used will not go to any party but will instead be burnt (consumed).
*An example:
- user takes part with 100A, where A is any ERC-20 token listed on the DutchX
- liquidity contribution is calculated, e.g. 0.3%
- total fees are 0.3A
- user chooses to settle half in OWL
- calculation of 0.3A into ETH then into USD (e.g. 0.6USD)
- 0.3 OWL is deducted (1USD = 1OWL)
- remainder of 0.3USD (=0.15 A) is taken from the order
- 99.85A is placed for the user as his/her order. Note that 0.3OWL are burnt and 0.15A go into the next auction as an extra sellVolume*
How is it used on the DutchX?
- OWL is completely optional to use. You must set an allowance for the smart contract for OWL.
- OWL is then deducted automatically (available using the same address you are trading from).
- OWL are, however, not needed to participate as a seller or bidder on the DutchX; its use is completely voluntary.
Why would one want to use OWL?
- You might have OWL as you used your GNO to generate it.
- You might be able to acquire it for less than 1USD worth and would hence reduce your liquidity contribution!
How does one get OWL?
- OWL is generated by locking GNO (of course you get the GNO back) during special generation times.
- Check this website to see if there is an ongoing generation or to see past generations and claim back your GNO if you haven’t done so already.
- OWL may be traded on secondary markets or OTC.
Auctioneer Powers
What are auctioneer powers?
On smart contract level, the DutchX has a number of clearly defined modifiable parameters that can be changed. The auctioneer has the powers over the following (complete list):
- De- & whitelisting of tokens that generate Magnolia
- Changing the threshold to start auctions
- Changing the threshold to add tokens to the DutchX protocol
- Setting a new external ETH/USD price feed
- Updating the DutchX contract logic, and
- Setting a new entity able to modify the contract parameters (the ‘auctioneer’).
Why are auctioneer powers needed?
The DutchX was designed to be a fully-decentralized trading protocol. This means that changes to the DutchX protocol must also be decided in a decentralized fashion.
Specifically, however, there are two reasons that make upgrade by hard-forks only (the alternative to an owner) not very user friendly:
- Some parameters need more frequent updating (such as the whitelisting mentioned)
- One of the value propositions of the DutchX is to be one global liquidity pool. If there was not a possibility to upgrade the master logic, one would risk splitting liquidity with every upgrade.
Who holds auctioneer powers to DutchX 1.0?
In the first version of the DutchX smart contracts, these auctioneer powers were relinquished. This meant that neither Gnosis nor anyone else, had the ability to alter the contracts parameters or logic.
Who holds auctioneer powers to DutchX 2.0?
The primary aim with this deployment was to provide the dxDAO with the auctioneer powers of the DutchX. The following parameters may be modified by successful proposal in the dxDAO.
Some more details on the auctioneer powers:
De- & whitelisting of tokens that generate Magnolia
Whitelisted tokens - if they aretraded in a whitelisted pair - generate Magnolia, which can be used to reduce liquditiy contribution.
Read above about Magnolia, Whitelist and Liquidity contribution.
- Whitelisting (and de-whitelisting) can happen for each token individually or for an entire list of tokens
- It is not necessary that the token is either listed for trading or actively traded
- The auctioneer calls the function updateApprovalOfToken on the DutchExchangeProxy contract which is implemented in the Token Whitelist contract
- There is no time lag to the execution of this function
- It applies immediately and is effective upon users claiming their tokens of whitelisted tokens (if traded in a whitelisted pair), also if the auction had finished prior to triggering this function
Changing the threshold to start auctions
Once this defined sellVolume (deposit) threshold is reached by both opposite auctions (each), and the prior auctions have finished, the new auctions commences.
- The auctioneer calls the function updateThresholdNewAuction of the Master Contract (via the Proxy)
- At the time of writing, this value is set at USD1000 (Technical note: In the contract 1 USD is represented as 1e18 uint256. E.g. USD1000 = 1000000000000000000000)
- There is no time lag to calling this function
- It applies to all auctions (no individual change possible) that have not started (also if currently waiting for funding)
Changing the threshold to add tokens to the DutchX protocol
- Once this defined sellVolume (deposit) threshold is reached, the first ever auction for this pair will commence. (Technical note: only one side has to reach the threshold if after 24h the thresholds have not been reached)
- The very first auction for an entirely new token on the DutchX has to be with WETH, where the defined threshold has to be reached solely on the WETH sellVolume.
- For the very first aucion of another token pair (without WETH), the defined threshold can be reached through the combined sellVolumes on both sides of the auctions.
- The auctioneer calls the function updateThresholdNewTokenPair of the Master Contract (via the Proxy)
- At the time of writing this value is set at USD1000 (Technical note: In the contract 1 USD is represented as 1e18 uint256. E.g. USD1000 = 1000000000000000000000)
- There is no time lag to calling this function
- It applies to all auctions (no individual change possible) that have not started (also if currently waiting for funding)
Setting a new external ETH/USD price feed
The DutchX needs an ETH-USD price feed for two purposes: (i) to calculate the thresholds mentioned above as well as (ii) calculating the liquidity contribution which can be settled in USD.
- The auctioneer calls the function initiateEthUsdOracleUpdate on the DutchExchangeProxy contract which is implemented in the EthOracle Contract
- There is a 30-day time lag for execution of this function
- After the 30 days are up, the auctioneer or anyone else calls the function updateEthUSDOracle in the same contract
- A slightly more technical side-note: though updateETHUSDOracle may be triggerd by anyone, only the auctioneer can commence the 30 day time period.
Updating the DutchX contract logic
Due to the proxy architecture of the smart contracts, the auctioneer may update the entire DutchX Mastercontract, hence being able to change any part of the DutchX logic (not only the modifiable parameters mentioned here), likely without the need for integrations to be renewed and deposits to be withdrawn.
- The auctioneer calls the startMasterCopyCountdown function on the DutchExchangeProxy contract which is implemented in the DxUpgrade contract
- This triggers a 30-day time window before the change is executed
- A slightly more technical side-note: though updateMasterCopy may be triggerd by anyone, only the auctioneer can commence the-30 day time period.
- The function can be called again during the time window effectively overwriting the prior change
- The triggering can also be effectively cancelled by calling the same function with the current address as the new address.
Setting a new auctioneer
The auctioneer holds the power to update itself.
- The auctioneer calls the updateAuctioneer function on the DutchExchangeProxy contract which is implemented in the AuctioneerManaged contract
- There is no time lag for its execution when triggering this function.
Price Oracle
The DutchX smart contract has one on-chain price oracle function, which is always the weighted average price of the last ended auction of the Token with respect to ETH. Weighted average by volume of the two opposite auctions (Token-ETH and ETH-Token). It can be used by other smart contracts. Obviously it’s not updated as often as in other exchanges but is hence also much less volatile. Check out the function in the code.
For various applications, this price feed might not be sufficient. More so, as it only consists of data of one auction pair, it might not only be gamable, its accuracy might also depend on the volume of that particular auction pair.
Taking a median may remedy these problems. Note that the median of a number of auctions on the DutchX is taken over time (rather than across many platforms at the same time), which may make it not as usable for some finance related decentralized applications, which need accurate prices by the second.
The price oracle smart contract, however, might be very useful for other applications, such as the calculation of the token value used on the vote staking interface of the dxDAO.
How does this DutchXPriceOracle work?
It takes the median of the last 9 auctions of that token pair on the DutchX, if they have run consecutively (i.e. constant liquidity is important), else it will not return a price feed.
- This price feed also only works for tokens with (W)ETH
- There are two functions: getPrice and getPriceCustom
- getPrice only works for actually whitelisted tokens
- getPriceCutstom allows customization (for other tokens).
Check out this Price Oracle API endpoint.
Check out the code.
Listing a token
Some information that you might find relevant when thinking about adding a token to the DutchX protocol:
- It is completely permissionless and decentralized: anyone can add a token pair based on the same rules of the smart contract
- No central entity decides on which tokens become tradable!
- It is completely free (gas costs, of course, incur)
- If a token is available to trade on the DutchX it does not necessairly imply that there is enough liquidity to actually be traded
- A token that is available to trade is not the same as a whitelisted token
- Gnosis Ltd does not decide on which tokens become tradable on the DutchX open protocol!
The theory to list
- A new token always has to be added as a pair with WETH
- For this, the first auction that is initiated has to be funded with an equivalent of 1k USD worth of WETH
- The initiator has to set a price for WETH-NewToken; the auction will start at twice this price
- There is an incentive to set the correct price: if it is too low, the initiator sells their WETH below marketprice. if it is too high, the auction will run longer.
- The auction starts after 6 hours
- No need to add two sides
- Someone should be ready to bid
- Adding is free: the funding is not “invested” or “lost”, it is merely exchanged
- After this, auction can run as defined in the smartc contracts:
- Opposite auctions start and run at the same time (i.e. A-WETH (sellToken is A, buyToken is WETH) & WETH-A (sellToken is WETH, buyToken is A))
- There is always only one auction running at the same time for a particular pair
- Subsequent auctions only start if the sellVolume of both opposite auctions is each above USD 1k
Some benefits of being traded on the DutchX
- Reduces reliance on centralized exchanges; the DutchX is non-custodial in nature
- Open: Incentivises building on top of a permissionless protocol, low barriers to entry and set and unbiased rules to be enforced by the dxDAO
- A fair price finding mechanism and a redistribution of paid fees to the users of the DutchX
- Fully on-chain: smart contracts can interact directly because there is no need for off-chain receipt/signing of a transaction
- The first fully decentralized & upgradable token trading protocol
- Particularly great for low-liquidity tokens due to the duration of the batching of the sell Volume and the single clearing price
- Don’t forget that the liquidity contribution retained in the ecosystem remain allocated to the same token pair. These contributions are added to the sell side of the next auction without any dilution with other pairs on the DutchX
- Provides an reliable on-chain price oracle
- There are several interfaces available for technical and non-technical traders
Liquidity
Please be aware: Having listed, does not mean that the token is traded. For this - of course - sufficient liquidity is needed.
- It is recommended that the lister initially also ensures that there is enough liquidity for the listed token pair
- It is a two-sided market place and for the network effects to work, the market has to function first
- There are two relatively easy options available right now:
Availabilty of different pairs
- Each token has to first be added as a pair with WETH
- Two tokens that are already available with WETH on the DutchX, may be initiated with one another
- For this, no price setting is needed (as both are available with WETH)
- For the listing of a pair that is not WETH, the accumulated sell Volume amount of both opposite auctions has to be at least 1K USD.
Technical steps
- Read the code here
- Check the Developer Guide
DutchX as an open protocol
The DutchX is 100% open source and has been built as a community effort to improve the problems that current centralized and decentralized platforms face.
The DutchX is an ecosystem of interfaces, on chain apps, and smart contracts that create a common liquidity pool that all users can benefit from.
 Open Protocol
Smart contracts
The core of the project is the Smart Contracts, which hold the logic described in the Smart Contract Documentation, and can be found in https://github.com/gnosis/dx-contracts
The smart contracts are the base of this open protocol, and anyone can build tools, applications and interfaces on top of them, making the DutchX a unique and fair protocol to exchange tokens.
The main contracts are:
- DutchExchange.sol: This contract contains all the Dutch Auction mechanisms. It includes the logic for adding a new token pair, posting a sell order, or a buy order.
- DutchExchangeProxy.sol: This contract acts as an intermediary between the users and the core contract. This contract is the one holding the data of the DutchX, so it’s the one we should use to interact with the DutchX. Please, read more about the Proxy Pattern for Smart Contracts in this Solidity DelegateProxy post.
Security was the main focus on the design and implementation of the DutchX. Check out this Security in DutchX document for more information.
Services, API, Bots and CLI
Another important piece of the DutchX is the DutchX services project.
This project uses the smart contract as a base layer, and builds some repositories, services and utilities on top of it.
This project may be split into different smaller ones in the future.
It has the following parts:
- Repositories: Abstraction on top of the smart contracts to make it easier
to interact with them. For example, they add the same validations that are going
to be performed in the smart contract, so they can throw more meaningful errors,
instead of the
revertthat smart contracts throw by default. - Services: Some use cases built on top of the DutchX. The CLI, Bots and API use this layer to perform all its tasks.
- API: REST Api that provides a simpler access to the data in the DutchX. Check out the API documentation
- CLI: The Command Line Interface is a very useful tool to invoke some
operations in the smart contracts such as posting sell/buy orders, and
extracting information from them (for example getting the status of a token
pair).
It can be used in test nets like
rinkebyor inmainnet. Learn more about the CLI page. - Bots: The bots are a series of small applications that run in the background and have a scoped task to fulfill. They interact with the DutchX performing some operations. For example the liquidity bots watch some markets and provide liquidity, ensuring that auctions run continuously and that prices don’t drop below market price. Learn more about bots in the following guide. Run your own bots
Contribute
The community is what makes the DutchX great.
Become part of it and contribute to create new interfaces, improve tools, and spread the word.
Meet the community on Github and our Gitter channel.
dxDAO
The dxDAO is a community-governed DAO with total control over the DutchX trading protocol.
The dxDAO is not a Gnosis DAO. Gnosis is not part of the dxDAO. Although the technical development of the dxDAO is a project of Gnosis Limited with the support of DAOstack based on DAOstack’s Framework, the contribution of the Companies was limited to providing the technical basis for the dxDAO, including its one month initialisation phase, which ran from 29 May to 28 June 2019. Gnosis Limited did not participate in the initial voting rights’ distribution in the dxDAO.
This readthedocs document aims to make it easier for interested third parties to understand the DutchX and dxDAO data as critical infrastructure of the Ethereum blockchain ecosystem
GNOSIS HAS STEPPED BACK FROM THE DXDAO
Vote Staking Period was completed on 28th of June 2019.
Have a look at the outcome: Overview of the dxDAO Reputation Distribution
Governance has started, so make sure to read: How to submit a proposal and vote in the dxDAO
–> Anyone can do this, not only Reputation holders.
–> You must read the participation agreement
Still reading?
- Read the dxDAO whitepaper
- Check out Dune Analytics’ Dashboard
- Former vote staking interface Stake for your vote
Catch up on the topic
- Epicenter Podcast
- Update on the Bug Bounty
- Test dxDAO bug bounty live
- Introducing the dxDAO
- A brief discussion of the protocol governing the dxDAO
- 2019 is the Year of the DAO
- THE dxDAO HAS AWOKEN
- dxDAO is based on DAOstack’s governance framework
- Check out another DAOstack DAO, the Genesis Alpha
Miscellaneous
Participation using ABI
- Stake using MEW/Mycrypto or any other ABI tools following this guide
Marketmakers
The DutchX is an open, decentralized trading protocol for ERC20 tokens using the Dutch auction mechanism to determine a fair value for the tokens.
The mechanisms used on the DutchX differ to orderbook-based exchanges. The DutchX has a number of inherent benefits for high volume traders. Check out some details in this slide deck:
Looking for Marketmakers?
In case you would like technical help in listing your token to the DutchX Protocol and run minimal liquidity bots, we have collected a handful of market makers that are able to facilitate this. We have been in touch with all of them, have explained the exact mechanism and are confident that they are technically able to interact with the DutchX protocol. We have no contractual relations and do not know what proposal they will make and which services they include. In no particular order, feel free to reach out to:
- Keyrock: write an to info@keyrock.eu with subject Market Making for DutchX + [Your Name]
- POINT95 Global Trading Limited: write an email to bd@p95g.com
- Prycto: write an email to DutchX@prycto.com
Interfaces
TL;DR
- Graphical User Interface for Sellers slow.trade
- Graphical User Interface for Bidders fairdex.net
- CLI
- API
DutchX as an open protocol
The DutchX is 100% open source and has been built as a community effort to improve the problems that current centralized and decentralized platforms face.
The DutchX is an ecosystem of interfaces, on chain apps, and smart contracts that create a common liquidity pool that all users can benefit from.
Open Protocol
Available interfaces
Interacting with the blockchain directly (or via the command line interface), users/traders are technically enabled to trade any pair that is listed on the DutchX protocol.
For users not quite as tech-savvy to interact with the blockchain directly, there are at least two graphical user interfaces built on top of the protocol by two independent and separate teams. These interfaces (platforms) allow direct interaction with the DutchX protocol - one single global liquidity pool, which these interfaces access.
The two graphical user interfaces are in nature very different as one allows participation as a seller in an auction and the other allows participation as a bidder in an auction. Both interfaces are mainly provided in a centralized manner (however, the teams are planning both to publish on IPFS/ENS).
The two graphical user interfaces are an ideal gateway for users to generate Magnolia: users need a compatible wallet (like Metamask or the Gnosis Safe for example) with some ETH or any traded ERC20 token to start trading.
Seller interface
The slow.trade team has a Mainnet interface available at slow.trade. A rinkeby version - to test - is also available at slow.trade/rinkeby.
On slow.trade, the user is facilitated to take part as a seller, i.e. to deposit a token into an auction. The interface is extremely simple and a user can already take part by depositing at any point in time - the deposit gets automatically put into the next running auction. Slow.trade is - on purpose - kept simple, with little additional information.
It is recommended for users that do not have a price perception: no strategy is needed to take part!
Slow.trade is additionally useful for any user as it displays the Magnolia balance attached to a user’s address (which cannot be seen in the wallet as it is locked in a separate contract).
The project is open source, with this Github.
The team decides on which tokens to list on their interface (which may be only a subset of those tradable (of which only some might be whitelisted)).
Bidder interface
The bidder interface is available at fairdex.net. Switch between Mainnet and Rinkeby with your wallet provider.
This interface reflects more relevant data for bidders in particular:
Participating as a bidder requires more active participation (though made super simple via this interface). For one, bidders need to be active in moment of time that the price reflects their willingness to pay.
In fact, this is the best strategy for participation: participation at a higher price, the bidder is at risk to overpay and participation below, the bidder is at risk to not be able to take part in the auction. This is the ideal strategy due to the fact that in the end - at auction closing - all bidders pay the same final (lowest) price! Rather than getting anything back, the bidder obtains more of the token that he/she purchased. This in turn means: upon participation, the bidder knows the minimum amount that he/she will receive.
On top of this, actually, the user can claim already this amount (and then any additional amounts and the remainder also upon closing of the auction). Hence, a bidder has instant liquidity, where this is important.
In summary: the bidders need to have a defined willingness to pay!
The team decides on which tokens to list on their interface (which may be only a subset of those tradable (of which only some might be whitelisted)).
Command line interface (CLI)
For more tech-savvy users of the DutchX protocol, instructions to using the command line interface are available here.
The command line interface is token-agnostic.
Application programming interface (API)
Check out the API here, available for both mainnet and rinkeby.
This is a read-only (REST) version and returns a number of auction details. It is directly linked to the blockchain (other than token symbol, which shouldn’t be used for query: always use a token address!).
The application programming interface is token-agnostic.
ERC20 pooling contract for MGN
Disclaimer
Please note that due to the mechanism design of the DutchX MGN Pool, it is expected that when participating in the DutchX MGN Pool the remaining number of the deposited tokens, which may be reclaimed following the end of the trading period, will be significantly lower than the initially deposited number of tokens and may in fact be nil (0). It is therefore advised to only participate in the DutchX MGN Pool, if one wishes to accrue MGN and values such accrued MGN sufficiently high to justify the significant risk of losing all tokens initially deposited into the DutchX MGN Pool.
Status
The MGN pooling contract is no longer active
The remainer of this section is kept merely for information and open source re-use by interested parties.
Read the former Walkthrough
Purpose of the contract
The MGN pooling contract works on top of the DutchX trading protocol. The purpose is for anyone to be able to participate easily in trades on the DutchX in order to generate Magnolia. Users may participate in this pool with their funds, which they will reiceve back at the end of the trading period (or more precisely: the value of their deposit at the end of the pooling period, which may have increased or decreased). The user will also receive the share of their MGN that was generated using their funds.
Logic of the contract
- The contract is set to run a certain amount of time (one for WETH-Token and one for Token-WETH)
- The contract uses all funds to continuously take part (with all funds) in the sell side of the auction
- The contract claims back the receiving token after an auction has finished and takes part in the sell side of the opposite auction
- This process continues until the pre-defined time has been reached and an even number of auctions have been run
- Magnolia is generated based on the rules of the DutchX (the pair has to be whitelisted)
Users’ actions
As the purpose is easy participation for a user, only three actions have to be conducted:
- The user may deposit funds (one defined ERC20 token) at any point in time before the pooling time has ended (and may deposit more throughout time)
- The user may only claim back the deposited funds at the end of the pre-defined pooling time. Note that the funds may have been subject to price increases or decreases. Funds are received back in the same token the user deposited.
- The user may also claim their share of Magnolia (this is only possible at the end of the pooling period + 24hours later)
- The user does not pay gas for the trading activity
Application to any ERC20 token
- Note that the contract is open source and may be deployed by anyone (ERC20 token to be specified upon deployment)
- Note that the deployment is always launching two contracts, one represeting ERC20 - WETH and the other representing the WETH - ERC20 trading pair, so that the both auctions can get liquidty.
- Note that at the same time also a bot should be run that claims on behalf of the smart contract and triggers the next participation (this is the bot paying gas)
- Note that though this ensures sell-side liquidity, it is highly advised to ensure the bidder side has also sufficient liquidity to buy up the sell-orders
Code and audit
- MGN-Pooling smart contract Github Repo
- Script of automated participation bot
- Interface Repo
- Audit report
API
The API is an alternative and easier way to access the information on the smart contracts.
It was built to make the information more accessible, so it hides the barriers that a newcomer to Ethereum development may find.
The API is accessible for:
- Mainnet: https://dutchx.d.exchange/api
- Rinkeby: https://dutchx-rinkeby.d.exchange/api
The API provides a simple way to browse over all methods:
 API docs
You can also use the TRY button to test the endpoint:

The API is Open Source, so anyone can run it in its own server.
Also, this very cool Subgraph is available: https://thegraph.com/explorer/subgraph/infinitestyles/dutchx
Read only API
The API provides read-only access, because it’s not configured with private keys and is not involved in any transaction signing.
It just gets the information from the smart contracts.
Note: The API is provided for information purposes only and reads data from the DutchX trading protocol on the Ethereum Blockchain. We have no control over the transactions executed, attempted to be executed or erroneously executed via the DutchX trading protocol, which is permissionless. We do not give any guarantee that any displayed information is accurate. No assessment or selection is conducted as to the display of the executed, falsely executed or attempted transactions on the DutchX trading protocol. It is possible that this API displays tokens or features that are not compatible with the DutchX trading protocol, because transactions or listings have been made in error. Accordingly, it is not advised to rely on the data displayed on this API to assess the compatibility of an intended transactions with the DutchX trading protocol We do not accept any liability to you or anyone else for any losses of any nature resulting from any transactions made or action taken in reliance on the information contained on this API. All and any such responsibility is expressly disclaimed.
Integration with the API
For developers, it should be very easy to get information form the API, check out these examples:
CLI
The Command Line Interface is a very useful tool to trigger smart contract operations such as the following:
- Get the DutchX account balance for any account.
- Deposit or withdraw funds into/from your DutchX account balance.
- Check the state of a given token pair: Auction index, sell/buy volume, start time, estimated closing time, etc.
- Post a sell order or a buy order.
- Claim back your tokens once the auction has cleared.
- ..and many other useful operations.
It can be used both on testnets like rinkeby, or on mainnet.
Implementation of the CLI
The CLI logic is implemented in the DutchX Services.
How to run the CLI
1. Install docker
- Windows: https://store.docker.com/editions/community/docker-ce-desktop-windows
- Mac OS: https://store.docker.com/editions/community/docker-ce-desktop-mac
- For other platforms or more details: https://docs.docker.com/install/
2. Clone the CLI scripts
Open the Command Prompt or Terminal, and type in the following:
# Clone repo
git clone https://github.com/gnosis/dx-tools.git
cd dx-tools
Alternatively, you can download the ZIP file instead of cloning the git repository.
3. Create local.conf using local.conf.example
This step can be omitted if you plan to use the CLI for read-only operations.
IMPORTANT: Your mnemonic phrase will be required in order to link your wallet to the DutchX. Make sure you don’t share
this information and that you keep the local.conf file that you will create offline. If you don’t do this, you risk losing your funds! Never commit this to Github. If you don’t know how to get your mnemonic phrase, you probably should not continue.
Go to the folder where you downloaded the repository, create a copy of the local.conf.example file
and call the new
file local.conf.
Edit the DEFAULT_MNEMONIC and add your own secret mnemonic, which is the one from the account that will be used to sign
the transactions.
Additionally, in this file you can add any custom configuration. Note that by modifying only this file you can keep your CLI in sync with future changes.
NOTE: Thelocal.confis git ignored, so you can add your wallet config here.
4. Make sure the scripts are executable
# Allow the CLI script to be executed
chmod +x dutchx*
5. Network info: Review the list of tokens you want to use
NOTE: This step can be skipped if you don’t intend to list new tokens on the DutchX.
This step is relevant because the DutchX is an open protocol where anyone can list new tokens to trade.
Each network has the following configuration:
Check out the complete list of tokens listed on the DutchX here:
- Rinkeby:
- Mainnet:
- Kovan: Unlike
RinkebyandMainnet,Kovandoesn’t have a published API. To check all available markets, you must do so on smart contract level:- https://dutchx.readthedocs.io/en/latest/smart-contracts_addresses.html
6. Try the CLI
Run the help command to get a list of all available commands:
# Rinkeby
./dutchx-rinkeby -h
# Kovan
./dutchx-kovan -h
# Mainnet
./dutchx-mainnet -h
Start trading
Disclaimer
Reliance on the CLI is at your own risk and your full responsibility. We will not be liable to you for any loss or damage, whether in contract, tort (including negligence), breach of statutory duty, or otherwise. We will not be liable for loss of profits, sales, business, or revenue, business interruption, anticipated savings, business opportunity, goodwill or reputation or any indirect or consequential loss or damage.
DutchX trading process
To be able to trade, you have to add your own mnemonic phrase to the config.file, as stated on step 3 above.
Trading on the DutchX requires you to send your tokens to a smart contract, where the trading occurs. The whole trading process takes place as shown in the following image:
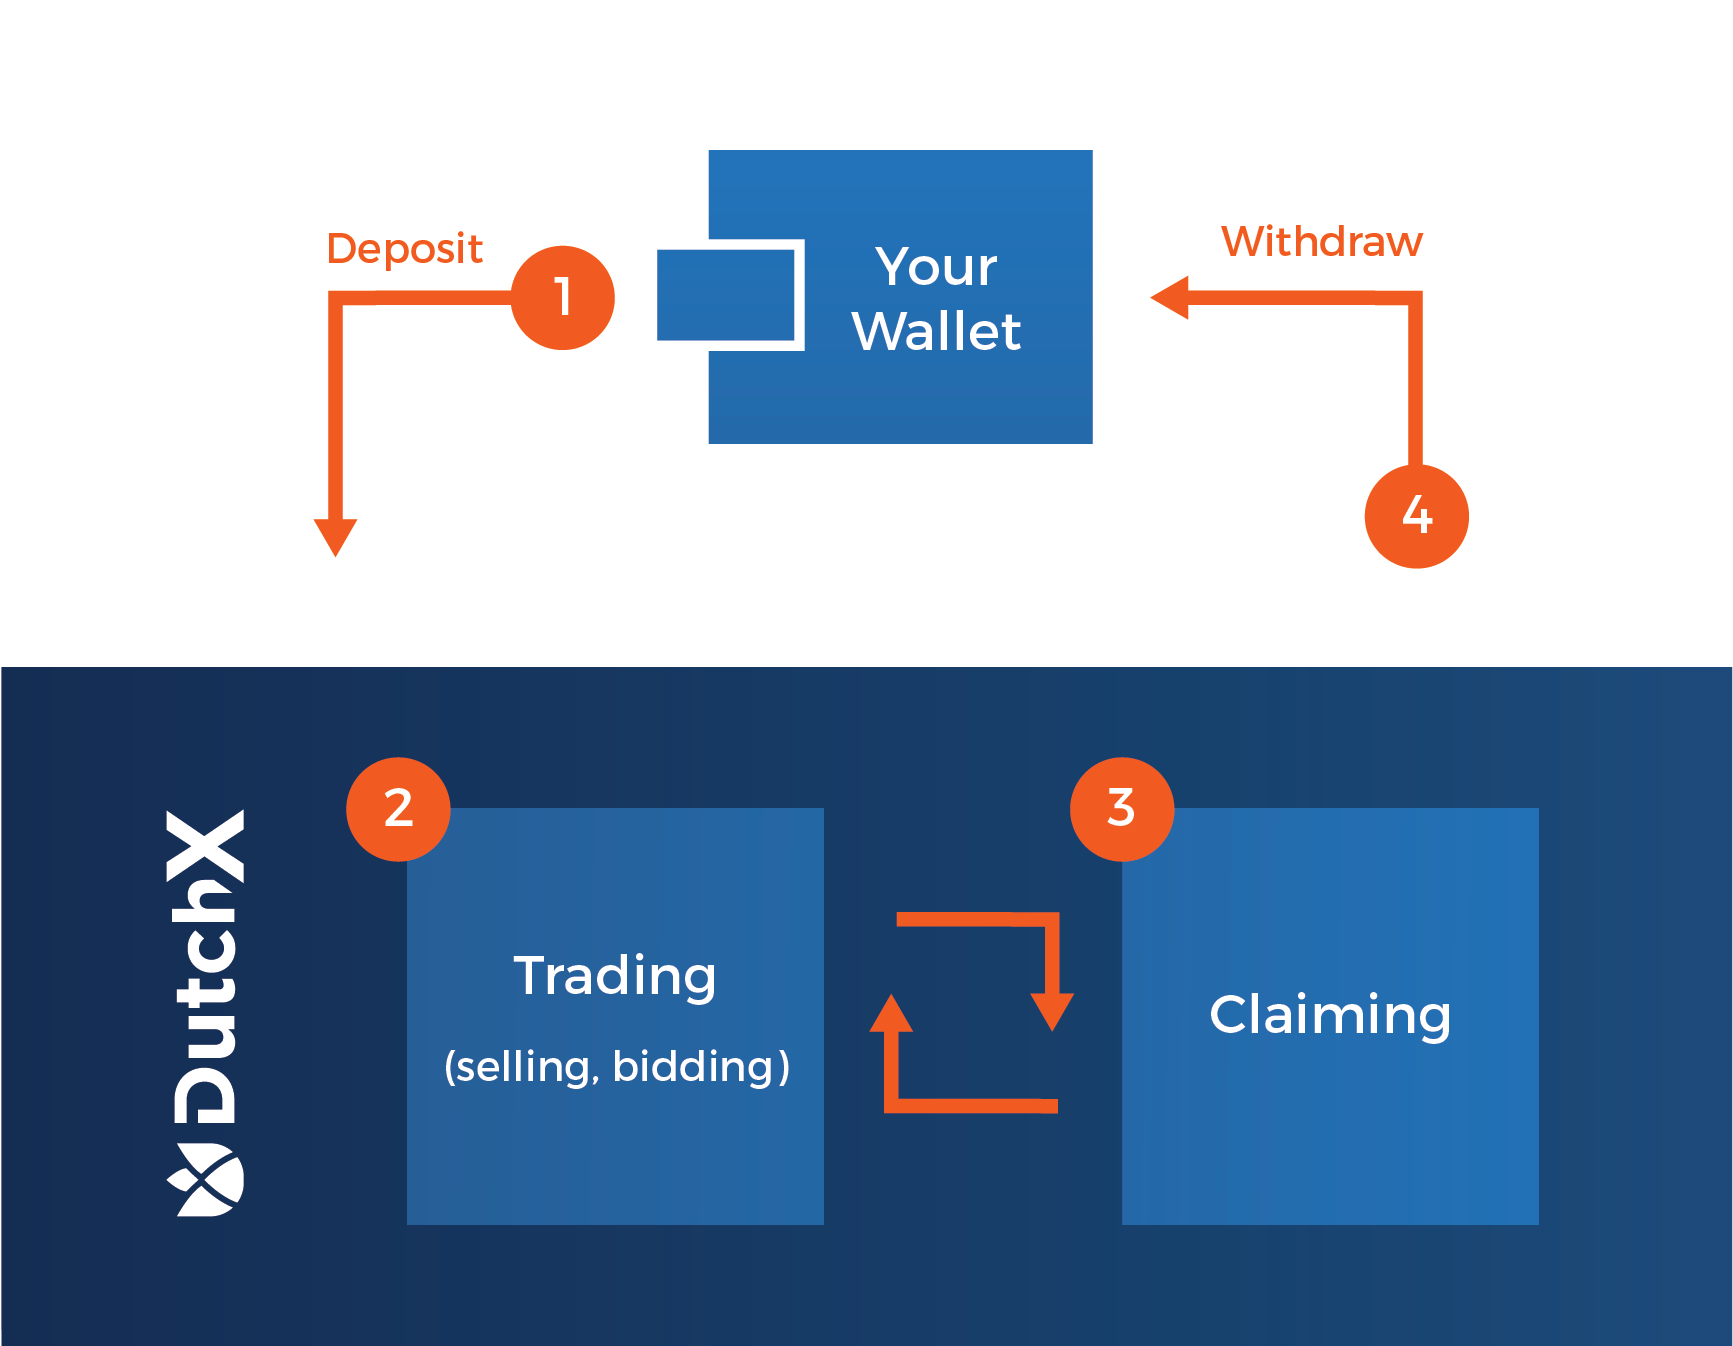
Before we start explaining each step in the image, we will use the balance command to make the process more clear.
All the commands used in this explanation will be for the Rinkeby Testnet. If you want to trade on the Ethereum Mainnet, use ./dutchx-mainnet instead of ./dutchx-rinkeby.
# Show the balance of the account inputed in the local.config file
./dutchx-rinkeby balances
# You will see the balances your balances displayed in a similar way as below:
INFO-cli ACCOUNT: "Your public Ethereum address" +427ms
INFO-cli BALANCE: 4.430652555999879 ETH +3ms
INFO-cli
INFO-cli Balances RDN (0x3615757011112560521536258c1e7325ae3b48ae): +941ms
INFO-cli - Balance in DX: 222.972178357604664181 +1ms
INFO-cli - Balance of user: 111.617365082280797714 +2ms
INFO-cli Balances WETH (0xc778417e063141139fce010982780140aa0cd5ab): +1ms
INFO-cli
INFO-cli - Balance in DX: 11.4032061309442109 +2ms
INFO-cli - Balance of user: 0 +0ms
As you can see, there are two types of balance for every listed token:
Balance of userindicates the balance in the users wallet.Balance in DXindicates the balance that has been deposited in the DutchX smart contract and is ready to trade. Lets now go through the steps in the image one-by-one.
1. Deposit tokens
Use the following command to deposit tokens you want to trade:
./dutchx-rinkeby deposit 0.35 WETH
NOTE: Since ETH is not an ERC-20, the DutchX will automatically call the wrapped Ether smart contract and wrap your Ether.
2. Trade on the DutchX
You can now take part in the running auction as a bidder in the current auction, or post a sell order for the coming one.
NOTE: Remember that as a seller you can only submit to the running auction if it is in the 10 min waiting period before it starts or else the upcoming auction. Sellers cannot deposit to auctions happening after the upcoming auction.
Before placing a trade, we recommend you try the following commands:
# This commands outputs all the available token pairs
./dutchx-rinkeby markets
# This command outputs information about the current auction of a given pair
./dutchx-rinkeby state WETH-RDN
After picking the pair you want to trade and checking the state of a given auction, you can start trading with the following commands:
# This commands will place a bid in the running auction (no need to specify the auction index)
./dutchx-rinkeby buy 5 WETH-RDN
# This command posts a sell order for the specified auction index.
./dutchx-rinkeby sell 5 WETH-RDN 361
NOTE: For the sell command, you currently need to specify the index of the upcoming auction in which you want to sell your tokens. To ensure that it is the next auction which start, check the state again, see which one is running and add 1 to the auction index. The 361 noted in the command above is an example only.
3. Claim the tokens from the auction you took part in
In order to see the resulting balance after trading in Balance in DX, you must execute the following commands:
# Claim tokens, which will give you the tokens of the auction you participated in, not mattering if you were selling or bidding
./dutchx-rinkeby claim-tokens WETH-RDN
# Claim tokens after participating as a seller, which will give you the second token in the pair
./dutchx-rinkeby claim-seller WETH-RDN
# Claim tokens after participating as a bidder, which will give you the first token in the pair
./dutchx-rinkeby claim-buyer WETH-RDN
It is important to remember that sellers can only claim their receiving tokens once the auction has finished. Bidders can claim the sell tokens they aqcuire (once they bid) anytime during the auction and can claim any additional increments in the future.
We recommend that bidders claim tokens once the auction has ended in order to avoid unnecessary gas costs.
4. Withrdaw tokens from the DutchX smart contract
This is the final step if you would like to have your tokens back in your wallet. It simply sends tokens from your Balance in DX to your Balance of user
./dutchx-rinkeby withdraw 0.35 WETH
We recommend users that plan on trading often in the DutchX to leave their tokens in the smart contract in order to avoid unnecessary gas costs.
Useful commands
So far we have covered the process of executing trades on the DutchX, but there are several additional commands that will give important information and facilitate the process.
We will do a rundown on some useful commands, starting by reminding you the command to view all commands :)
# Rinkeby
./dutchx-rinkeby -h
Auction and trading history commands
It can prove useful to check information of previous auctions and trades in the past. You can display the information of cleared auctions and filter it by dates using the following commands:
For valid date formats we use ISO 8601
# Get today's auctions
./dutchx-rinkeby auctions --period today
# Get auctions from the last 7 days
./dutchx-rinkeby auctions --period week
# Get this week's auctions
./dutchx-rinkeby auctions --period week
# Get last week's auctions
./dutchx-rinkeby auctions --period last-week
# Get auctions from a specified date range
./dutchx-rinkeby auctions --from-date=2018-05-25 --to-date=2018-05-26
# Export auctions from a given date range to a .csv file
./dutchx-rinkeby auctions --from-date=2018-05-25 --to-date=2018-05-26 --file=auctions.csv
As mentioned previously, you can also get the history of previous trades. Use the following commands:
# Get todays auctions
./dutchx-rinkeby trades --period today
# Get last 7 days auctions
./dutchx-rinkeby trades --period week
# Get this week's auctions
./dutchx-rinkeby trades --period week
# Get last week's auctions
./dutchx-rinkeby trades --period last-week
# Get auctions between two dates
./dutchx-rinkeby trades --from-date=2018-05-25 --to-date=2018-05-26
Additionally, you can apply any of these filters:
# Filter by token
# It will filter by trades of auctions that contain the given token
./dutchx-rinkeby trades --period today --token RDN
#Filter by wallet
# You can use any of the additional commands and specify a wallet in order to just see these trades
./dutchx-rinkeby trades --period today --token RDN --account=0x45345b00156efe2a859b7e254ab3ae0bb2ebfc0e
# Filter by sell token
# It will filter by trades of auctions that contain the given token as a sell
# token
./dutchx-rinkeby trades --period today --sell-token RDN
# Filter by buy token
# It will filter by trades of auctions that contain the given token as a buy
# token
./dutchx-rinkeby trades --period today --buy-token RDN
# Filter by auction index
# It will filter by trades of auctions that contain the given token as a buy
# token
./dutchx-rinkeby trades --period today --auction-index 24
# Filter by account
# It will filter by trades of the given account address
./dutchx-rinkeby trades --period today --auction-index 24
# Export the result to a file
./dutchx-rinkeby trades --from-date=2018-05-25 --to-date=2018-05-26 --file=auctions.csv
Analytics & Alerts
Where can you gather information on what’s happening on the DutchX Protocol Level on the Ethereum blockchain?
There are some sources available for you:
- Check out the read-API
- Check out this VisualX, displaying past market data, auction details, check-balances functions and much more.
- Check out the DutchX Subgraph (+Github Link)
- Check out this dashboard provided by Dune Analytics
You can also create your own alert on Alethio Monitoring to get notified of certain events on the DutchX. As an example, below is a step-by-step guide for an alert that tracks the event of a new token being added to the DutchX:
- Select to monitor Smart Contracts
- Add the contract address of the DutchX proxy contract: 0xb9812e2fa995ec53b5b6df34d21f9304762c5497
- Filter for both transactions and contract messages (internal transactions)
- Filter for the payload prefix (method ID), in case of the addTokenPair function this is 0xe9f8cd70
- To get notified every time the the addTokenPair function is called, set the trigger criteria to a 1% increase within 5 min
- Choose your prefered notification channel (currently only slack & email available)
Get started: Build on top of the DutchX
We’ve prepared some examples on how you can build on top of the DutchX.
There’s many guides, but we recomend you to start by doing the:
Next steps
Although the way of using the contracts of the
Example 01: Basic Web - Deposit
works for many projects, others prefer to work using a local node like
ganache-cli to speed up the development.
Also, for medium size projects, you’ll find yourself doing things that are much easier using truffle (test, migrations, interaction, sharing contracts, etc…)
Next step will show you how to create a project from scratch that depends on the DutchX NPM Package and migrate all the contracts to a local ganache.
Basic truffle project
This guide is an example that shows how to create a new project from scratch
that depends on DutchX and how you can deploy the DutchX contracts in a
ganache-cli local node.
This project is interesting for allowing to deploy easily the contracts in local, so we don’t depend on testnets like Rinkeby and we can speed up the development.
Also truffle has many other advantages that makes easier the development, so it should be consider for medium size project.
Follow the steps in the guide:
Next steps
Once you have the guide completed, a good idea is continuing with this guide Example 03: Onchain integration - Use it as an oracle.
Onchain integration
Use DutchX as an Oracle
Before starting this guide, you should be already familiar with how to Local Development + Truffle. Please, complete that guide first before you start with this one.
Once you know how to create a project that depends on the DutchX, and you know how to migrate the contracts for local development, you are ready to use the contract from our project.
One simple use-case of the DutchX is as an on-chain price oracle.
Don’t forget to check out the Price Oracle section for an explanation of the two different price oracles available.
Learn how to get the price for any token pair from the DutchX following the steps described in this project:
Deposit tokens
The DutchX allows to exhange any ERC20 compatible tokens.
In order to post sell orders, buy orders or add token pairs, you first need to deposit the tokens in the DutchX, so it’s important you understand how to:
- Wrap ether (into WETH - Wrapped Ether)
- Set an allowance of any token for the DutchX
- Deposit in the DutchX
WETH (Wrapped Ether)
Ether is not an ERC20 token, this is why we need to wrap it first.
Technically, this means that we need to send some ether to the deposit function in a token contract called WETH (Wrapped Ether):
- WETH contract: https://rinkeby.etherscan.io/address/0xc778417e063141139fce010982780140aa0cd5ab#code
- Info about WETH: https://weth.io
- More info about WETH: https://blog.0xproject.com/canonical-weth-a9aa7d0279dd
Allowance (any ERC20 token)
Other important thing we should know, is that the deposit function in DutchX,
will call the ERC20 token contract transferFrom function to withdraw the
amount for the user:
- This
transferFromwill fail if the user don’t set an allowance of at least the deposited amount for the DutchX proxy address (entry point for DutchX) - So you first need to invoke the
approvefunction - This step is mandatory for WETH and for any other ERC20 token.
Deposit
The DutchX deposit operation will allow you to add tokens to your balance.
When you have balance in the DutchX you’ll be able to:
- Submit sell orders
- Submit buy orders
- Add token pairs
Sequence diagram
This sequence diagram will shows how the different contracts and the user interact in order to do a deposit:
- Wrap 0.1 WETH: Remember Ether is not ERC20 compatible, so we need to do this
step (
depositfunction on WETH contract). - Set allowance, so DutchX proxy can transfer 0.1 WETH: Otherwise the deposit will fail, because the DutchX wouln’t be entitled to do the operation.
- Deposit 0.1 ETH in DutchX proxy: If we did the two prior steps, the user will have 0.1 WETH more in it’s balance.
 Sequence for deposit
How to do it?
In this guided example you will make a dApp that wraps ether, sets the allowance and deposit into the dutchx.
Also you can use the CLI
Add a token pair
The DutchX is an open protocol, and as such, anybody can add a token pair to trade.
IMPORTANT NOTES
- Make sure the token you are adding is in fact an ERC20 token - the protocol does not double check. Only ERC20 tokens are tradable!
- Make sure you are aware that the DutchX price at Smart Contract level of a given token pair
Token A - Token BisToken A in wei / Token B in wei. Normally, the tokens have 18 decimals, so the price at protocol level is the same number as a user might expect. But it’s not the case if the token have a different number of decimals. When we list the token, we should express the price in how much wei of token B I get for one wei of token A.
There are several ways to add a token pair to the DutchX. All of them end up
using the addTokenPair function in the
DutchExchange.sol
contract.
- Important we don’t interact directly with this contract, as it is described next, all interactions must be done through a proxy.
- The deployed contract is in https://etherscan.io/address/0x2bae491b065032a76be1db9e9ecf5738afae203e#code
To invoke the addTokenPair operation, we need to do it through the address
of the deployed DutchExchangeProxy.sol
- The address for the proxy is: https://etherscan.io/address/0xb9812e2fa995ec53b5b6df34d21f9304762c5497
- All the other address can be found in: https://dutchx.readthedocs.io/en/latest/smart-contracts_addresses.html
- Please, read more about the Proxy Pattern for Smart Contracts in this Solidity DelegateProxy post.
Note: if you would like to have a token listed on a graphical user interface on Rinkeby only, please check this information.
SUMMARY of the process of adding a token
IMPORTANT: Before you add a token
- It is recomended to add it in Rinkeby first (See Rinkeby contract addresses)
- Make sure there’s market makers and arbitrage bots before adding a market (See Run your own bots on the DutchX)
- You can do this process manually, interacting directly with the contracts, however, we provide a CLI and truffle scripts that will make it simpler and they will do some validations before sending the transaction.
- If you require help, check out this section on market makers.
To add a token pair, follow this steps:
- Make sure you have the address of the ERC20
token and
$1,000worth of WETH (it’ll be used for the first auction, so you’ll get it back after is cleared) - Set an allowance for the DutchX (proxy), so it can take the required amount of
WETH when you call the deposit function (call
approvefunction in WETH contract) - Deposit the WETH into your DutchX balance (call the
depositfunction in the DutchX proxy) - Add token pair (call the
addTokenPairfunction in the DutchX proxy) - Make sure now your token is listed, for example using the API https://dutchx.d.exchange/api/v1/markets
- 🎉Celebrate
- 🔈Spread the work so sellers/bidders participate in the new market
- 📈 Run bots and arbitrage bots to ensure there’s a market
1. Get the information for adding a token pair
Let’s assume we want to add the RDN-WETH token pair.
To add a token pair you will need the following information:
- Address of the first token:
WETHin this case- When you list a token for the first time it’s mandatory to use
Wrapped Ether(WETH) as the other token in the pairing. - Check out this this link in order to learn more about Wrapped Ether.
- The addresses for
WETHare:
- When you list a token for the first time it’s mandatory to use
- Address of the token you want to add:
RDNin this case.- This is the address of the
ERC20token you want to add. - For example, on the mainnet
RDNtoken has the address 0x255Aa6DF07540Cb5d3d297f0D0D4D84cb52bc8e6
- This is the address of the
- Price of the token pair:
- This is the price you claim that your token has against the other token,
that’s
WETH-RDNprice in this case (584 ETH/RDNby the time this document was written) - Note that there’s no benefit on adding the wrong price:
- If you decide to use a very low price, anyone could participate in the
auction and buy cheap the
WETHyou deposit when you add a token pair. - If you set it to high, the auction will take more time to reach the market price. It’ll end up closing with the market price.
- If you are confused about how the mechanism work, read the Blog posts, and for a very detailed mathematical explanation, check out the Smart Contract Documentation.
- If you decide to use a very low price, anyone could participate in the
auction and buy cheap the
- This is the price you claim that your token has against the other token,
that’s
- Funding for first token (in Weis): For example
18 WETH(more than1,000$, note we use584 ETH/RDNas the price)- This is the amount you are going to deposit for the first auction of the token pair.
- It’s important to know that, in order to add a token, you should surplus the
minimum threshold for adding a token pair (
$1,000of the token). For the calculation of the worth in USD of your tokens, the DutchX will use two things:- The price you provide: This is the price you claim your token is worth.
- The price of
WETH-USD: The DutchX uses an oracle that reports the current price for this pairing.
- Your account should have this amount of tokens in its DutchX balance. Don’t worry about this right now, because it’s covered in the Fund the account section.
- Funding for the second token:
- This is not mandatory, so you can set a
0here. - It’s enough to provide liquidity in any of the sides. If one of the tokens
is
WETH(this case), you must provide it in that token.
- This is not mandatory, so you can set a
2. Fund the account
Once you know the amount you need to do the deposit of the token (18 WETH in the
example).
In order two add balance to your account, we need to invoke two operations in the smart contracts:
- Approve the DX to withdraw tokens in your name: This is a call to the
ERC20
approvefor the funding token (WETHin this case). You must approve at least the funding amount, and use the DutchExchangeProxy address contract, so the DutchX is entitled to deposit the amount into your balance when you invoke the next operation (deposit). - Deposit funds in your DutchX balance: This is a call to
DutchExchange.sol
deposit. You must use at least the funding amount.
The easiest way to invoke these two operations is to use the CLI, so please
set it up by following the steps described in the CLI page.
1. Verify that your account has the tokens We are trying to deposit some tokens into the DutchX, so first we should make sure they are in our balance:
./dutchx-rinkeby balances --account <your account address here>
2. Do the deposit
Once the CLI is ready, just execute the deposit operation, make sure:
- You use the right network (
rinkebyormainnet) - You use the right mnemonic (the one that has the tokens you want to deposit into the DutchX)
- NOTE: the
CLIwill automatically do aapproveand adeposit. Additionally, in the case ofWETH, it’ll wrapEtherif you don’t have enough balance.
# Wrap, approve and deposit into the DutchX
./dutchx-rinkeby deposit 18 WETH
3. Verify your new balance on the DutchX
./dutchx-rinkeby balances --account <your account address here>
3. Add the token pair
Once you have all the information and you have deposited in the DutchX the funding amount, you are ready to invoke the addTokenPairFunction.
There are several ways to do this:
- Use the
add-token-pairscript: This is the recommended one, since it also performs some validations and shows help messages. - Use truffle console: Since the DutchX Smart Contracts is a truffle project, you can use the console to add the token pair or invoke any other logic of the contract.
- From a migration in your project: Use this option if you are building a project and you want to also add the tokens in your local development node.
- Using the CLI: The
CLIhas also aadd-token-pairthat uses the same format as theadd-token-pairscript.
3a. Use the add-token-pair script (recommended)
To make things easier, there’s a truffle script in the dx-contracts project.
So the steps would be:
1. Clone the the repo and install the dependencies:
# Clone the repo and cd into the project
git clone https://github.com/gnosis/dx-contracts.git
cd dx-contracts
# Install the dependencies
npm install
# Compile contracts and inject the network info
npm run restore
2. Create a file with the information required for the operation
- Read the required information in the previous section
- You can use WETH_RDN.js as an example on how to provide the information.
- Save your config file in the current directory, for example
ABC-WETH.js
3. Run it first in dry-run mode:
It’ll check if everything is OK for adding the token pair, but it won’t execute the transaction:
- Use the mnemonic of the account that deposited the initial funding.
- Use the file you created in the previous step (i.e.
./ABC-WETH.js) - Provide the name of the network in which you want to add the token pair:
mainnetorrinkeby. - Don’t forget the
--dry-run
MNEMONIC="your secret mnemonic ..." npm run -- add-token-pairs -f ./ABC-WETH.js --network mainnet --dry-run
If everything went smoothly, you should now be able to execute it for real. Otherwise, the command will tell you what is the problem and what you need to do in order to solve it.
Please make sure that you provide the correct route to your token pair file. This route should be relative to project rootdx-contracts
4. Run the script without the dry-run:
MNEMONIC="your secret mnemonic ..." npm run -- add-token-pairs -f ./ABC-WETH.js --network mainnet
3b. Using truffle console
Since the DutchX Smart Contracts is a truffle project, you can use the console to add the token pair or invoke any other logic of the contract.
So the steps would be:
1. Clone the the repo and install the dependencies:
git clone https://github.com/gnosis/dx-contracts.git
cd dx-contracts
npm install
2. Enter into the truffle console
Make sure you:
- Use the mnemonic of the account from which the initial funding was deposited.
- Provide the name of the network in which you want to add the token pair:
mainnetorrinkeby.
MNEMONIC="your secret mnemonic ..." truffle console --network mainnet
3. In the truffle console
Enter the following commands, one by one:
// Get the DutchExchange instance using the DuthExchange contract and the
// DuthExchangeProxy addres.
DutchExchangeProxy.deployed().then(p => proxy = p)
dx = DutchExchange.at(proxy.address)
// Add token pair
/*
addTokenPair(
address token1,
address token2,
uint token1Funding,
uint token2Funding,
uint initialClosingPriceNum,
uint initialClosingPriceDen
)
*/
dx.addTokenPair(
// WETH
'0xc02aaa39b223fe8d0a0e5c4f27ead9083c756cc2',
// RDN
'0x255Aa6DF07540Cb5d3d297f0D0D4D84cb52bc8e6',
// 18 WETH
18000000000000000000,
// 0 RDN
0,
// Check price of RDN-WETH in:
// https://www.coingecko.com/en/price_charts/raiden-network/eth
// 1 ETH = 584 RDN
584, // numerator
1 // denominator
)
3c. From a migration in your code
To add the token pair using migrations, you should first be familiarized on how to build on top of the DutchX.
Make sure you have completed these two guides:
After those guides, you should be able to create a new migration like this one:
/* global artifacts */
/* eslint no-undef: "error" */
const DutchExchange = artifacts.require("DutchExchange")
module.exports = function (deployer, network, accounts) {
return deployer
deployer
// Make sure DutchX is deployed
.then(() => DutchExchangeProxy.deployed())
.then(dxProxy => {
// Get a DutchX instance
const dx = DutchExchange.at(dxProxy.address)
// Add your token pair
return dx.addTokenPair(
// WETH
'0xc02aaa39b223fe8d0a0e5c4f27ead9083c756cc2',
// RDN
'0x255Aa6DF07540Cb5d3d297f0D0D4D84cb52bc8e6',
// 18 WETH
18000000000000000000,
// 0 RDN
0,
// Check price of RDN-WETH in:
// https://www.coingecko.com/en/price_charts/raiden-network/eth
// 1 ETH = 584 RDN
584, // numerator
1 // denominator
)
})
DutchExchangeProxy
}
3d. Using the CLI
The CLI has also an add-token-pair operation that uses the same format as the
add-token-pair script.
Usually, it is preferable to use the add-token-pairs script instead of the CLI,
it has some advantages, so consider using it.
To use the CLI:
1. Create a file like the one described in add-token-pair script section
You can use this file as a template. It’s important that you create your new file in the same folder.
2. Execute the add-token-pair operation
Execute the command, and make sure:
- You use the right network (
rinkebyormainnet) - You use the right mnemonic (the one that has the tokens in its DutchX balance)
./dutchx-rinkeby add-token-pair --file /resources/add-token-pair/ABC-WETH.js
Run your own bots on the DutchX
Bots are series of small applications that run in the background and have a scoped task to fulfill.
They interact with the DutchX performing some operations.
For example, liquidity bots watch some markets and provide liquidity to ensure that auctions run continuously and prices don’t drop below the market price.
Running bots is important for markets where there’s insufficient volume or a market maker in place.
 Bots cycle
Bots are implemented in the DutchX Services project and are Open Source for anyone to use, modify, or improve.
How to run the bots
In this guide we will show how to run the DutchX bots to ensure liquidity for any ERC20 token pair list.
To make it easier, we provide a Docker image with all the bots and the
CLI.
Follow through this document to run your own bots and learn how to operate on the DutchX.
If you follow through, you’ll get:
- The liquidity bots, up and running
- You’ll known how to fund them so they can operate
- You’ll learn how to use the CLI (command line interface)
- To check the state of the auctions
- To interact with the DX: Claim, buy, sell, etc.
An easy way to run the bots is to use dx-tools
0. Requirements
Before being able to run the bots you will need to:
1. Install Docker
- Windows: https://store.docker.com/editions/community/docker-ce-desktop-windows
- Mac OS: https://store.docker.com/editions/community/docker-ce-desktop-mac
- For other platforms or more details: https://docs.docker.com/install/
2. Clone the dx-tools repository If you are a Git user open the Command Prompt or Terminal, and type in the following:
# Clone repo
git clone https://github.com/gnosis/dx-tools.git
cd dx-tools
Alternatively, you can download the ZIP file instead of cloning the git repository.
1. Create the config file for the bots
Create a config file for the bots, like the one in conf/bots-conf.js.example, where:
MARKETS: List of the ERC20 token pairs you want the bots to watch.- Format:
[{ tokenA: <token1>, tokenB: <token2> }, { tokenA: <tokenN>, tokenB: <tokenM> }]* - Example:
[{ tokenA: WETH, tokenB: RDN },{ tokenA: WETH, tokenB: OMG }] - It’s important that for every distinct token provided, you also provide the address, the can be passed either in the config file you are creating or as ENV_VAR. If you add them to the config file REMEMBER to add them to the module.exports section.
- WETH_TOKEN_ADDRESS:
0xc58b96a0278bd2c77bc93e01b148282fb8e753a5 - RDN_TOKEN_ADDRESS:
0x3615757011112560521536258c1e7325ae3b48ae - OMG_TOKEN_ADDRESS:
0x00df91984582e6e96288307e9c2f20b38c8fece9
- Format:
TOKENS: List of the ERC20 tokens to be used with the bots.- This list is handful to configure the
BALANCE_CHECK_BOTandDEPOSIT_BOT
- This list is handful to configure the
MAIN_BOT_ACCOUNT:- Select the main bot account (account index of the ones generated from the
MNEMONIC) - The main bot account that will be used to generate reports
- Select the main bot account (account index of the ones generated from the
PRICE_REPO: You can configure which external price feeds to use. You can get more information hereBOTS: a list of bots to be created. Can contain one or more of the following. Any bot can be disabled by not adding it to this list.BUY_BOT: Configuration for buying botSELL_BOT: Configuration for selling botBALANCE_CHECK_BOT: Configuration for balance check botHIGH_SELL_VOLUME_BOT: Configuration for high sell volume botWATCH_EVENTS_BOT: Configuration for watch events botDEPOSIT_BOT: Configuration for deposit botCLAIM_BOT: Configuration for claim bot
WARNING: When creating a new configuration file you may name it as you wish, but make sure you update base-bots.sh in order to use your own configuration.
2. Run the Bots
You should consider filling this environment variables with your own configuration. For an easy use you can create a local.conf file using local.conf.example
MNEMONIC:- Use your secret BIP39 mnemonic.
- The bot address will be the first account generated by that mnemonic.
PK:- You can alternatively use a private key
- Private key can’t be used at the same time with a MNEMONIC
ETHEREUM_RPC_URL:- Url for a Ethereum node
- You can use your own node or setup infura for example:
https://rinkeby.infura.io
DX_SERVICE_VERSION- It is highly recommended that you set a fixed version to avoid accidental upgrades that may bring breaking changes
- You can review the existent versions here
We provide three scripts in order to launch your bots. Once configured correctly you can simply run:
# Rinkeby
./bots/bots-rinkeby
# Kovan
./bots/bots-kovan
# Mainnet
./bots/bots-mainnet
When you run it for the first time, you should see something similar to:
 alt text
Don’t worry for now about the WARN message shown at the bottom, we’ll deal with it in the Fund the bots section.
This script will:
- Start the configured bots that will ensure the liquidity. You can check more info about the different types of bots in DutchX Bots Types
- Runs a simple API server that exposes basic information: http://localhost:8081
Fund the bots
The bots automatically participate in the auctions performing bids and asks when the time is right.
In order to place this bids and asks, they need to have a balance in the DutchX
smart contract.
In order to fund the bots, we need to know their Ethereum address, this is determined by the secret mnemonic you’ve used to run the bots.
An easy way to know the address is just to visit the about endpoint:
You should see among other information, the accounts used by the bots:
 alt text
Once you have the bot account, your secret mnemonic and the bots running, you are all set for the funding.
The easiest way is to use the DutchX CLI.
Check out the Deposit section in this guide
DutchX CLI (Command Line Interface)
In the docker image, it’s also available a CLI, with some basic operations for using the DutchX.
You can use it for getting the state of a token pair, or to trade in an auction among other things.
Checkout the CLI documentation to learn how to use it.
This sample project also provides a simple CLI script you can use.
State of a DutchX Auction
There’s a basic command in the CLI that is very helpful to get the state of the auctions.
Run the help command to get a list of all available commands:
# Rinkeby
./dutchx-rinkeby -h
# Kovan
./dutchx-kovan -h
# Mainnet
./dutchx-mainnet -h
Example: Get the state of the WETH-RDN auction
./dutchx-mainnet state WETH-RDN
We would get something similar to:
 alt text
For other methods, or to learn how to use the CLI go to:
Debug
To increase the debug level, you can change the bot script to run with
run bots-dev instead of run bots.
Don’t forget to change it back for the production script.
Next steps
You may be also interested in:
DutchX Bots
When we start the application, it will start also 3 bots.
Every bot is created with one goal, so once they are up, the will try to do their jobs.
Sell Liquidity Bot
This bot requires WATCH_EVENTS_BOT to be configured and tracking the same MARKETS
This bot will make sure we meet the minimum liquidity required by the smart contract for the auction to start.
In other words, it makes sure the auction starts automatically filling the missing sell volume.
The smart contract won’t start the auction, unless we have more than
$1.000 worth of the sell token, so this bot fill the missing difference.
When will this bot ensure the sell liquidity?
It will ensure it as soon as both of the opposite auctions clear for a token pair.
Which of the two auctions it will fund?
It will fund the one with the highest funding, so it has to fill with less worth of tokens.
Sell Liquidity Bot configuration
SELL_BOT_MAIN:- name: The name to display in notifications and messages
- factory: The factory to create the bot. You can create your own bot if you want!
- markets: An object selecting the markets to watch (as explained here)
- accountIndex: The accountIndex from the accounts generated from the
MNEMONICthat is going to be used by this bot - notifications: The notification system to be used by the bot. For now only
slackis available - checkTimeInMilliseconds: the time between bot checking to sell liquidity
Buy Liquidity Bot
This bot will make sure the auction closes when we reach the market price.
If nobody bids when the auction is on the market price, the price will continue to go down, and eventually, after 24h, could get to 0.
To avoid this situation, the buy bot will buy automatically when the token price is at a right price.
How does the bot know what is the market price?
Right now the buy bot can check in any of these exchanges:
- Binance: https://www.binance.com
- Bitfinex: https://www.bitfinex.com/
- HitBTC: https://hitbtc.com/
- Huobi: https://www.huobi.com
- IDEX: https://idex.market/
- Kraken: http://kraken.com
- Liquid: https://www.liquid.com/
Depending on the token pair, we can configure an strategy for getting the market price.
If you consider that none of these exchanges fits to your needs you can make a pull request and add a new one. Check here how to add a price feed
Buy Liquidity Bot configuration
BUY_BOT_MAIN:- name: The name to display in notifications and messages
- factory: The factory to create the bot. You can create your own bot if you want!
- markets: An object selecting the markets to watch (as explained here)
- accountIndex: The accountIndex from the accounts generated from the
MNEMONICthat is going to be used by this bot - rules: The rules to indicate the bot when to do buys (read next section)
- notifications: The notification system to be used by the bot. For now only
slackis available - checkTimeInMilliseconds: the time between bot checking to buy liquidity
Buy Liquidity Bot price repository
PRICE_REPO:- factory: The factory to create the repository. You can create your own repository if you want!
- priceFeedStrategiesDefault: The default price feed strategy object (read next section)
- priceFeedStrategies: The price feed strategy object for each token pair (read next section)
- priceFeeds: The price feed factory. You can implement your own
- strategies: The strategies factory. You can create your own
Strategies for getting the price - Sequence
The current strategy implemented by the buy bot is called sequence, but more
strategies could be implemented for future versions.
For example, we could configure the bots with the following strategies:
priceFeedStrategiesDefault: {
strategy: 'sequence',
feeds: ['binance', 'huobi', 'kraken', 'bitfinex']
},
priceFeedStrategies: {
'WETH-OMG': {
strategy: 'sequence',
feeds: ['binance', 'huobi', 'bitfinex']
},
'WETH-RDN': {
strategy: 'sequence',
feeds: ['huobi', 'binance', 'bitfinex']
}
}
For the sequence strategy we can define a sorted list of the exchanges we want
to use for getting the price.
The buy bot will try to get the price from the first exchange, if it’s down or unresponsive, it will try to get the price from the second one, and so on.
The idea is to pick the order using first the most trusted exchanges, for example we could use the trade volume to help us decide.
You can select other strategies or priceFeeds. First they should be added to the bots git repository and then you can add them by configuration. Check here how to add a price feed
priceFeeds: {
binance: {
factory: 'src/repositories/PriceRepo/feeds/PriceRepoBinance'
},
kraken: {
factory: 'src/repositories/PriceRepo/feeds/PriceRepoKraken',
url: 'https://api.kraken.com',
version: '0'
}
},
strategies: {
sequence: {
factory: 'src/repositories/PriceRepo/strategies/sequence'
}
}
Buy liquidity rules
Another important part of the buy liquidity bot, is the buy rules.
These rules allow the bot to decide how much they should buy, and in what precise moment.
For example, we could define these rules:
- Ensure that 1/3 of the sell volume is bought when the price equals the market price.
- Ensure that 2/3 of the sell volume is bought when the price is 2% below the market price.
- Ensure that the whole sell volume is bought when the price is 4% below the market price.
This rules can be specified using this configuration:
const BUY_LIQUIDITY_RULES = [
// Buy 1/3 if price equals market price
{
marketPriceRatio: {
numerator: 1,
denominator: 1
},
buyRatio: {
numerator: 1,
denominator: 3
}
},
// Buy 2/3 if price falls below 98%
{
marketPriceRatio: {
numerator: 98,
denominator: 100
},
buyRatio: {
numerator: 2,
denominator: 3
}
},
// Buy the 100% if price falls below 96%
{
marketPriceRatio: {
numerator: 96,
denominator: 100
},
buyRatio: {
numerator: 1,
denominator: 1
}
}
]
Balance Check Bot
The liquidity bots are very useful, but in order to operate, they need to have enough tokens to perform the bids and asks, and also some Ether so they can pay the gas costs for the transactions.
This bot will check periodically the balances for the bots and will show a warning message when we are below the defined threshold.
In the future, we will provide a way to send the notification using Slack or mail.
Balance Check Bot configuration
BALANCE_CHECK_BOT:- name: The name to display in notifications and messages
- factory: The factory to create the bot. You can create your own bot if you want!
- tokens: A list selecting the desired tokens to follow (ex. [‘WETH’, ‘RDN’])
- accountIndex: The accountIndex from the accounts generated from the
MNEMONICthat is going to be used by this bot - notifications: The notification system to be used by the bot. For now only
slackis available - minimumAmountForEther: the minimum amount of Ether we want the bot to hold
- minimumAmountInUsdForToken: the minimum amount of any other token in USD
Balance thresholds
For example, the rules could be, notify if we are below:
0.4 Ether$5000worth of any tokens
So we would have this configuration:
minimumAmountForEther: 0.4, // 0.4 Ether
minimumAmountInUsdForToken: 5000 // $5000
High Sell Volume Bot
This bot will check the markets you select and will send a log notification if any of the markets volume is over your account balance. This is very handful if you want to ensure liquidity to a market and want to make sure that all liquidity is bought.
High Sell Volume Bot configuration
HIGH_SELL_VOLUME_BOT:- name: The name to display in notifications and messages
- factory: The factory to create the bot. You can create your own bot if you want!
- markets: An object selecting the markets to watch (as explained here)
- accountIndex: The accountIndex from the accounts generated from the
MNEMONICthat is going to be used by this bot - notifications: The notification system to be used by the bot. For now only
slackis available
Deposit Bot
This bot will check periodically your account balances and will automatically deposit tokens into the DutchX. This is very handful when a bot is running out of funding. You just have to send the tokens to the bot account and the deposit bot will handle the rest.
Deposit Bot configuration
DEPOSIT_BOT:- name: The name to display in notifications and messages
- factory: The factory to create the bot. You can create your own bot if you want!
- tokens: A list selecting the desired tokens to follow and deposit (ex. [‘WETH’, ‘RDN’])
- accountIndex: The accountIndex from the accounts generated from the
MNEMONICthat is going to be used by this bot - notifications: The notification system to be used by the bot. For now only
slackis available - inactivityPeriods: a list of from-to time periods in which the bot will not deposit funds (useful when you want to withdraw)
- checkTimeInMilliseconds: the time between bot checking to deposit funds
Claim Bot
This bot will check periodically for unclaimed balances in the configured markets and will automatically claim all of them. This is useful so the bot can recover on his own funds used on previous auctions.
Claim Bot configuration
CLAIM_BOT:- name: The name to display in notifications and messages
- factory: The factory to create the bot. You can create your own bot if you want!
- markets: An object selecting the markets to watch (as explained here)
- accountIndex: The accountIndex from the accounts generated from the
MNEMONICthat is going to be used by this bot - notifications: The notification system to be used by the bot. For now only
slackis available - autoClaimAuctions: the number of previous auctions you want the bot to check (ex. 90 will correspond to aprox 3 weeks of auctions if around 4 auctions each day)
- cronSchedule: You can select using crontab style a time schedule for the claim. You can check here if you have doubts.
Watch Events Bot
This bot can watch for events in market auctions to operate immediately once an auction has closed.
WATCH_EVENTS_BOT:- name: The name to display in notifications and messages
- factory: The factory to create the bot. You can create your own bot if you want!
- markets: An object selecting the markets to watch (as explained here)
Security
As soon as you start using your bots with real funds. There will be security trade-offs. If you run the bots in a regular cloud server with a MNEMONIC phrase or a Private key, if an attacker breaks your server security and is able to reveal those secrets, would easily steal all your funds.
One solution we developed to mititate that risk is using multi signature software for holding the funds, specifically Gnosis Safe Contracts in conjuction with a Safe module that is operated through a regular account (with Mnemonic / private key) but with restricted access, the scope of actions is limited to those related with posting orders and depositing tokens, but not the possibility to withdraw funds from the DX. In case you want to withdraw the funds, you need to sign a transaction with the safe contract owners (should be different accounts than the operators).
This setup is a bit complex to setup from the scratch so for making it easier to manage, we created a CLI
The main roles involved are:
- Safe contract. It’s the contract that holds the tokens and Ether used for the DutchX. It should have at least two owners and two required confirmations.
- Safe module (DutchXComplete or DutchXSeller). Has to be enabled by the safe contract, so it can execute transaction on behalf of the safe. It limits the actions to: deposit, approve tokens, wrap ETH, post sell order, post buy order (only in complete version) and claiming.
- Operator. Regular account that interacts with the safe-module. This is the account the bots will use to generate the transactions. Need to have a bit of ether for paying the transaction fees. It doesn’t have tokens.
- Whitelisted tokens. Tokens allowed to be used in the DX by Safe module.
Buy Bot price feed
If you are running the bots it’s important to have a good price feed for the token pair you are trading.
The Buy Bot can be configured to follow some rules. For example:
- Buy
33%of the sell volume if we are 1% below the market price - Buy
66%if we are 2% below the market price - Buy
100%if we are 4% below the market price
The thing is, how does the bot know what is the market price?
In the bot configuration, the market will be associated with a list of price feeds (exchanges that report the current price):
- https://github.com/gnosis/dx-examples-liquidity-bots/blob/master/conf/bots.js#L73
Every market can have it’s own feed list, and can be configured to use them following a strategy. At least one price feed is necessary.
Price Feed
There are many price feeds already implemented, for example:
- Binance: https://www.binance.com
- Bitfinex: https://www.bitfinex.com/
- HitBTC: https://hitbtc.com/
- Huobi: https://www.huobi.com
- Kraken: http://kraken.com
- Liquid: https://www.liquid.com/
You can use any price feed available here: https://github.com/gnosis/dx-services/tree/master/src/repositories/PriceRepo/feeds
The next section will show you how to add a new price feed.
Add your own Price Feed
You can use any price feed available here: https://github.com/gnosis/dx-services/tree/master/src/repositories/PriceRepo/feeds
If the one that you need is missing, you can implement it on your own and
create a Pull Request so it can be added to the project.
To implement a new price feed, is as simple as create a new Javascript file that implement the function:
+ getPrice ({ tokenA: String, tokenB: String }) : Promise<Number>
1. Fork dx-services project
Bots are implemented in the DutchX Services project and are Open Source for anyone to use, modify, or improve.
You should fork this project, using develop branch.
2. Add the new price feed repository
The price repository is implemented in src/repositories/priceRepo In this folder you can find another two folders:
- feeds:
- Price feeds implementations
- strategies:
- Strategies used to check the price.
- Right now only
sequencestrategy is implemented. - This strategy will be configured with a list of price feeds
- The strategy will try to get the price from the first feed, if the price is not available (i.e. the exchange API service is down), it’ll try with the second feed in the list, and so forth.
- It’s OK to have just one feed in your list, but keep in mind that if the feed is down, the buy bot will wait until is up again.
So,to add a new price feed, we need to add a new implementation to the feeds
folder.
You can check other integrations or use them as a template in order to speedup your task.
Your new implementation should expose the following method:
+ getPrice ({ tokenA: String, tokenB: String }) : Promise<Number>
This function receives a token pair (i.e. { tokenA: 'RDN', tokenB, 'WETH' })
and returns a promise with the current price of the token pair.
Check out this example:
If you take a look on another feeds you will also notice a getSymbols function,
which is very useful for checking that the queried token pair exists at the
external provider.
Usually this function also determines if the given token order is correct, as many external providers will only accept token pair query in a precise order.
We have also implemented a Cache system for the getSymbols function that you
should use in order to avoid repeating lot of heavy queries, as the symbols get
updated very rarely and some exchanges might limit the number of request they
allow you to do.
You can check this example for the getSymbols function.
3. While adding the price feed
You can use our playground to see if your integration is returning the expected values. ExchangePriceRepo playground
You may change the configuration, run this file with
node tests/playground/ExchangePriceRepo/getPrice.js and check if your integration is
returning the price values or some error
4. Unit testing the price repository
Add also a test for the new price feed.
It’ll verify that it works properly and can help to detect possible future changes of the API your feed implementation rely on.
You can find some automated unit testing in tests/repositories/ExchangePriceRepo
Add the unit test for your feed in this folder and, as before, use one of the already existing ones to speed up your task.
5. Add a Pull Request to our repository
Once you are comfortable with your integration you should upload your changes to
Github and open a Pull Request to develop branch on
DutchX Services.
We will review your code and merge it to our repository if everything is correct.
Once merged into develop, a new docker image with the changes will be
automatically pushed:
- https://hub.docker.com/r/gnosispm/dx-services/tags/
Periodically, a new stable version is release, so once merged into master, the
changes will be ready in the staging version.
6. Thank you for your collaboration
Thank you so much for your collaboration!!
DX-Uniswap-Arbitrage
Overview
- Introduction
- Contracts
- Bots
Introduction
Blockchains have brought with them the paradigm of programmable money. Whereas before, money could be represented in software it is now a native type and a first class citizen. As such there are interesting opportunities to wield them. One such opportunity is an arbitrage between two decentralized exchanges—in our situation we are using the DutchX and Uniswap.
Previously, making a purchase of an asset on one exchange in order to sell it at a higher price on another entailed the risk of price movement during the operation. That movement might invalidate the original opportunity so that the arbitrageur either took a loss of profit or was left holding an asset they no longer wanted. This could occur because that process is actually asynchronous—the buyer has at least two discreet actions (the buy and the sell) and time will pass between them. In our decentralized exchange scenario we are able to combine all of our actions into one so there is no time that passes between the buy and the sell and we can eliminate the risk of price change.
This document and the software it describes can be used to execute arbitrage opportunities between ERC-20 tokens that are listed on both the DutchX and Uniswap. It requires available Ether to execute these orders and comes with configurable Bots that can be used to automatically execute the opportunity.
Contracts
The DutchX uses a proxy contract to interact with a main DutchExchange.sol contract where there are a series of auctions constantly underway. Typically the auctions begin when there is enough sell volume to instigate them. The price of these sell auctions begin at 2x the price of the previous closing. This price decreases over time with the goal of reaching the previous closing price after 6 hours and reaching 0 after 24 hours. During this time buy orders can be made at the current price. Since the price will keep decaying until all assets have been sold, the buyer knows that they will receive at least as much as they paid for in that moment. Since they know they have purchased at least as much as the current price dictates, they are able to instantly withdraw that amount (although it is likely they will actually have purchased more than that amount in total at a lower price). The ability to withdraw at least that amount is what makes the synchronous arbitrage possible.
Uniswap has one main Factory contract which keeps track of all Uniswap Exchanges and is used to make new ones as well. Each Uniswap Exchange is a copy of the Exchange template and contains a single pair of ERC-20 tokens or a pair between an ERC-20 and Ether (most are of the latter type). Similar to the DutchX, these contracts contain the ability to buy or sell an asset in a single transaction making our atomic swap of assets between the exchanges possible.
Our Arbitrage Contract needs to reference the DutchX proxy address as well as the Uniswap Factory Address. To save gas these are hard-coded for Rinkeby and Mainnet, but left as constructor arguments for local development. The main arbitrage contract comes with some abilities to manage balances on the DutchX as well as the ability to execute arbitrage opportunities.
If a specific token is cheaper on the DutchX with relation to Ether it would initially be bought from the DutchX and sold for Ether on Uniswap; This is called a dutchOpportunity. If a specific token is cheaper on Uniswap it would be purchased with Ether and sold on the DutchX for Ether; this is called a uniswapOpportunity. Each method will execute the subsequent buys and sells on the respective exchanges in a single transaction. At the end of the transaction the total amount of profit gained is confirmed. If the methods were executed when there was in fact no opportunity for an arbitrage, this will be detected and the transaction is reverted. The only potential loss is in the gas used to check the opportunity. That is why the bots used to determine when to execute are important in saving the loss of unnecessary gas expenditures.
The arbitrage contract has the following Interface:
contract Arbitrage is Ownable {
/// @dev Payable fallback function has nothing inside so it won't run out of gas with gas limited transfers
function() external payable {}
/// @dev Only owner can deposit contract Ether into the DutchX as WETH
function depositEther() public payable onlyOwner;
/// @dev Only owner can withdraw WETH from DutchX, convert to Ether and transfer to owner
/// @param amount The amount of Ether to withdraw
function withdrawEtherThenTransfer(uint amount) external onlyOwner;
/// @dev Only owner can transfer any Ether currently in the contract to the owner address.
/// @param amount The amount of Ether to withdraw
function transferEther(uint amount) external onlyOwner;
/// @dev Only owner function to withdraw WETH from the DutchX, convert it to Ether and keep it in contract
/// @param amount The amount of WETH to withdraw and convert.
function withdrawEther(uint amount) external onlyOwner;
/// @dev Internal function to withdraw WETH from the DutchX, convert it to Ether and keep it in contract
/// @param amount The amount of WETH to withdraw and convert.
function _withdrawEther(uint amount) internal;
/// @dev Only owner can withdraw a token from the DutchX
/// @param token The token address that is being withdrawn.
/// @param amount The amount of token to withdraw. Can be larger than available balance and maximum will be withdrawn.
/// @return Returns the amount actually withdrawn from the DutchX
function withdrawToken(address token, uint amount) external onlyOwner returns (uint);
/// @dev Only owner can transfer tokens to the owner that belong to this contract
/// @param token The token address that is being transferred.
/// @param amount The amount of token to transfer.
function transferToken(address token, uint amount) external onlyOwner;
/// @dev Only owner can approve tokens to be used by the DutchX
/// @param token The token address to be approved for use
/// @param allowance The amount of tokens that should be approved
function approveToken(address token, uint allowance) external onlyOwner;
/// @dev Only owner can deposit token to the DutchX
/// @param token The token address that is being deposited.
/// @param amount The amount of token to deposit.
function depositToken(address token, uint amount) external onlyOwner;
/// @dev Internal function to deposit token to the DutchX
/// @param token The token address that is being deposited.
/// @param amount The amount of token to deposit.
function _depositToken(address token, uint amount) internal;
/// @dev Executes a trade opportunity on DutchX. Assumes that there is a balance of WETH already on the DutchX
/// @param arbToken Address of the token that should be arbitraged.
/// @param amount Amount of Ether to use in arbitrage.
/// @return Returns if transaction can be executed.
function dutchOpportunity(address arbToken, uint256 amount) external onlyOwner;
/// @dev Executes a trade opportunity on uniswap.
/// @param arbToken Address of the token that should be arbitraged.
/// @param amount Amount of Ether to use in arbitrage.
/// @return Returns if transaction can be executed.
function uniswapOpportunity(address arbToken, uint256 amount) external onlyOwner;
}
Bots
Gnosis has developed a sophisticated system of Bots available in the dx-services repository on Github. These services are primarily used to populate auctions with assets and execute buy orders if a price reaches a threshold below what a seller was willing to sell at. This repo now includes services to facilitate arbitrage opportunities as well. These can be executed manually via the Command Line Interface (CLI) or via auto-executed Bots.
In order to calculate whether there currently exists an arbitrage opportunity the bots periodically check the current price of an asset on both Uniswap and the DutchX. It is possible that the current price on Uniswap will be lower than the DutchX while there may still not be an arbitrage opportunity. This is because Uniswap has a great deal of price slippage that depends on how liquid the actual market is. After an initial arbitrage opportunity is detected it is checked incrementally how large of a purchase order would be possible on Uniswap before the price slippage would ruin the opportunity. After that limit is reached, the potential profit gained is checked against the gas cost of executing the order. If there is still a potential profit, the order is executed.
With regard to the arbitrage CLI the following commands are available:
deposit-ether <amount> [--arbitrage-contract address]
Deposit any Ether in the contract to the DutchX as WETH
deposit-token <amount> <token> [--arbitrage-contract address]
Deposit any token in the contract to the DutchX
dutch-opportunity <token> <amount> [--arbitrage-contract address]
Execute a Dutch Opportunity transaction with Arbitrage contract
get-balance [token] [--arbitrage-contract address]
Get the arbitrage contract balance of any token (blank token for Ether)
manual-trigger <token> [--arbitrage-contract address] [--minimum-usd-profit profit]
Attempt an arbitrage
transfer-ether <amount> [--arbitrage-contract address]
Transfer Arbitrage contract ETH to contract owner (amount = 0 transfers total balance)
transfer-ownership <arbitrage-address> <new-owner-address>
Transfer ownership of the Arbitrage contract
transfer-token <amount> <token> [--arbitrage-contract address]
Transfer Arbitrage contract token balance to contract owner
uniswap-opportunity <token> <amount> [--arbitrage-contract address]
Execute an Uniswap Opportunity transaction with Arbitrage contract
withdraw-ether <amount> [--arbitrage-contract address]
Withdraw WETH from DutchX and convert to Ether
withdraw-token <amount> <token> [--arbitrage-contract address]
Withdraw token from DutchX
withdraw-transfer-ether <amount> [--arbitrage-contract address]
Withdraw WETH from DutchX, convert to Ether and transfer to owner address
With regard to the bots the following config could be used for checking arbitrage between Ether and Raiden as well as Ether and Omisego:
{
name: 'Arbitrage bot',
factory: 'src/bots/ArbitrageBot',
botAddress: '0x123',
markets: [
{ tokenA: 'WETH', tokenB: 'RDN' },
{ tokenA: 'WETH', tokenB: 'OMG' }
],
arbitrageContractAddress: '0x234',
minimumProfitInUsd: 5, // $5
notifications: [{
type: 'slack',
channel: 'CABG321'
}],
checkTimeInMilliseconds: 60 * 1000 // 60s
}
Hackathons
Develop use cases, raise awareness, improve usability, encourage further integration, and ultimately draw liquidity to one global DutchX pool
Upcoming / ongoing
none to report at the moment
Previous
- UK university Competition 21-23 of November 2018
- Challenge 1: Build an inferfae between our latest prediction markets to the realitio contracts.
- Challenge 2: Create an alternative front end or client for the Gnosis Safe. Check information for both challenges in the link above!
- DutchX/Difusion Workshop and Hackathon 8-9 of December 2018
- Thanks to the great help of Work on Blockchain, we are hosting a DutchX/Dfusion workshop and Hackathon beginning of December. Warm up your Dev skills and build your Dapp on top of the DutchX.
- Berlin Blockchain Week - ETHBerlin 7-9th of September 2018
- Win 24ETH (5’000€) for a DutchX integration
- If you’ve missed the DutchX Developer Workshop held ahead of ETHBerlin, check out the recording to get up to speed on integration cases
Participation details
- Submission
- Via Gitcoin
- Readme should include team details, idea description and use case
- Sunday, September 9th 2018, 12:30CEST
- 5-7min pitching the idea on Sunday afternoon
- Can be on local host (Ganache-CLI) or Rinkeby
- Via Gitcoin
- Details
- WIN 24ETH (5’000€)
- It’s independent of the ETHBerlin prize and can be announced on top
- ETHBerlin rules apply
- Support?
- We are here to support you! Come by the Gnosis booth on the 2rd floor. If you can’t find us (esp. on Saturday), we will monitor our Gitter for you.
The winning team
- PoolX, the winning team wrote a smart contract to pool initial liquidity for the first auction to list a new token to the DutchX Protocol. They also integrated this into a telegram bot for users to take part in the Pool. Super cool!
Judging Criteria
The Idea (20%)
In this categories factors such as use and relevancy will weigh in. Does the idea make sense and is it relevant to the DutchX? Further considerations include whether the idea fits with the DutchX “values” (e.g. fair and decentralized) and some points will go towards originality.
Technical difficulty (35%)
This is straight forward: In this category all things “technical” will be considered, such as: level of complexity, how was it implemented and documented; how well is the code written, is the code bug-free and does it go beyond the SDK and documentation that is already provided for you?
Usability for others (30%)
This category can be either considered for usability fostering further technical integration or in case you are targeting end-users, for those. Hence, the category includes anything ranging from ease of use, design, intended behavior, parameterization, re-usability of the code etc.
Size of potential users (10%)
This category asks two questions: How much liquidity is expected per user (plus how often is it used per user) and what is the potential reach of unique users?
The WOW-factor (5%)
Bonus points for anything that stood out and was beyond expectations!
Cannot decide what idea to pursue?
Ultimately, and each of the categories, can be summarized in “how and to what extent does this help the liquidity of the DutchX”? Ask yourselves this when you’re struggling to decide from a number of awesome ideas.
Struggling to find an idea?
Have a look at the side bar: we’ve included some development ideas. Some are well defined already, some are really more a collection of rough ideas. Find your inspiration there, take it away and make it your own idea or come up with something completely novel.
Community Resources
The DutchX is not just another trading platform, but an open trading protocol that anyone can build on. In order to keep this spirit of interactive use, we have a series of communication channels so you can contribute, build your own use case, and stay up to date on our latest news.
Blog Posts
- Introducing the DutchX
- The Mechanism Design of the DutchX
- On all things Tokens
- The Liquidity Contributions Model
- The Main Benefits of the DutchX Mechanism
- User Groups
- Gnosis DutchX and Initial OWL Generation Bug Bounty
- The DutchX as an Open Protocol
- The DutchX Smart Contracts are Live on Mainnet
- The Road towards a Fully Decentralized Exchange
- The DutchX Pilot
- The DutchX — Take Part in the Arbitrage Opportunity
- DutchX Smart Contracts 2.0 Bug Bounty
- New DutchX Smart Contracts are Now Live
- DutchX Token Listing Reward
Videos
- Christiane Ernst, DutchX PM presents the DutchX and dxDAO at EthCC Paris 2019
- Christiane Ernst, DutchX PM, and Angel Rodriguez, DutchX tech lead, present the DutchX at Web3.0
- Christiane Ernst, product manager of the DutchX, speaks at DappCon 2018
- Listen to our CTO, Stefan George, giving a DutchX intro at Ethereum London
- Christiane Ernst introduces the DutchX at EthCC Paris 2018
Projects building on the DutchX
- Eazy Exchange - an interface built by Midas, using the DutchX as the protocol (currently on Rinkeby)
- slow.trade - a graphical interface and trading platform that lets you seamlessly interact with the DutchX decentralised trading protocol as a Seller.
- FairDex - a graphical interface and trading platform that lets you seamlessly interact with the DutchX decentralised trading protocol as a Bidder.
Add this cool logo to your site if you built on top of the DutchX:
.png)
Communication Channels
Integration Ideas
Gnosis is not funding any additional projects building on top of the DutchX as the DutchX is fully governed by the dxDAO. Check out how to submit a proposal and be funded by the dxDAO
Below you find a collection of random ideas that came up while designing the DutchX.
More defined sample ideas
Smart contracts
“End to end”-participation solution
- On an interface level (the trading platform that allows the user to interact with the DutchX open protocol), the user must sign several transactions
- Wrapping ETH
- Paying with OWL (if available)
- Allowance of token
- Confirmation of Order
- Claim and Withdraw
- It would make sense to have a contract where the user can send ETH (specifically for an auction pair) and the contract does everything automatically and even sends back the exchanged funds to the user’s address
- Smart contract must know how much comes from which address and allocate the exchanged token to this one.
- Must overcome problem that the DutchX contract needs to be requested to do claim and withdraw
- Must overcome gas problem (take liquidity contribution from user)?
- Must overcome problem that the pre-set gas limit in most applications might be too low to do one transaction up to confirmation of order.
An arbitrage bot which can act as a bridge between the DutchX and another exchange and does a transaction atomically (i.e. one transaction that buys on another exchange and takes part with the funding on the DutchX)
- Arbitrage opportunities exist if there is a price differential on another exchange and on the DutchX
- For example, on Exchange Y, the price for A in units of B is 1.5. Once the auction A-B reaches this price, it is worthwhile to buy B on Exchange Y and use it to bid in the A-B auction on the DutchX.
- You need to find an exchange with sufficient liquidity and where such an atomic transaction is possible.
- Added complexity: If it is not the same token pair, but another transaction in between i.e. A for B, B for C and C for A.
Pooling contract to list a token
Note: This idea has been picked and is actively pursued.
- The rules in the smart contract is such that a listing token pair is done by
- i) specifying the NewToken
- ii) Funding the auction
- iii) setting the price
- After 6h, the auction will start
- There might not be sufficient interest by just one party to initiate this; hence, the funding could be pooled
- Contract would specify who inputs how much money and then allocates the exchanged funds based on the same percentage
- Optional but highly recommended: also collecting funds for the bid side and taking part at a prior specified price.
Token BuyBacks (and burn?):
Note: Check first what has been done as part of this bounty before you proceed with a similar idea.
- A token project might have the need to buy back tokens
- The difficulties thereby could be:
- On which exchange would the project do this?
- And how would it publicly announce it?
- Is it binding? How will it be ensured that they stick to this?
- Oftentimes it’s difficult to move funds between exchanges
- If there is a smart contract that keeps some parameters open (is somewhat customizable), projects could use the DutchX, which is available to anyone without and larger hurdle.
- The project would inject an amount of ETH as a sellVolume and declare that it will take part in the ETH/SpecificToken auction
- The contract would work such that the following parameters would need to be specified:
- Amount of ETH to be included in the buy back
- How many auctions
- Which specific auctions (by index) and how much in each auction
- Amount would need to be pre-submitted
- A sample of a buy-and-burn need could be this one: https://research.aragon.org/t/thoughts-on-aragon-network-treasury-governance-and-reserves/180
The DutchX as an alternative to OTCs?
OTCs (over-the-counter) trades are trades that are executed in other ways than via traditional exchanges. Usually two parties execute a trade with one another by being matched via a dealer and oftentimes it is larger orders that are being executed. OTC are particularly common for illiquid markets. There are some risk attached to OTC trades such as the lack of (reliable) information and likely high bid-ask spreads that make it difficult to trade profitably.The DutchX could solve this problem by offering an alternative to OTCs:By having a set of smart contracts where large orders are added (and automatically scheduled in set auctions), plus a public forum where this is announced, could lead to much better prices (and the pre-commitment and announcement should help within illiquid markets.
Front-end
- Provision of a widget that does data analytics specifically tailored to the need of a seller active on. Two samples of trading interfaces built on top of the DutchX smart contracts are https://eazy.exchange/ and https://dutchx-rinkeby.d.exchange/
- Data analytics may include but are not limited to:
- ETH to EUR/USD price feed
- Highest volume auctions
- Liquidity contributions as part of the sellVolume
- Last available price overview
- Countdown for next auction to start (approximation only)
- Data analytics may include but are not limited to:
Services
- A bot that automates listing a token to the back-end.
- The rules in the smart contract is such that a listing token pair is done by
- specifying the NewToken
- Funding the auction with the equivalent of 10kUSD in ETH
- setting the price for ETH/NewToken
- After 6h, the auction will start
- A token project might not want to do this. The bot (or alternatively together with a simple interface) would therefore receive the funding and ask for the price input (both needed to start the auction)
- Added feature: Bot could take part on the buy side as well as this should really be ensured for triggering the auction. In that case, naturally, the bot would need the bidToken in funding as well.
- Added feature: the bot could take the price feed from another exchange rather than asking for it (if a price feed is available).
- The rules in the smart contract is such that a listing token pair is done by
Further ideas
Smart Contracts
- Imitating limit order buy having a contract that is funded by the user and buys back at a certain price (floor)
- Contract that takes out data information from the DutchX - more concrete and historic data.
- Creating a price feed out of it to be used in another instance → build a bridge into another projects (sample project for this: https://github.com/gnosis/dx-examples-dev/tree/master/03_onchain-integration-oracle)
- Arbitrage strategies may differ:
- Funds are needed to match the order first and buy back (or first on the DutchX)
- The token swap is such that the order may be settled on behalf of the user (without needing to put up the funds)
- User needs to set allowance with other exchange and DutchX. Ideally contract would also then cancel the other order on the other exchange.
- Might be an integration into e.g. 0x.
- OTC trades are usually not done over an exchange, which is the whole point of it. However, these deals are typically for low-liquidity tokens, which is ideal for a DutchX application. Would be cool to see a smart contract pre-commitment for OTC deals.
- Smart contract that allows tokens to be traded which are not available as a pair on the DutchX (e.g. via WETH as all listed tokens have to be available with ETH). E.g. user would like to trade A vs. B but only A-WETH and B-WETH is available. Smart contract can be designed to automate A for WETH and then WETH for B.
Front-ends
- Anything that is a graphical display/widgets. Check out some samples here: https://www.tradingview.com/widget/
- Interface to start the listing process
- Deposit and withdraw widget (incl. wrapping and unwrapping ETH)
- Currently only deposit and postOrder is done in one and also claim and withdraw.
Services
- Email (or bot) notification service when an address has claimable funds
- User enters to this website
- User enters email address and wallet address
- “I would like to be notified if there are claimable funds available in connection with this wallet address” (submit)
- First time user receives email to confirm email address and privacy policy (if applicable)
- User has the option to unsubscribe
- Notification bot when a token pair reaches a certain price
- Arbitrage bot between the two opposite auctions
Ideas for financial instruments
- Decentralized token lending protocol (uses price feed of DutchX and liquidates using the DutchX if collateral falls below a certain amount (proposals have already been handed in)
- A “top 10”-token Fund on the DutchX. Always invests 10% into each of the 10 highest priced tokens. Those token fund tokens can be purchase via the DutchX also
Ideas for larger projects
- Interface for a bidder participation
- A widget for integration on any project’s website that goes through the DutchX process
- “Buy ABC”
- Includes participation in the DutchX as a seller (using ETH)
- Ideally built on top of the “end-to-end”-solution mentioned above
Ideas for documentation
- Screencast on CLI participation
- Screencast on participation directly on smart contract level
- Screencast on API
- Screencast on using the minimal liquidity bots
Contribute
The DutchX is 100% open source and has been built as a community effort to improve the problems that current centralized and decentralized platforms face.
The community is what makes the DutchX great.
Become part of it and contribute to create new interfaces, improve tools, and spread the word.
Meet the community on Github and the Gitter channel.
Checkout the Developer Guides and documents DutchX as an open protocol.
Join the public DutchX telegram channel.
Smart Contracts Addresses
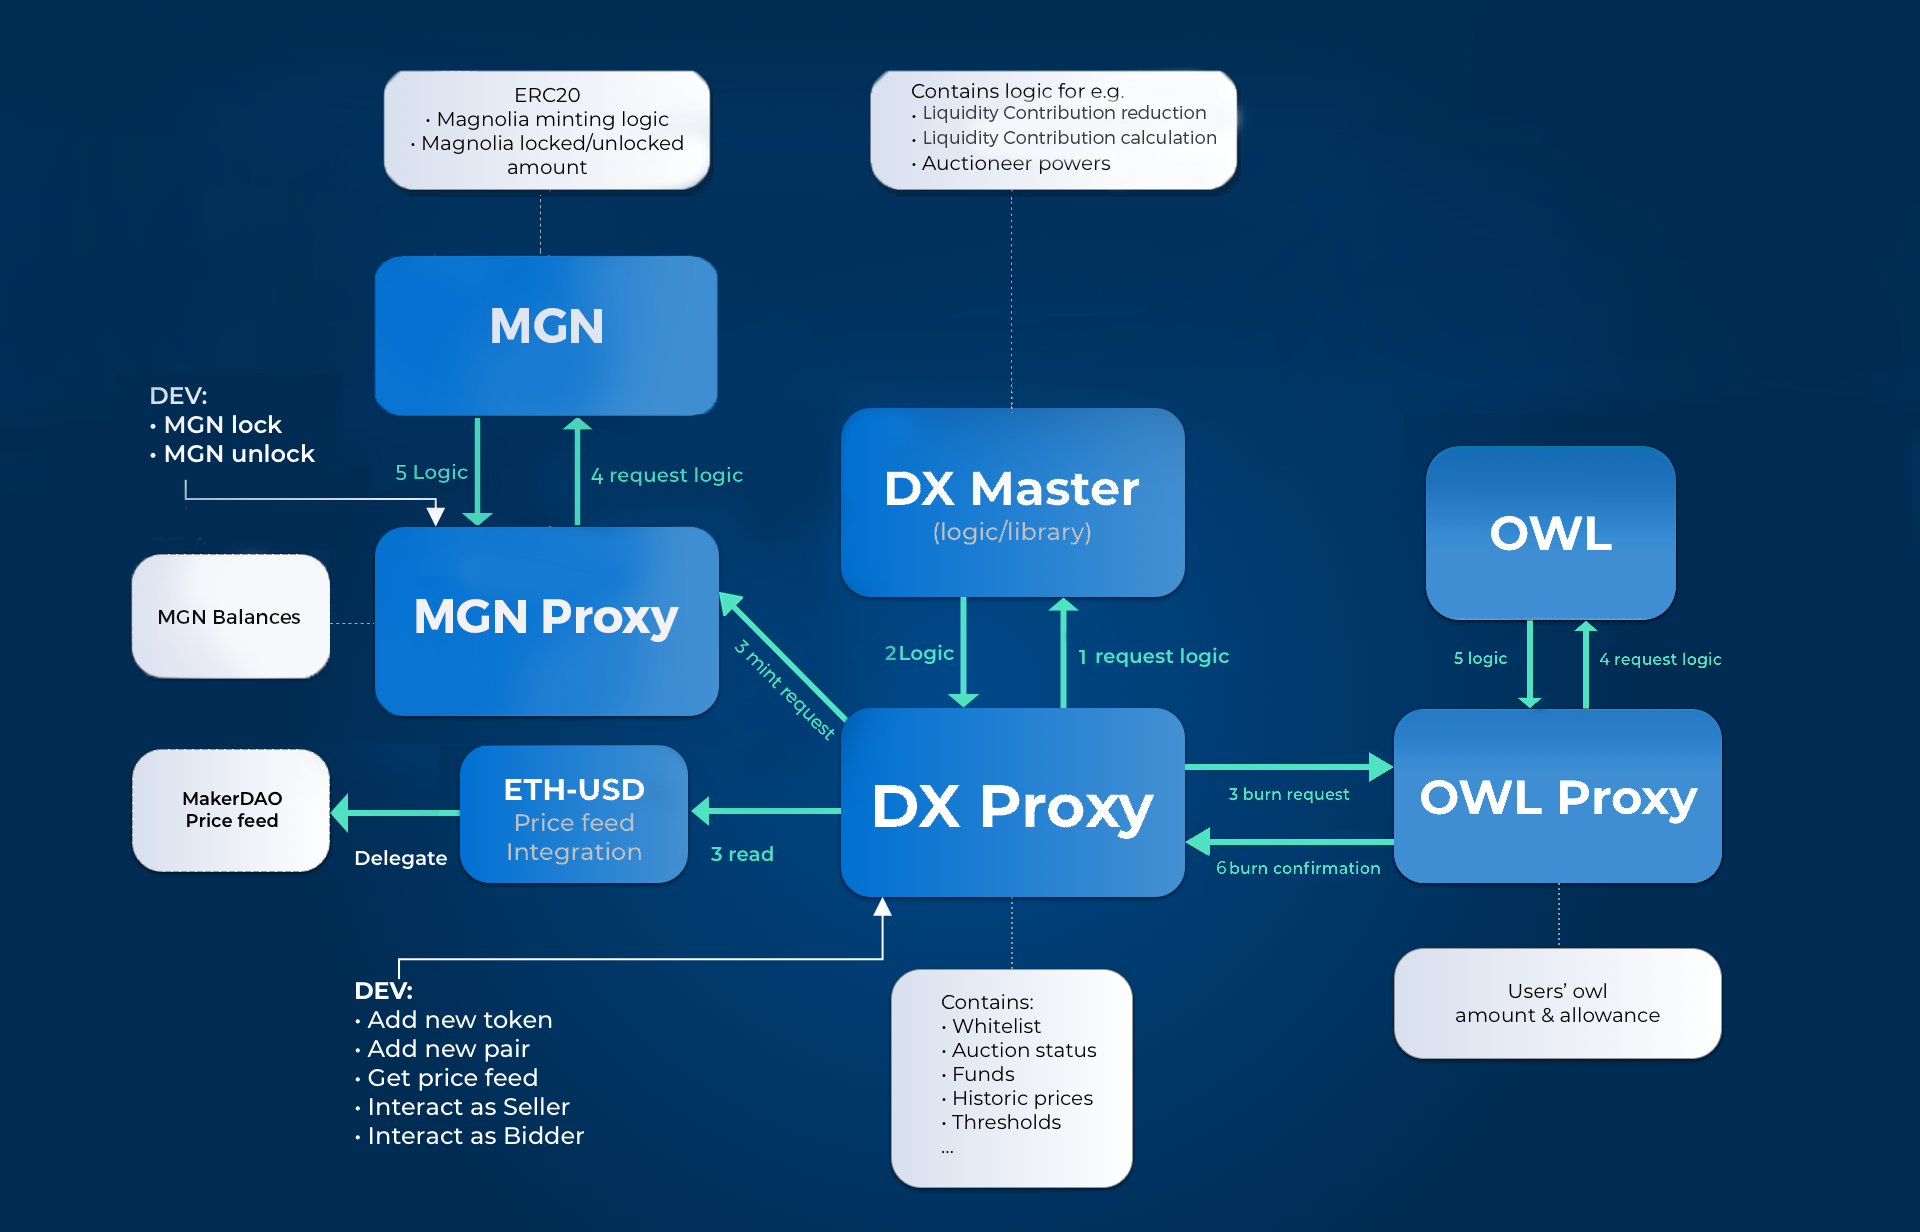
DutchX 2.0 - dxDAO
Mainnet
- DutchX (proxy): https://etherscan.io/address/0xb9812e2fa995ec53b5b6df34d21f9304762c5497
- DutchX (master): https://etherscan.io/address/0x2bae491b065032a76be1db9e9ecf5738afae203e
- PriceOracleInterface: https://etherscan.io/address/0xef6e5fc1a796db0a9a848eb1bb1156a9648f5ac6
- Medianizer: https://etherscan.io/address/0x729D19f657BD0614b4985Cf1D82531c67569197B
- TokenFRT - MGN (proxy): https://etherscan.io/token/0x80f222a749a2e18eb7f676d371f19ad7efeee3b7
- TokenFRT - MGN (master): https://etherscan.io/token/0xbe4eecb9ebc040183a95f22a74a5763d442dfbb5
- TokenOWL (proxy): https://etherscan.io/token/0x1a5f9352af8af974bfc03399e3767df6370d82e4
- DutchExchangeHelper: https://etherscan.io/token/0x64832950abccaa3d02ab8eb09aa058d789f5bb6a
Rinkeby
- DutchX (proxy): https://rinkeby.etherscan.io/address/0xaaeb2035ff394fdb2c879190f95e7676f1a9444b
- DutchX (master): https://rinkeby.etherscan.io/address/0x7b7dc59adbe59ca4d0eb32042fd5259cf5329de1
- PriceOracleInterface: https://rinkeby.etherscan.io/address/0xbee04d92b297d79889b3bca0c33ed76e02de62b4
- Medianizer: https://rinkeby.etherscan.io/address/0xbfff80b73f081cc159534d922712551c5ed8b3d3
- TokenFRT - MGN (proxy): https://rinkeby.etherscan.io/token/0x4ed5e1ec6bdbecf5967fe257f60e05237db9d583
- TokenFRT - MGN (master): https://rinkeby.etherscan.io/token/0x84fb65d27ffa1c5ed2671e680438a988f295a4f4
- TokenOWL (proxy): https://rinkeby.etherscan.io/token/0xa7d1c04faf998f9161fc9f800a99a809b84cfc9d
- DutchExchangeHelper: https://rinkeby.etherscan.io/token/0x97f73cde38699065ba00fb5eeb34c02dcda667cd
Kovan
- DutchX (proxy): https://kovan.etherscan.io/address/0x775ea749a82a87f12199019e5166980f305f4c8f
- DutchX (master): https://kovan.etherscan.io/address/0xab4860ccc54f27a1e2c7a8bed64e2980142461b2
- PriceOracleInterface: https://kovan.etherscan.io/address/0xbf72ca4c2e7c0edf1ca82ff6c9f6e9204d1e9580
- Medianizer: https://kovan.etherscan.io/address/0xa944bd4b25c9f186a846fd5668941aa3d3b8425f
- TokenFRT - MGN (proxy): https://kovan.etherscan.io/token/0x2b3a76ed4edb76e8fcd261fd978e78efb313d5a2
- TokenFRT - MGN (master): https://kovan.etherscan.io/token/0xb4d40b3dba88e53cdbd9361717f5d86899ede1b3
- TokenOWL (proxy): https://kovan.etherscan.io/token/0xb6f77a34ff81dd13fa68b5774d74541a61047fe8
- DutchExchangeHelper: https://kovan.etherscan.io/token/0xa71d54360d4adf8d52460fe068611dd608b0a8ef
DutchX 1.0
Mainnet
- DutchX (proxy): https://etherscan.io/address/0xaf1745c0f8117384dfa5fff40f824057c70f2ed3
- DutchX (master): https://etherscan.io/address/0x039fb002d21c1c5eeb400612aef3d64d49eb0d94
- PriceOracleInterface: https://etherscan.io/address/0xff29b0b15a0a1da474bc9a132077153c53a2373b
- Medianizer: https://etherscan.io/address/0x729D19f657BD0614b4985Cf1D82531c67569197B
- TokenFRT - MGN: https://etherscan.io/token/0xb9625381f086e7b8512e4825f6af1117e9c84d43
- TokenOWL (proxy): https://etherscan.io/token/0x1a5f9352af8af974bfc03399e3767df6370d82e4
Rinkeby
- DutchX (proxy): https://rinkeby.etherscan.io/address/0x4e69969d9270ff55fc7c5043b074d4e45f795587
- DutchX (master): https://rinkeby.etherscan.io/address/0x9e5e05700045dc70fc42c125d4bd661c798d4ce9
- PriceOracleInterface: https://rinkeby.etherscan.io/address/0xa6a644ef9da924b3ecea6cbfd137a825d1ff2a91
- Medianizer: https://rinkeby.etherscan.io/address/0xbfff80b73f081cc159534d922712551c5ed8b3d3
- TokenFRT - MGN: https://rinkeby.etherscan.io/token/0x152af9ad40ccef2060cd14356647ee1773a43437
- TokenOWL (proxy): https://rinkeby.etherscan.io/token/0xa7d1c04faf998f9161fc9f800a99a809b84cfc9d
Kovan
- DutchX (proxy): https://kovan.etherscan.io/address/0x4183931cce346feece44eae2cf14d84c3347d779
- DutchX (master): https://kovan.etherscan.io/address/0xd133d9f2fdce177ae3b3cc2aaa8dfef23414c5aa
- PriceOracleInterface: https://kovan.etherscan.io/address/0xdcd22750a182a7a055d069c9f3295f8f3290d6d2
- Medianizer: https://kovan.etherscan.io/address/0xa944bd4b25c9f186a846fd5668941aa3d3b8425f
- TokenFRT - MGN: https://kovan.etherscan.io/token/0x98709b83af325a46edfac2f053a730a2980b3682
- TokenOWL (proxy): https://kovan.etherscan.io/token/0xb6f77a34ff81dd13fa68b5774d74541a61047fe8
Changes from DutchX 1.0 to 2.0
Please see this list for a comprehensive overview of the changes made from the DutchX 1.0 to the DutchX 2.0 smart contracts with each corresponding pull request:
- Liquidity contribution goes down to 0.1%
- Magnolia tokens can only be unlocked at once
- Both sides of the auction each need a min. of $1,000 to start
- Closing theoretically closed auctions when posting sellOrders
- Claim and withdraw function for all auction indices together
- Proxy contracts for the Magnolia tokens
- Fix re-entry vulnerability
- Extract functionality out of the main contract
- Adapt migrations to Truffle 5
- Remove auctioneer check for upgrading the Price Oracle and Master Contract
- Add linter for Solidity
- Extract some getter functions from DutchX
- Upgrade to Solidity 0.5
- Make price oracle interface Read-Only
- Add clearing times
- Solve BadTokenProblem
Security
Security was the main focus on the design and implementation of the DutchX.
The mechanism is designed to solve the problems various exchanges (centralized and decentralized ones) face, aiming to remove parties that take advantage and profit out of the users.
The result is a fair exchange of tokens where all users interact under the same rules.
The smart contracts code was submitted to:
Internal audit
- The code is open source and public for anyone to review.
- During construction, it was subjected to constant internal audits, peer reviews, and unit testing.
External audit
![]()
DutchX 1.0
An external audit by three auditors of Solidified was conducted.
- Three auditors reviewed the code in parallel in an isolated review. Then they compared the findings and came to a group consensus. After some minor iterations all the risks are mitigated.
- Check out the Solidify Audit Report.
- Check this post Securing Gnosis’ Dutch exchange smart contracts — a case study to learn more on this audit process.
DutchX 2.0
- Two auditors of Solidified (the same auditors as for the prior audit) reviewed the code.
- Check out the Solidify Audit Report.
- Also check out this Solidified audit report of the price oracle
Bug bounties
- On top of the audits, a Bug bounty program was created. It offers generous prizes for finding security risks or any other bug.
- The bug bounty is still ongoing today on the DutchX smart contract code base 2.0 (no bugs have been discovered on DutchX 1.0).
- Check the details in DutchX Smart Contracts 2.0 Bug Bounty for more information.
Other intgerations
The DutchX is a non-custodial trading protocol. Your funds are only held in the audited smart contracts, so no company or organization holds the funds, just the audited contracts.
Note: The dxDAO will govern the DutchX. This decentralized autonomous organization may update the master logic of the DutchX with a 30 day time delay. In case of a malicous update, you must: 1) remove your funds from the DutchX smart contracts and 2) revoke any token allowances set! Other than via this update, there is no other connection to the dxDAO. The dxDAO cannot access funds of the DutchX!
Note: Keep in mind that, as a user of a decentralized application, you are the only one who has access to your private key, so it’s important that you keep you keys safe.
Social